
The Admin application is delivered in two access levels, and this manual is divided accordingly.
- White Label – the WL Manager application, which looks and works like the Admin but covers a limited range. A White Label administrator works with instruments, trading groups and routing. Chapter 2 describes everything available at this level.
- Full-server License – the complete application. In addition to everything a White Label sees, it covers platform categories, staff accounts, market data, the hedge, abuse and exposure rules, liquidity provider and FIX connectivity, and the maintenance tools. Chapter 3 describes it.
If you log in with White Label access, the tabs described in chapter 3 are simply not present in your menu. Each chapter is written to be read on its own, so you only need the one that matches your access level.
STARTUP GUIDE #
Before anything else, the application has to be installed and started. Whichever access level you have, this part is the same.
here(Windows) / here(MacOS)
Installation #
The Admin application is installed and updated by the MTR Broker Management application. Install that first, then log in and start the Admin from there. Installation files and login instructions are covered in the MTR Broker Management application manual.
A few things worth knowing about how it behaves day to day.
The window comes back on its own. After you log out of the Admin, the MTR Broker Management window returns to the foreground automatically, so it does not stay hidden behind other windows.
A damaged download repairs itself. Downloaded application files are checked for integrity. If a damaged file is detected you get an error message, the file is removed automatically, and it is downloaded again at your next login. If you see such a message, simply log in again.
An update that cannot finish tells you why. Most often a second copy of the application is still running and holding the files. You get a message explaining that the update will be retried the next time you start it – close every open copy and start it again.
WHITE LABEL FEATURES #
With White Label access you work in the WL Manager – a separate application with its own API. It is started from MTR Broker Management just like the Admin and looks and works the same way; the difference is how much of the system you can reach. The Full-server License level described in chapter 3 covers considerably more: platform categories, staff accounts, market data, the hedge, abuse and exposure rules, liquidity provider and FIX connectivity, and the maintenance tools. None of those appear in your menu.
What you do have is the part that shapes what your own clients trade on: the instrument list, the trading groups, and the routing of your clients’ trades.
Main window #
The main window is split into three areas: the navigation menu on the left, the working area in the middle, and a status bar along the bottom.
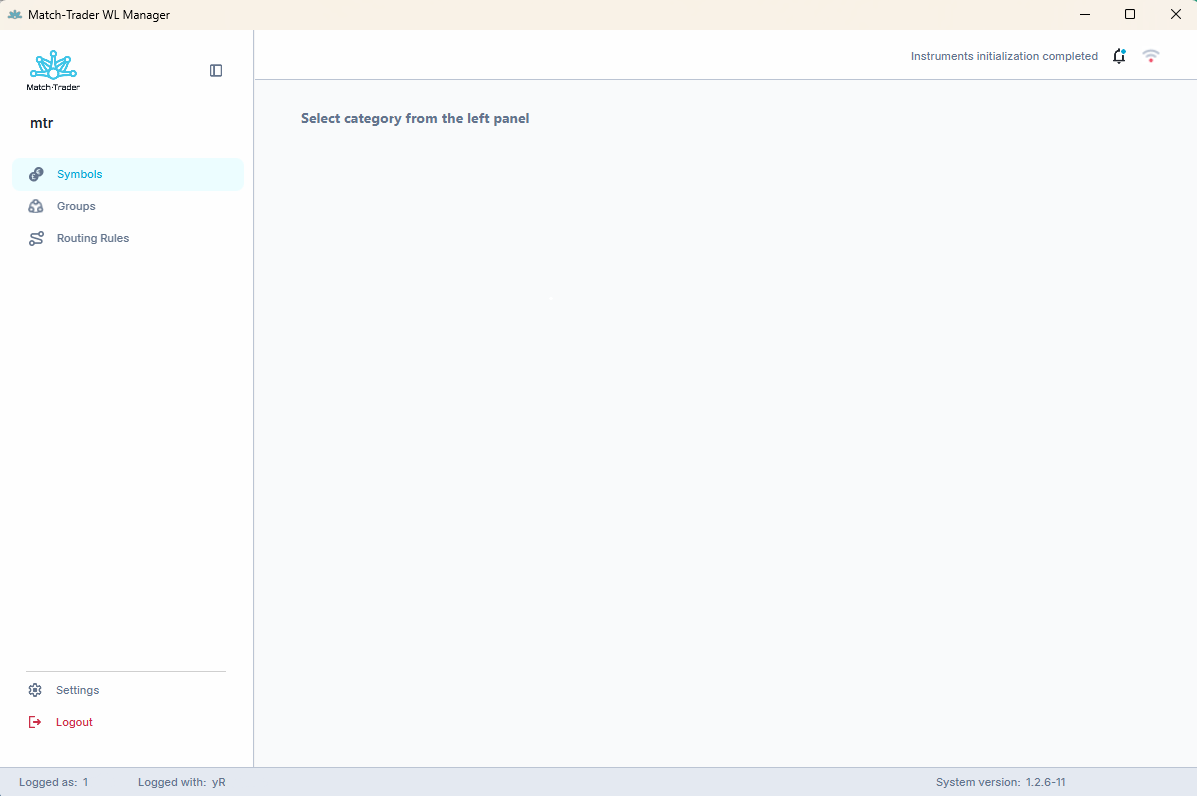
Navigation menu. The menu on the left has three tabs – Symbols, Groups and Routing Rules – with Settings and Logout at the bottom. Above the menu you can see the name of the environment you are connected to, together with a button that collapses the menu to icons when you need more room for a wide table.
Top bar. On the right-hand side there is a Login panel link, a bell icon opening the list of system notifications, and the network reliability indicator described below.
Status bar. The bottom of the window shows which account you are logged in as, the name of the token used for the connection, and the version of the application. When you report a problem, this is the information to quote.
What the Wi-Fi icon means. The icon in the top bar reflects the latency between the application and the server, and any automatic reconnection attempts. Green means ping below 100 ms and a healthy connection. Yellow, shown with one grey bar, means ping between 100 ms and 300 ms, so noticeable latency. Red, with two grey bars, means ping above 300 ms or a degraded connection. Hovering over the icon shows the current ping.
When the connection drops, the application keeps trying to reconnect for up to 30 seconds before the session is treated as disconnected, and the icon reflects the retry state during that window – so you can tell temporary latency apart from a real disconnection. If reconnecting fails, you are returned to the login screen with a message explaining why.
How the tables work. All three tabs are tables and they behave the same way, so what you learn in one applies to the others.
- Search per column – every column has its own search field directly under its header. Filling in more than one narrows a long list down step by step, which is usually faster than scrolling.
- Operators on number columns – number columns accept >, <, >= and <=, so you can look for everything above or below a value instead of an exact match.
- Sorting – click a column header to sort by it.
- Column configuration – you choose which columns are visible: in Symbols with the “+” icon at the right-hand end of the header row, in Groups and Routing Rules with the columns icon at the top right of the view.
The lists can also be navigated from the keyboard: arrow keys move through a list, Enter opens details or confirms, ESC closes the current window and Backspace goes one step back.
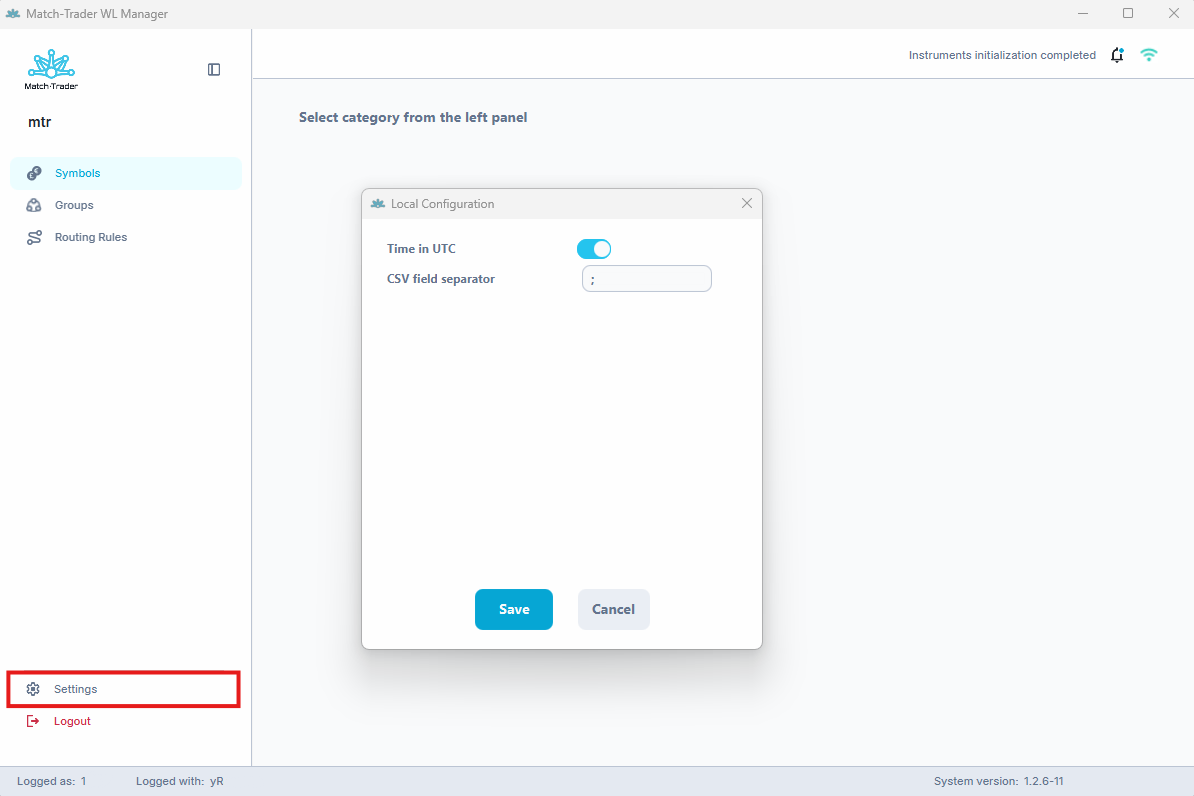
Settings. Settings at the bottom of the menu opens the Local Configuration window, with the settings of the application itself rather than of the environment. They apply to your own installation, and Save applies them.
- Time in UTC – shows times in UTC instead of your local time zone. Worth turning on when you compare notes with someone in another time zone.
- CSV field separator – the character separating fields in the files you export. Set it to match what your spreadsheet application expects.
Symbols #
The Symbols tab lists the instruments configured in the environment together with their parameters. At this access level the view is read-only – there are no action buttons, only the Filter field and the per-column search. Instruments are added, their baseline parameters changed, and their trading sessions and holidays configured at the Full-server License level.
That does not make the tab less useful. What you set for your own clients in Groups is applied on top of these values, so this is where you check what you are starting from – if a group leaves a field empty, the value shown here is what applies.
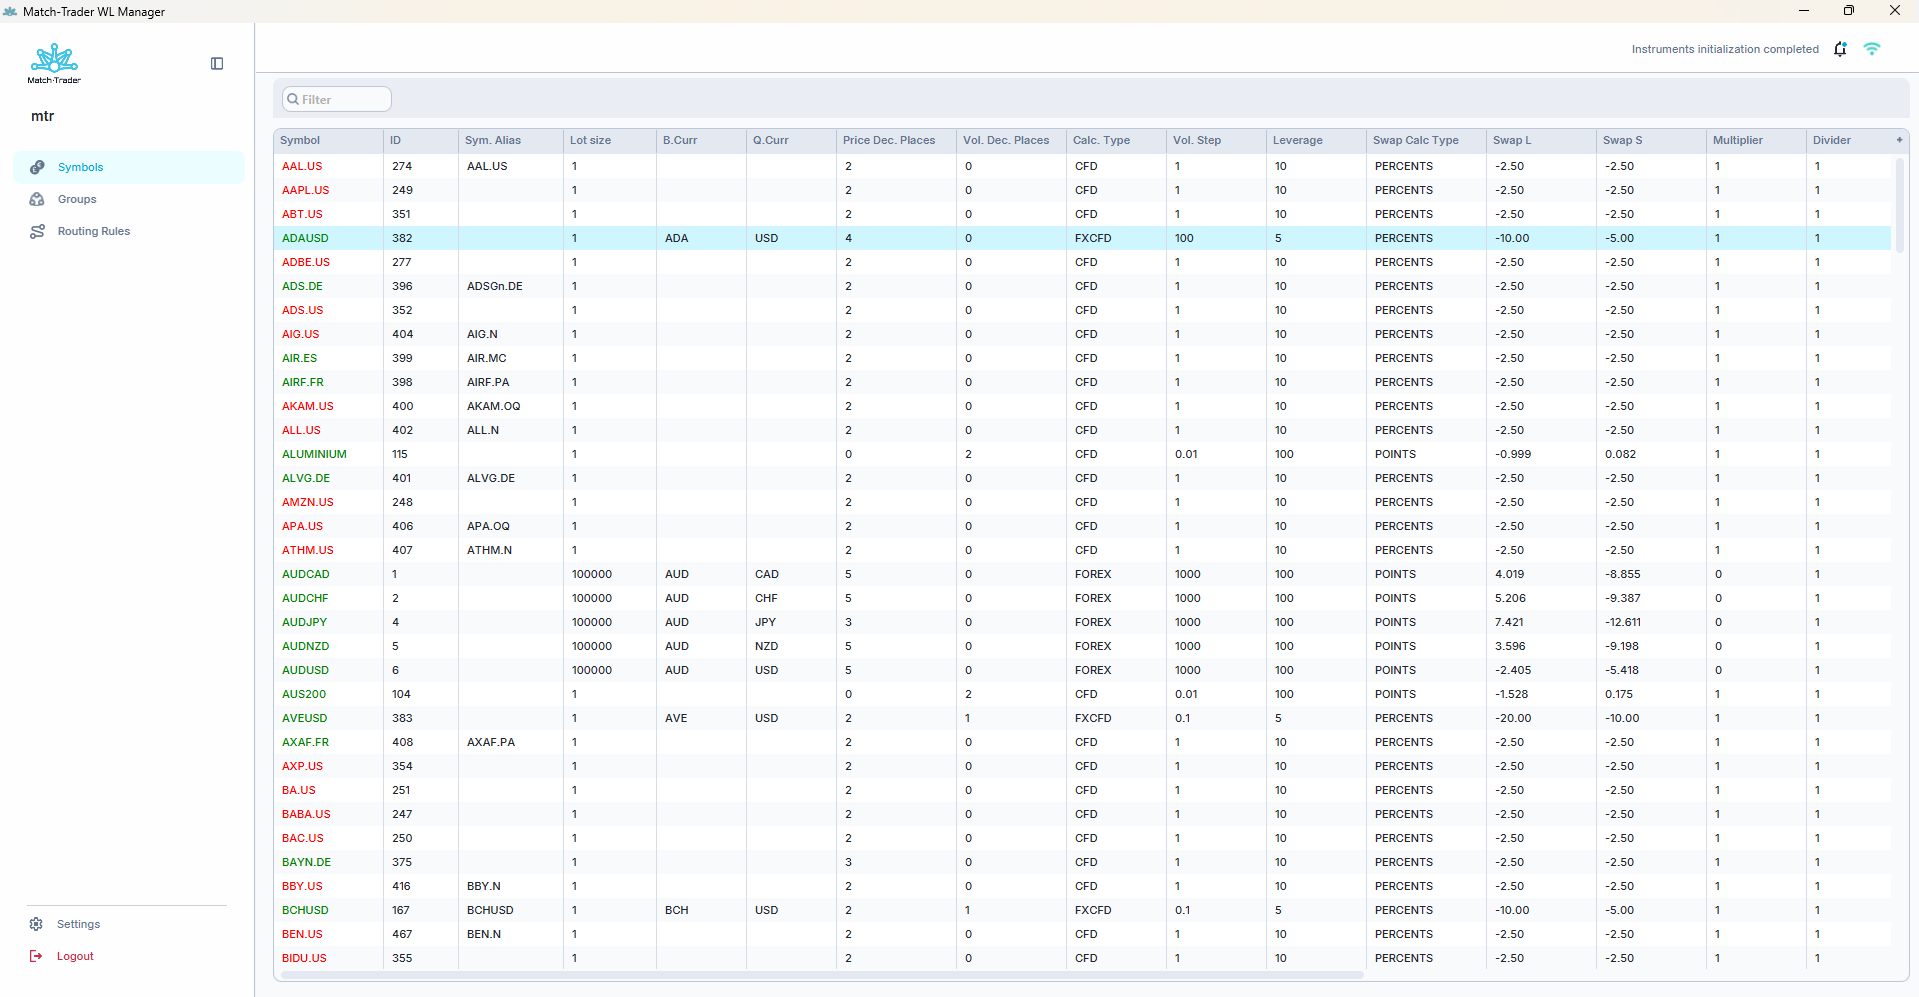
What the columns mean.
- Symbol – the name of the instrument in the system.
- ID – the unique identifier of the instrument in the system.
- Sym. Alias – the name shown to traders on the platform. When it is empty, the Symbol name is used instead.
- Lot size – the size of one lot, also treated as the contract size. If lot size for XAUUSD is 100 with Multiplier and Divider both at 1, opening 1.00 lot opens 100 ounces.
- B.Curr – the base currency, the first currency in a pair: the one being bought or sold. In EURUSD it is EUR.
- Q.Curr – the quote currency, the second currency in a pair: it says how much the base currency is worth. For EURUSD it is USD. Base and quote currency are used only for the FOREX calculation type and are ignored for CFDs.
- Price Dec. Places – how many digits are shown after the decimal point in the price. In other words, the precision of the instrument.
- Vol. Dec. Places – the precision of the order volume. At 2, a trader can change volume in steps of 0.01 contract units.
- Calc. Type – the calculation type, which decides how margin, nominal value and swaps are worked out. FOREX for currency pairs, where the default contract size is 100 000 units; CFD for contracts for difference such as indices, commodities and shares; FXCFD for cryptocurrencies; PRED for prediction markets, which settle against the outcome of an event and where leverage does not apply, swaps are always zero and only long positions can be opened.
- Vol. Step – the smallest volume increment, offset by the volume decimal places. With Vol. Dec. Places at 0 and Vol. Step at 1, a trader cannot open half a position. For FOREX the default contract size is 100 000 units and the step is 1000, because 0.01 lot equals 1000 units.
- Leverage – the default leverage for the instrument. At 100 it is 1:100, meaning 1% of the position’s nominal value is required as margin; at 30 it is 1:30, meaning 3.33%.
- Swap Calc Type – how swaps are calculated: Points charged daily, or Percents as an annual rate.
- Swap L and Swap S – the swap values for long and short positions.
- Multiplier – increases the nominal value of a position by multiplying the lot size by this value. Applies only to CFD and FXCFD.
- Divider – decreases the nominal value by dividing the lot size by this value. Applies only to CFD and FXCFD. Lot size multiplied by Multiplier and divided by Divider gives the contract size: with lot size 100 for XAUUSD, multiplier 2 and divider 1, opening 1.00 lot opens 200 ounces.
- Mult. Curr. – the currency the instrument is denominated in. For GER30 it is EUR.
- Description – the instrument description shown on the trading platform.
- Delay Yellow [s] – how many seconds without a new quote before the instrument is marked yellow, meaning the price is getting stale.
- Delay Red [s] – how many seconds without a new quote before it is marked red, meaning the price should no longer be relied on.
- Termination Type – used for instruments that do not run indefinitely. Expiration means the instrument stops trading on the termination date and settles. Rollover means it rolls over to the next contract on that date instead of ending. Left empty for ordinary instruments.
- Termination Date [UTC] – the date on which that happens, chosen from a calendar and given in UTC.
The table scrolls sideways, and the “+” icon lets you hide the columns you do not need so the ones you do fit on screen.
Groups #
A trading group is the set of conditions your clients trade on: deposit currency, leverage, commissions, stopout levels, reporting and which instruments are available. Every trading account belongs to exactly one group, so this is where you shape your offer – a demo group, a retail group and a professional group are the same platform with different group settings.
At this access level you configure existing groups but do not create them. The main view has Download for exporting the list; new groups are created at the Full-server License level. To change a group’s settings, double-click it, or right-click it and choose Edit group. With several groups ticked, the right-click menu offers Bulk edit group instruments, Bulk edit EOD/EOM and Bulk edit swaps config, which apply the same settings to all of them at once.
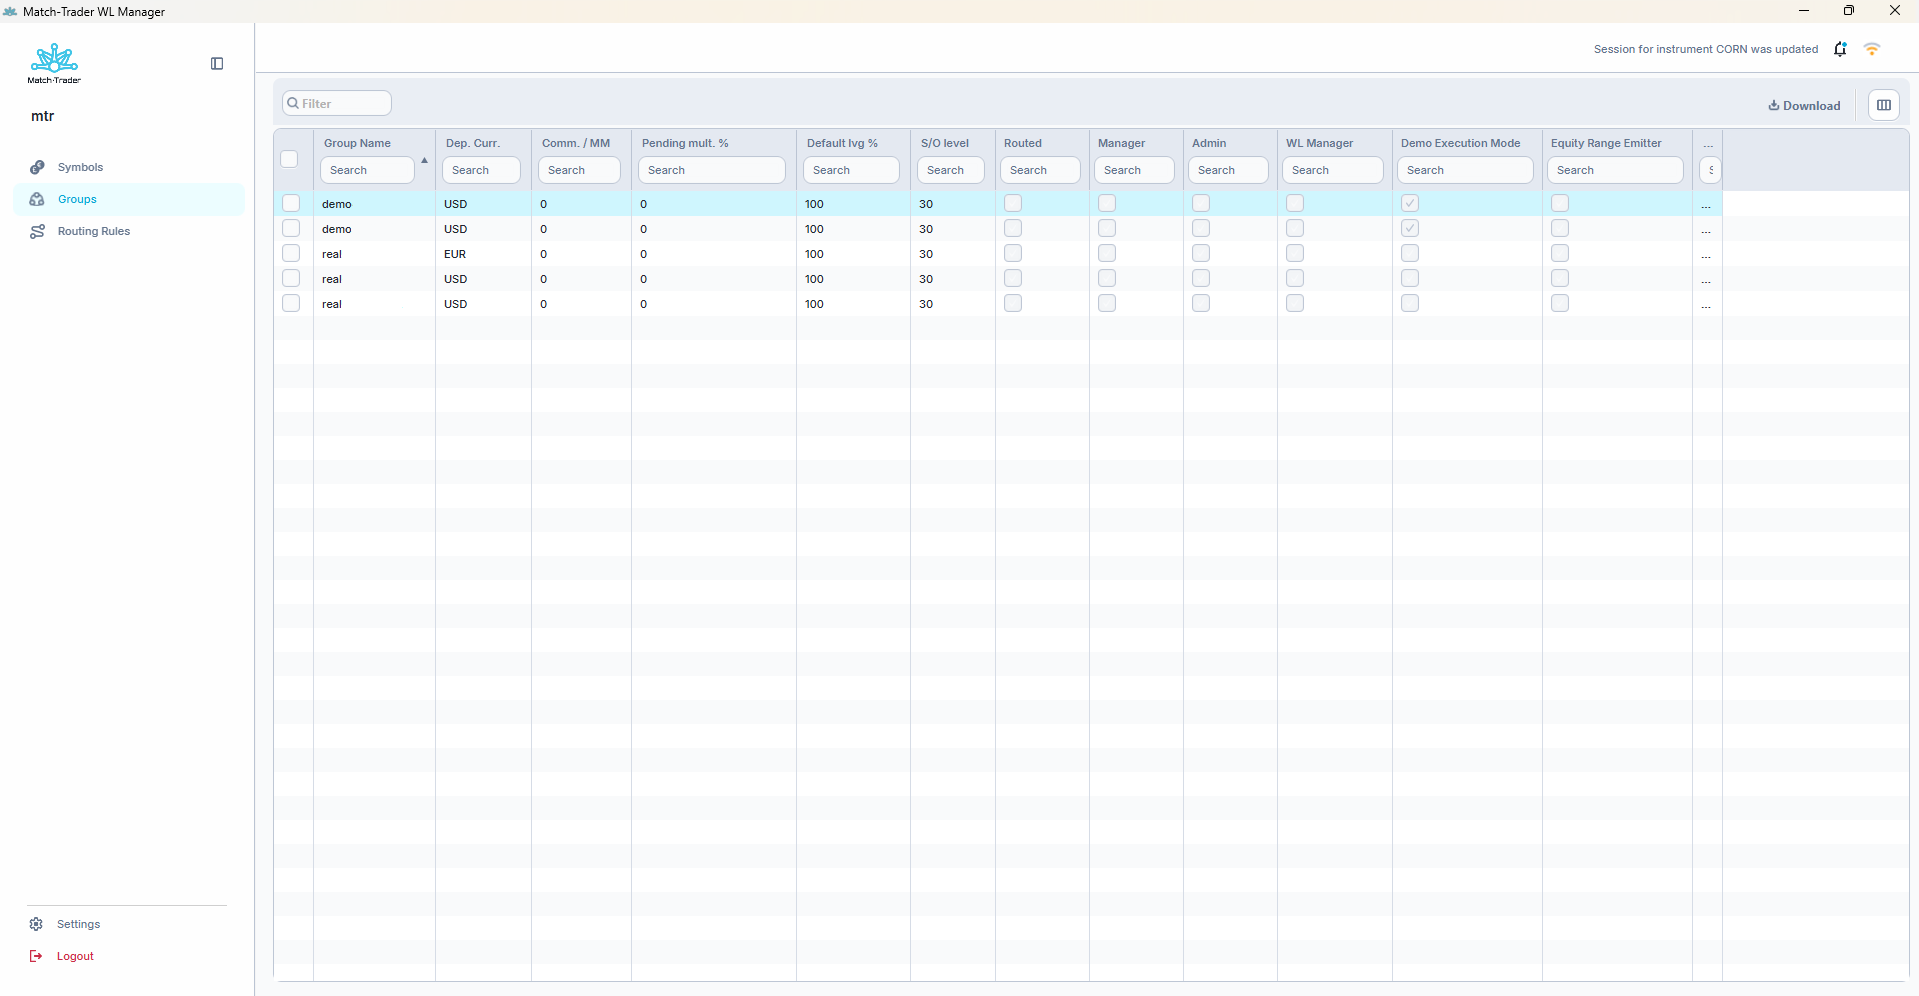
What the group list shows.
- Group Name – the name of the group.
- Dep. Curr. – the deposit currency of the group.
- Comm. / MM – the default commission per million USD traded.
- Pending mult. % – the percentage applied as margin for pending orders. Applies only to accounts in FIFO mode.
- Default lvg % – the leverage percentage every account created in the group starts with. It works together with the instrument leverage: with instrument leverage 30 and this value at 100, final leverage is 1:30 (3.33% margin); at 200 it becomes 1:60 (1.67%).
- S/O level – the level at which accounts in the group reach stopout.
- Routed – whether trades from this group are hedged with a liquidity provider.
- Manager, Admin, WL Manager – whether accounts in this group hold the Manager, Admin or White Label Manager role. These are the groups used for staff accounts rather than clients.
- Demo Execution Mode – whether the group executes orders without consuming liquidity. Explained below.
- Equity Range Emitter – has to be enabled for prop trading groups so that trading rules can be monitored.
- Company – the broker company the group belongs to.
Double-clicking a group opens Group Details, organised into tabs: Main Configuration, Swaps, EOD/EOM, Restrictions and Archiving. Two buttons at the top open separate windows – Configure Instruments and Configure SMTP – and Save and Cancel apply or discard everything you changed across the tabs.
Two fields are shown for reference and cannot be edited at this access level: Group Name and Company. The change history of a group is also not available here – the Group History and Instruments History tabs exist only at the Full-server License level.
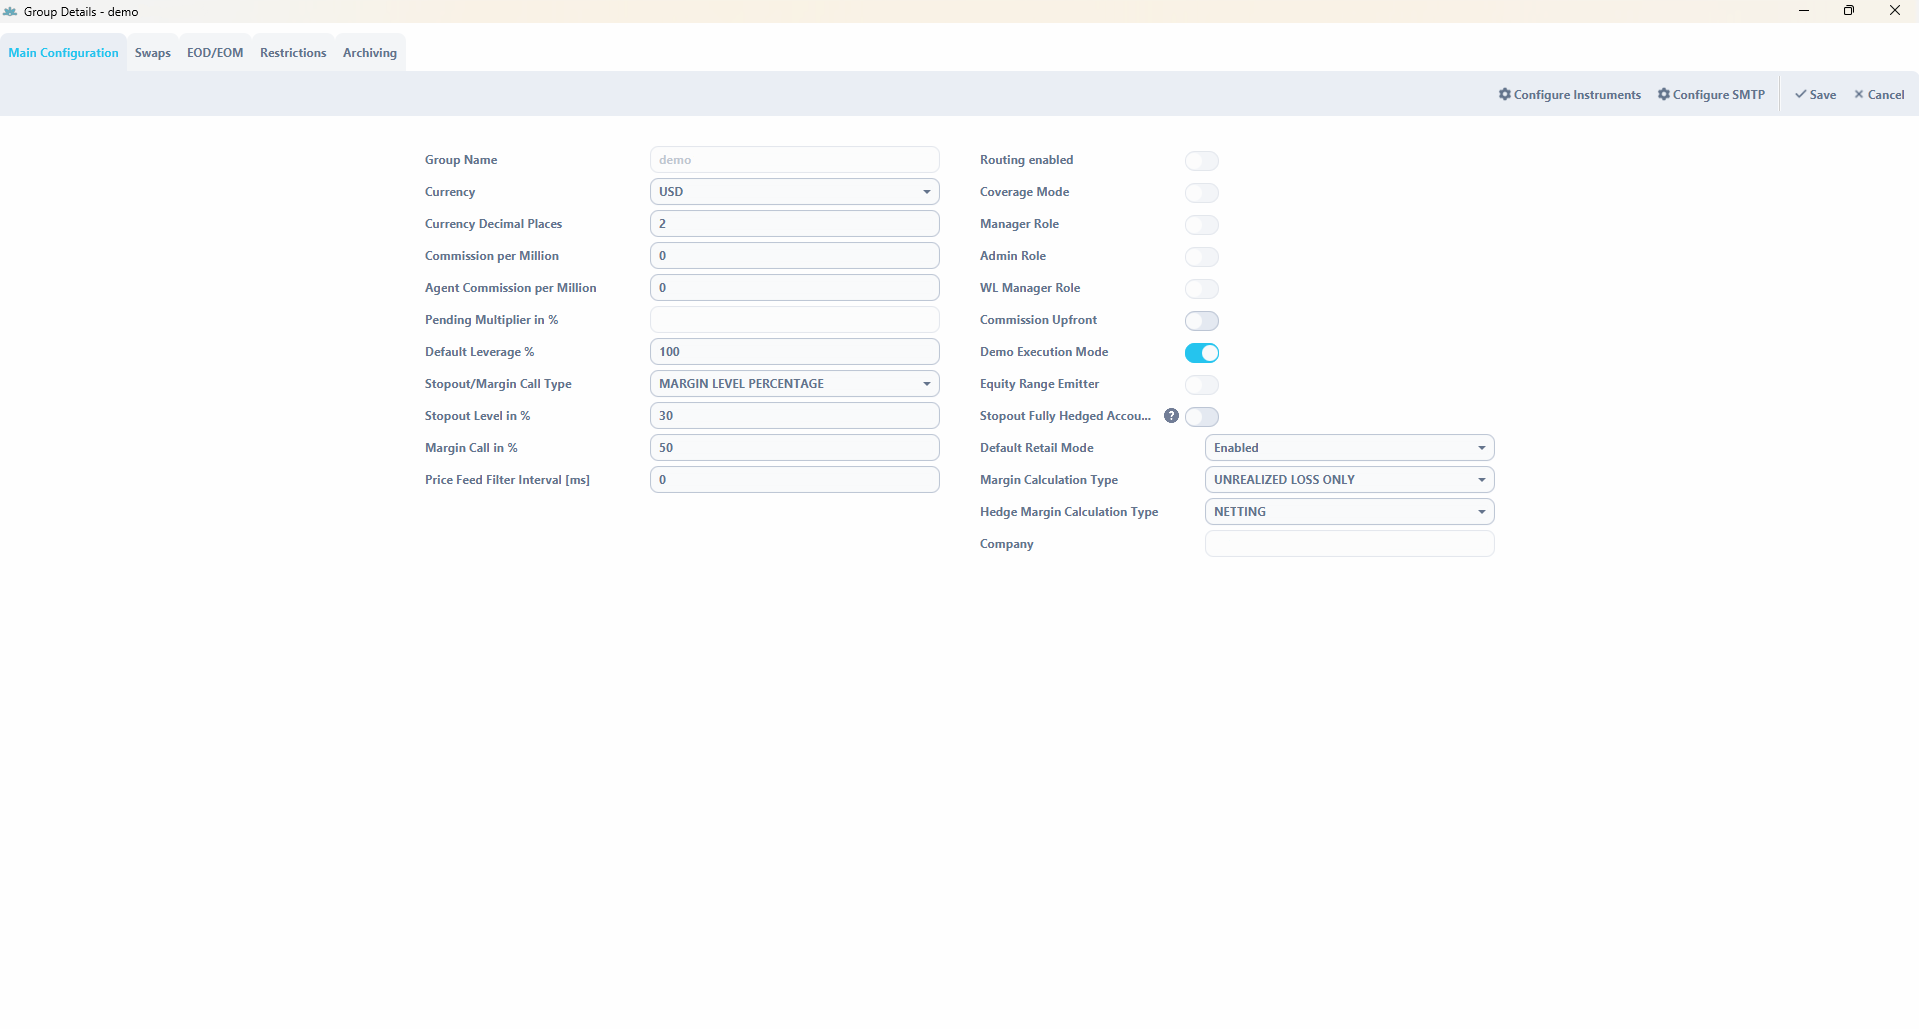
Main Configuration.
- Group Name – the name of the group. Not editable.
- Currency – the deposit currency of the group.
- Currency Decimal Places – the precision used for the deposit currency.
- Commission per Million – the commission charged for one million of turnover in this group.
- Agent Commission per Million – the part of that commission which goes to agent accounts. It is included in the broker commission: set 10 as Commission per Million and 2 here, and the broker receives 8 while the agent receives 2 per million.
- Pending Multiplier in % – the percentage applied as margin for pending orders. Applies only to accounts in FIFO mode.
- Default Leverage % – the leverage percentage assigned to every account created in the group. See Leverage configuration for the full calculation.
- Stopout/Margin Call Type – how stopout is calculated. ABSOLUTE EQUITY USD triggers stopout when equity falls to a fixed amount: a trader with a balance of $5000 whose equity, meaning balance including open positions, drops to $3000 or below – with the level set to 3000 – has positions closed after roughly 2 seconds, beginning with the largest loss. MARGIN LEVEL PERCENTAGE triggers when the ratio of equity to used margin falls to the configured percentage: with the level at 30%, positions are closed until the level is back above 30% or all positions are closed.
- Stopout Level in % – the level at which stopout is triggered, in the unit set by the type above.
- Margin Call in % – the level at which clients receive a margin call notification. At 50, accounts are notified when their margin level drops to 50% or lower.
- Price Feed Filter Interval [ms] – delays execution of trades in milliseconds. Used against scalping.
- Routing enabled – allows orders from this group to be routed to a liquidity provider. The group also has to be covered by a routing rule.
- Coverage Mode – used when hedging exposure with an external provider, so that netted exposure is reflected correctly in the position summary. When you are fully hedged, the summary should show no exposure.
- Manager Role, Admin Role, WL Manager Role – whether users in this group hold the Manager, Admin or White Label Manager role.
- Commission Upfront – charges the whole commission when the trade is opened, rather than splitting it between opening and closing.
- Demo Execution Mode – orders are executed at market prices without affecting the order book, so they do not consume liquidity. Orders are processed under the Fill or Kill rule: filled completely or rejected. If an order exceeds available liquidity the system cannot determine a price and returns a Not enough liquidity error. Execution prices use the volume weighted average price. With order book lines of 5, 10 and 15 lots, an order for 40 lots is rejected, while one for 29 lots is executed and the order book stays unchanged.
- Equity Range Emitter – has to be enabled for prop trading groups in order to monitor trading rules.
- Stopout Fully Hedged Accounts – stops out clients whose positions have a total margin of 0 and equity below 0. Available only when Hedge Margin Calculation Type is set to NETTING, which is why the option appears inactive on groups configured the other way.
- Default Retail Mode – when enabled, accounts newly created in this group work in retail mode; when disabled, they are created in FIFO mode. Existing accounts are not affected. In FIFO mode, First In First Out, positions cannot be opened in opposite directions on the same instrument: with a 1.0 lot buy on EURUSD, opening a 0.3 lot sell partially closes the buy and leaves 0.7 lot. Take Profit and Stop Loss are also unavailable in FIFO mode.
- Margin Calculation Type – UNREALIZED LOSS ONLY means free margin equals equity counting unrealised loss, minus margin; UNREALIZED PROFIT LOSS counts both unrealised loss and unrealised profit.
- Hedge Margin Calculation Type – NETTING calculates margin after positions are netted, so 2 lots of EURUSD buy against 1 lot sell is margined on 1 lot; LARGER_LEG takes the side with the larger total margin, so the same case is margined on the 2 lots bought.
- Company – the broker company the group belongs to. Shown for reference, not editable.
EOD/EOM controls the daily and monthly reports sent to clients in this group. Always Generate Account Snapshot captures snapshots regardless of the report settings; EOD Reports Mode and EOM Reports Mode decide whether the reports are sent; Account Snapshot Generation Time sets the time of day; and Exclude Empty EOD Report and Exclude Empty EOM Report stop reports going to clients with no trading activity in the period.
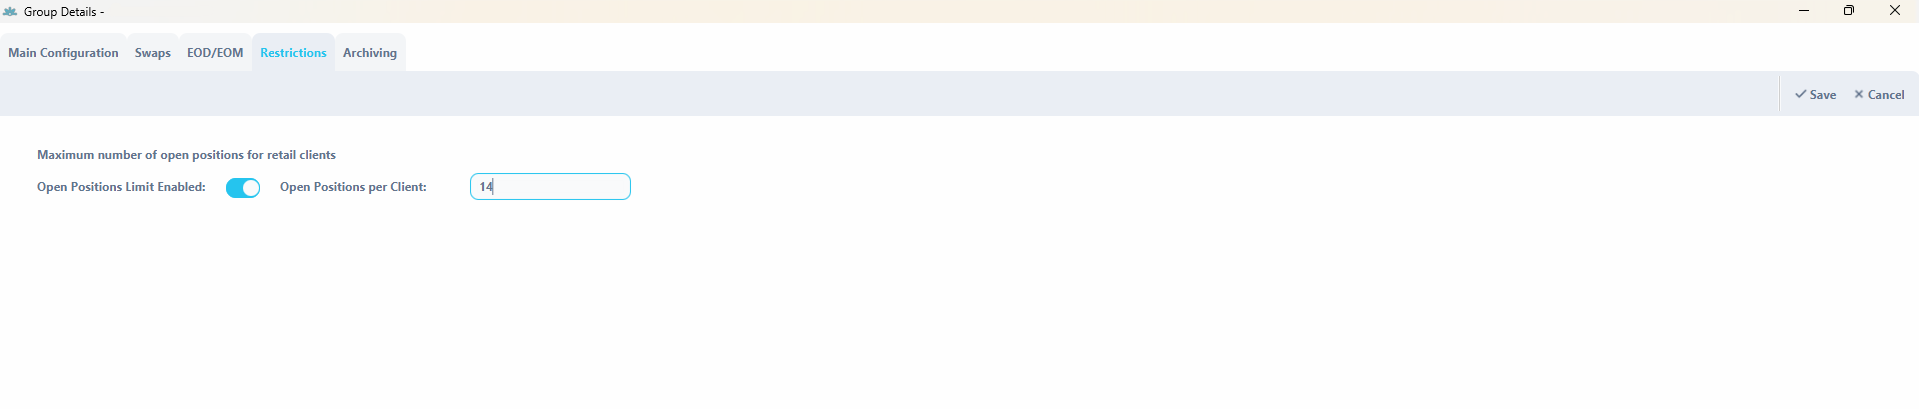
Restrictions caps how many positions a client may hold at once. Under Maximum number of open positions for retail clients, Open Positions Limit Enabled switches the limit on and Open Positions per Client sets how many open positions each retail client may have. With the limit off, the value is ignored.
Archiving deletes trading accounts that have submitted no orders within the inactivity period you set, and can be limited to accounts with selected access rights. Before an account is deleted, its pending orders are cancelled, its open positions are removed and its balance and credit are set to zero – so switch it on only where that is acceptable, typically on demo groups.
Configure SMTP opens a separate window where you set the mail server used for this group’s reports and notifications – end of day and end of month reports, stopout and margin call messages. You set SMTP host and SMTP port, the Login and Password of the mailbox, Mail from as the sending address, Copy to for an address receiving a copy of every report, SSL and TLS for the encryption, a Signature added to outgoing mail, and Delay between mails in milliseconds for providers that rate-limit sending. A Test e-mail button checks the settings before you rely on them, and a second tab, Email Notification Setup, controls whether messages about deposits, withdrawals and credit in or out are sent.
Configure instruments #
The Configure Instruments button in Group Details opens the instrument settings for that one group. This is where a group stops being a set of general conditions and becomes a concrete offer: which instruments the group can trade at all, and on what terms.
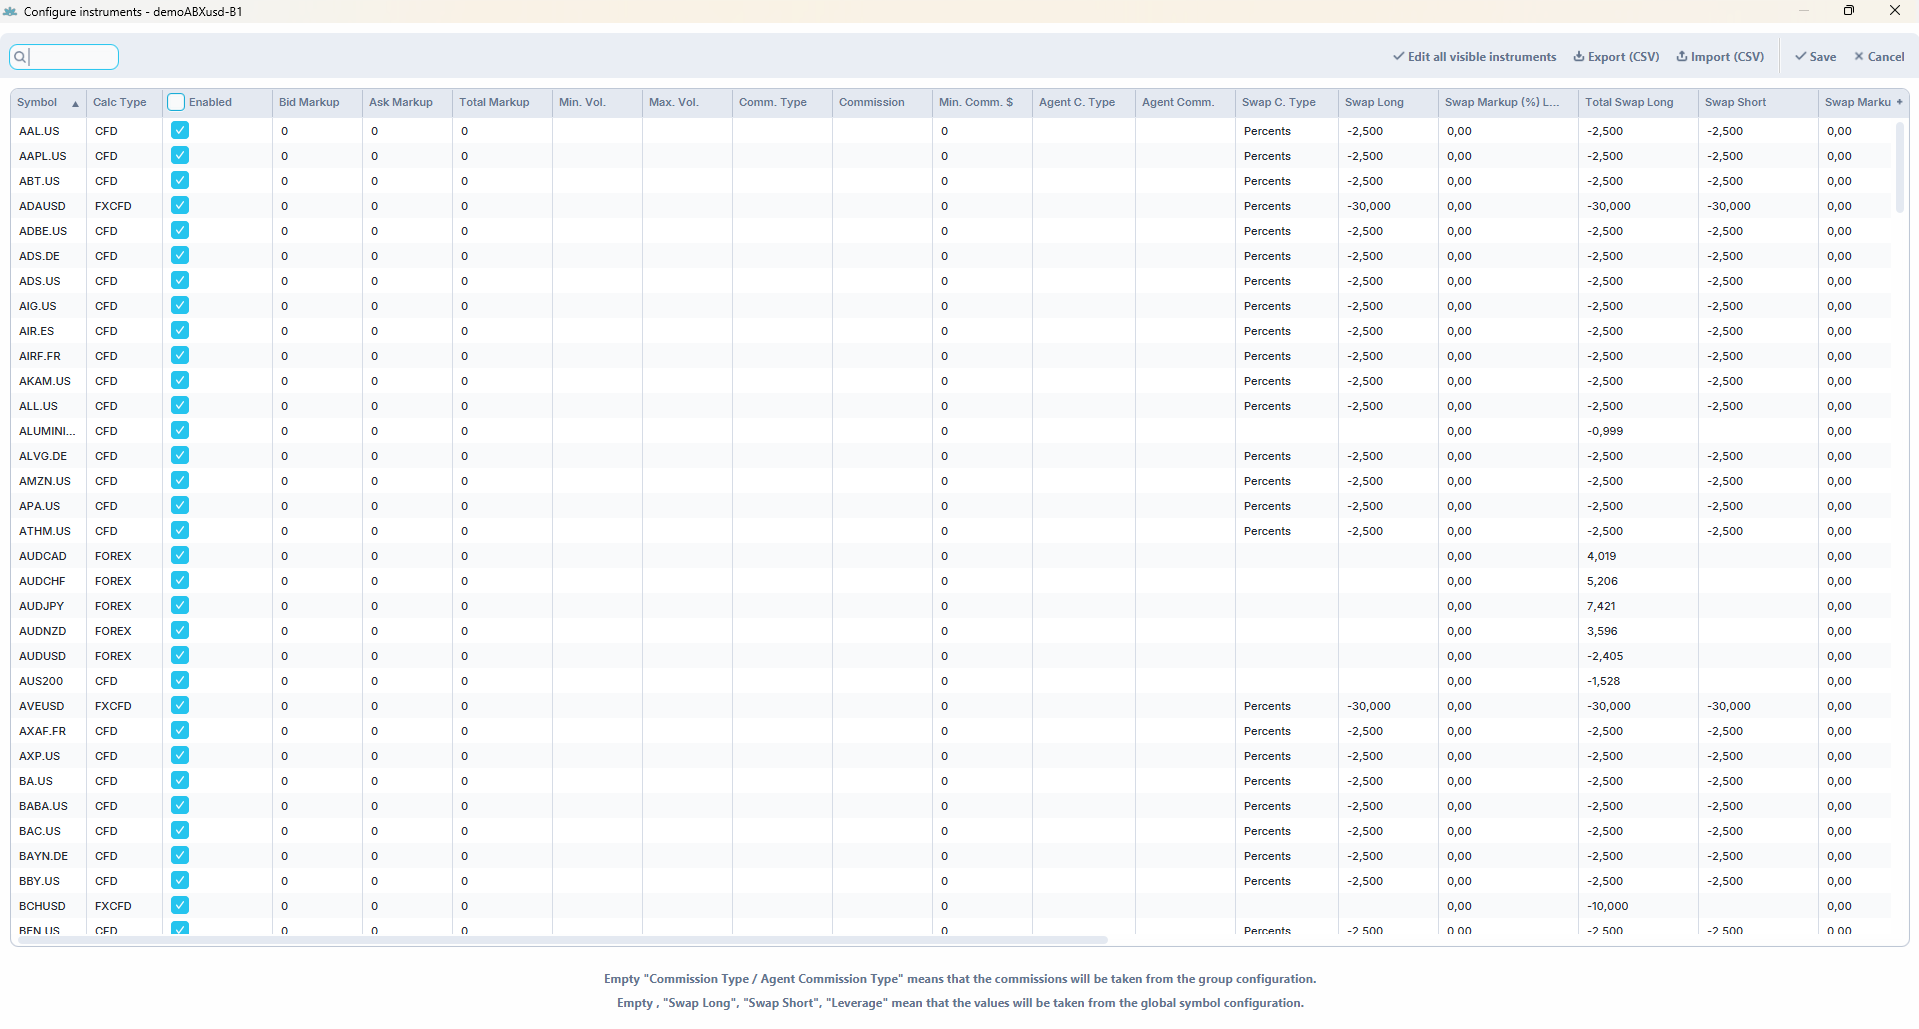
An empty field means “inherit”, not “zero”. This is the single most important thing to understand about this window, and it saves a lot of confusion later. Leave Commission Type or Agent Commission Type empty and the commission is taken from the group configuration. Leave Swap Long, Swap Short or Leverage empty and the values are taken from the instrument’s own configuration, the one visible in the Symbols tab.
Fill a field in and it overrides the inherited value for this group only. This is the mechanism that lets you set your own terms without being able to change instruments globally: you cannot edit the instrument in Symbols, but you can override its values here for your own group. The application shows the same reminder at the bottom of the window.
Deciding whether an instrument is available.
- Enabled – whether the instrument is quoted and tradable in this group at all. This is the master switch.
- Disable Trading – keeps sending live prices for the instrument but blocks trading on it. Use this rather than Enabled when you want clients to keep seeing the market but not act on it.
- Close Only Mode for Retail – existing positions can be closed but no new ones opened. Applies to retail accounts.
- Long Only Mode for Retail – only buy positions can be opened on the instrument. Applies to retail accounts. It is switched on automatically when an instrument of the PRED type is added to the group.
Price and volume.
- Bid Markup – the markup applied to the bid price, in whole points. It is entered as a negative value, because lowering the bid is what widens the spread on that side: -2 lowers the bid by 2 points.
- Ask Markup – the markup applied to the ask price, in whole points, entered as a positive value: 2 raises the ask by 2 points.
- Total Markup – how much the two markups widen the spread together, calculated for you as Ask Markup minus Bid Markup: with -2 and 2 it is 4. It is the widening of the spread the client actually sees. Note that a markup may already be applied at provider level before yours, so the client’s spread is the raw spread plus that markup plus this one.
- Min. Vol. – the smallest position size, in lots. At 0.1, a trader cannot open less than 0.1 lot.
- Max. Vol. – the largest position size, in lots. At 1, no single position may exceed 1 lot. This caps individual positions, not the total: a trader can still open several of them. To cap the total, use Max Exposure below.
Commission.
- Comm. Type – how the client commission is calculated on this instrument. The available types are USD / $1M, USDc / Contract, USDc / Lot, 1/10% (permills) and Points, each explained with its formula and a worked example in Commission configuration below.
- Commission – the value of the commission, in the unit implied by the type.
- Min. Comm. $ – a floor on the commission. If the calculated amount comes out below this, this value is charged instead.
- Agent C. Type and Agent Comm. – the same two settings for the agent’s share. Setting the agent commission per instrument here is one of two possible methods; the other is per group. Use only one method per group.
Leverage.
- Leverage – custom leverage for this instrument in this group. Left empty, the value from the Symbols tab applies. At 100 leverage is 1:100, meaning 1% of the position’s nominal value is required as margin; at 30 it is 1:30, meaning 3.33%.
- Fixed Leverage – decides whether the value above is final or still multiplied by the account’s Leverage %. With account Leverage % at 200 and instrument leverage at 30: unchecked gives a final ratio of 1:60 (1.67%), checked gives 1:30 (3.33%). Check it when you need a hard limit on an instrument regardless of the account setting.
Swaps.
- Swap C. Type – how swaps are calculated for this instrument in this group: Points daily or Percents annually.
- Swap Long and Swap Short – the swap values for long and short positions. Left empty, the values from the Symbols tab apply.
- Swap Markup (%) Long and Swap Markup (%) Short – a percentage markup applied on top of the swap value. Negative values down to -100% are allowed, so the field can reduce swaps as well as increase them. The formula and worked examples are in Swaps and swap markups below.
- Total Swap Long and Total Swap Short – the resulting swap after the markup is applied, calculated for you.
- Swaps multipliers – whether the per-day multipliers from the group’s Swaps tab apply to this instrument. If this box is not checked, those settings are ignored for it – the most common reason a configured three-day swap does not appear.
- Swap Schedule Type – whether swaps are charged every given number of Days or Hours.
- Swap Schedule Value – how many days or hours, in the unit chosen above.
- Swap Free Days – how many days after a position is opened no swaps are charged. At 7, the first swap is charged on the eighth day after the trade was opened.
Risk. Max Exposure sets the maximum exposure a single client in this group may hold on this instrument. Above this value the client cannot increase the position further.
Changing many instruments at once. Editing a few thousand instruments one by one is not realistic, so the window has three tools for it. All of them respect the per-column search fields, and that is what makes them safe: filter the list first, confirm you are looking at exactly the instruments you mean, then act.
- Edit all visible instruments – sets one column to the same value for every row currently displayed. Because it works on what is displayed, the filter you applied beforehand defines the scope.
- Export (CSV) – downloads the current configuration. Worth doing before any bulk change, both as a starting point for editing and as something to fall back on.
- Import (CSV) – uploads an edited file to apply the changes.
Save applies everything; Cancel discards it. Nothing takes effect until you save.
Swaps and swap markups #
A swap is the financing cost of holding a position overnight. Three separate things decide what a client is actually charged: the swap value, the markup applied to it, and the schedule saying when it is charged. They are configured in different places, which is why swaps are the setting most often reported as “not working”.
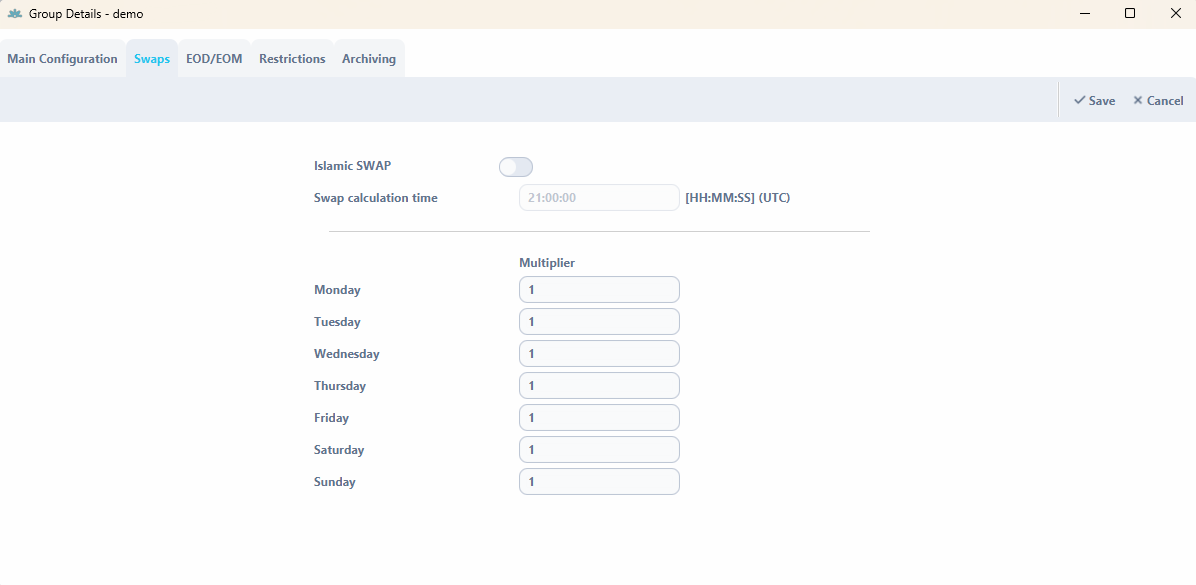
The Swaps tab. The Swaps tab in Group Details holds swap multipliers for individual days of the week. This is how a three-day swap is set up: enter 3 in the multiplier field for Friday and 0 for Saturday and Sunday. The weekend is then charged in one go on Friday and nothing is charged while the market is closed, so clients do not get margin calls or stopouts over the weekend because of swaps. All days start at 1, which charges the normal daily swap. Swap Calculation time sets the time of day at which swaps are charged on client accounts.
If a three-day swap does not appear, check this first. For the multipliers to work, the Swaps multipliers box has to be checked for the instrument in Configure Instruments. Without it the day multipliers are ignored for that instrument.
Islamic swaps, when enabled, present swaps to the client as a deposit or withdrawal with the comment storage fee, containing the position and the instrument, instead of as a swap.
How the swap markup is calculated. Swap markups are set per instrument in the group’s instrument settings, in Swap Markup (%) Long and Swap Markup (%) Short. The final swap charged to the trader is:
Final Swap = Swap – (|Swap| × SwapMarkup / 100)
The absolute value in the formula is the part that matters. It means the direction of the markup stays the same whether the underlying swap is positive or negative. A positive markup always works in the broker’s favour – it reduces the swap paid to the trader, or increases the swap charged to the trader. A negative markup always works in the trader’s favour – it increases the swap paid to the trader, or reduces the swap charged to the trader.
Four examples, covering both signs of both values:
- Swap = 1000, markup = 20% → final swap = 800
- Swap = 1000, markup = -20% → final swap = 1200
- Swap = -1000, markup = 20% → final swap = -1200
- Swap = -1000, markup = -20% → final swap = -800
Markups act as a multiplier on the swap value taken from the group or instrument configuration – they never change the base swap value itself, which is why Total Swap Long and Total Swap Short are shown separately in Configure Instruments. Negative values are accepted down to -100%, so the same field can both widen and discount swaps.
When swaps are charged. Swap Schedule Type and Swap Schedule Value in Configure Instruments decide the frequency, and the group’s Swap Calculation time decides the starting point. With Schedule Type HOURS, Schedule Value 3 and Swap Calculation Time 00:00, swaps are charged every 3 hours starting from midnight. With Schedule Type DAYS and the same value and time, they are charged every 3 days at midnight.
Swap Free Days delays the first charge: at 7, a position opened today is charged its first swap on the eighth day. This is separate from the schedule, which governs the rhythm once charging has begun.
Commission configuration #
There are two commissions in the system and it is worth keeping them apart from the start. The broker commission is what you charge the client. The agent commission is the share of it that goes to an introducing broker. The agent commission is not added on top – it is taken out of the broker commission.
Put 10 in Commission per Million and 2 in Agent Commission per Million, and per million traded the broker receives 8 and the agent receives 2.
Setting the commission your clients are charged. Open Groups, double-click the group, enter the value in Commission per Million and save. The commission is calculated as:
(commission per million / 1 000 000) × (nominal value of instrument × lots traded × exchange rate to USD)
The exchange rate only comes into it when the nominal value is in a currency other than USD.
For example, a client trades 1 lot of AUDUSD. The nominal value of AUDUSD is 100 000 AUD, the AUD rate to USD is 0.73, and Commission per Million is set to 10:
(10 / 1 000 000) × (100 000 × 1 × 0.73) = 0.73
That is the commission for opening the trade. The same calculation runs again when the client closes it, so the total on the round trip is 1.46. The difference between what you charge your clients and what you are charged on the hedge side is your margin on those clients – charge 20 USD per million while being charged 10, and the remaining 10 is yours.
Two warnings before you set up the agent commission. Both of these cause real problems in practice.
- Do not set the agent commission in both Client Office and here. If you do, the agent is paid twice. Pick one application and configure it there only.
- Use only one method per group. The agent commission can be set for the whole group or per instrument, and mixing both within one group is not supported.
Method one – for the whole group. Open Groups, double-click the group, enter the value in Agent Commission per Million and save. It is calculated with exactly the same formula as the broker commission, so 1 lot of AUDUSD with the rate at 0.73 and the value set to 10 gives 0.73 on opening and 1.46 on the round trip.
Method two – per instrument. Open Groups, double-click the group, then click Configure Instruments. For each instrument you can set Agent C. Type, which decides how the commission is calculated, and Agent Comm., which is the value. Save to confirm.
The five commission types. The same five are available for both the client commission and the agent commission. The difference between them is what the value is measured against – turnover, contract size, lots, nominal value or points – and that changes the order of magnitude of the number you enter, which is where mistakes happen.
USD / $1M – set per one million USD traded by the client.
(commission value / 1 000 000) × lots traded × nominal value of instrument × exchange rate to USD
Example: the type is set to 10. The client opens 1 lot of EURUSD, nominal 100 000 EUR, with the rate at 1.18 USD per EUR. (10 / 1 000 000) × 1 × 100 000 × 1.18 = 1.18 on opening, and another 1.18 on closing if the rate has not moved.
USDc / Contract – set in US cents per contract, meaning per instrument lot size traded.
commission value × instrument lot size × lots traded
Do not use this type for forex instruments. Their lot size is 100 000, so the smallest possible commission on 1 lot would be 1000 USD.
USDc / Lot – set in US cents per lot traded.
commission value × lots traded
Example: the type is set to 3 for AUDCAD, so 3 cents per lot. The client opens 1 lot: 0.03 × 1 = 0.03 USD.
1/10% (permills) – set at 0.1% per nominal value traded.
commission value × 0.1% × lots traded × nominal value of instrument × exchange rate to USD
Example: the type is set to 5 for GBPNZD. The client opens 1 lot and the GBP rate to USD is 1.3111. 5 × 0.1% × 1 × 100 000 × 1.3111 = 655.55. Note how large this comes out – this type is easy to misjudge.
Points – set as a points value per lot traded.
commission value × instrument point value × lots traded
Example: the type is set to 3 for AUDCAD, whose point value is 0.75641. The client opens 2 lots: 3 × 0.75641 × 2 = 4.54 USD. The easiest way to check an instrument’s point value is on the trading platform itself, through the information button on the instrument.
Leverage configuration #
Leverage is not set in one place. Three settings combine into what the trader actually gets, which is why the leverage on an account rarely matches any single number you can see on screen:
- Leverage on the instrument, visible in the Symbols tab – the baseline for that instrument everywhere.
- Leverage on the instrument within a group, in Configure Instruments – overrides that baseline for your group only.
- Leverage % on the trading account, taken from the group’s Default Leverage % when the account is created.
The Fixed Leverage checkbox in Configure Instruments decides whether the third setting is applied at all. Checked, the instrument leverage is final and the account’s Leverage % is ignored. Unchecked, the two are combined as below.
Calculating the final leverage.
final leverage in % = (100 / (account Leverage % × instrument leverage)) × 100%
The result is the percentage of the position’s nominal value taken as required margin. To express it as a ratio, divide 100 by that percentage.
Take BTCUSD, with the account’s Leverage % at 200 and the instrument leverage in the client’s group at 10:
(100 / (200 × 10)) × 100% = 5%
5% of the nominal value is required as margin, which corresponds to a ratio of 1 : (100 / 5) = 1:20.
What that means for a real position. Taking the same configuration – account Leverage % 200, instrument leverage 10, so an effective 1:20 – and opening 1 lot of BTCUSD, meaning 1 BTC, at a price of 65 679 USD:
margin required = nominal value × effective margin percentage = 65 679 × 5% = 3 283.95 USD
So roughly 3 284 USD of margin is held for that position.
Reading it the other way round. It is often easier to sanity-check a configuration from the instrument value alone. With the account’s Leverage % at 100, the instrument leverage translates directly into the familiar ratio: 100 gives 1:100, meaning 1% margin; 30 gives 1:30, meaning 3.33% margin.
Raising the account’s Leverage % above 100 loosens leverage, lowering it tightens leverage. With instrument leverage at 30: an account Leverage % of 100 gives 1:30 (3.33%), while 200 gives 1:60 (1.67%). This is the mechanism to use when you want one client on tighter or looser terms than the rest of their group without touching any instrument settings.
Routing rules #
Routing rules decide which trades are sent to an external liquidity provider. This tab lists the rules that apply to your groups, so you can see how your clients’ trades are being handled.
Why the list may look empty. You see the rules that were assigned to your group at the Full-server License level, through a rule’s Broker Group setting. A rule with no such assignment does not appear here – so an empty list does not mean nothing is being routed, it means no rule has been made visible to your group.
What the columns show.
- Sequence – the order in which rules are evaluated. Lower numbers take precedence over higher ones.
- Group Pattern – the groups the rule covers.
- Symbol Pattern – the instruments hedged under the rule. * means all of them.
- LP ID – the liquidity provider the trades are sent to.
- Status – whether the rule is currently active.
- State – whether the rule is enabled in the system.
- Coverage Percent – what percentage of the trades is covered on the provider’s side. 100 means the provider covers them one to one.
What you can and cannot change. New rules are created at the Full-server License level, not here. On the rules you can see, two fields are locked: LP ID and Group Pattern. That is deliberate – they decide which provider is used and whose trades are affected, so they stay with whoever owns the liquidity relationship. What is left to you is the part that concerns your own offer – above all which instruments you want hedged, and the schedule saying on which days and at which hours your clients’ trades should be routed.
Routing only one direction. Routing Side limits the rule to one trade direction: Both, the default, Long Only or Short Only. Orders in the other direction can still be opened on the client account, they are just not routed, and closing positions on the provider’s side works regardless of this setting. Routing Side works correctly only for retail client accounts – on B2B accounts it leads to incorrect routing, which the tooltip next to the field also warns about.
Why an order can be rejected for no apparent reason. Routing rules use the before-execution model: a client’s position opens only if there is enough margin to open the hedging position on the provider’s account. If there is not, the client cannot open the position at all – so the cause may be on the provider’s side rather than on the client’s account.
Also note that the group itself has to have Routing enabled switched on in its configuration. A routing rule alone does not route anything if the group is not set up for it.
FULL-SERVER LICENSE FEATURES #
This chapter covers the complete application. Everything described in chapter 2 is available here as well, with fewer restrictions – groups can be created, instruments edited, trading sessions configured, routing rules created – and on top of that come the tabs that do not appear at White Label level at all: platform categories, staff accounts, market data, the hedge, abuse and exposure rules, liquidity provider and FIX connectivity, and the maintenance tools.
Main window #
The main window is split into three areas: the navigation menu on the left, the working area in the middle, and a status bar along the bottom.
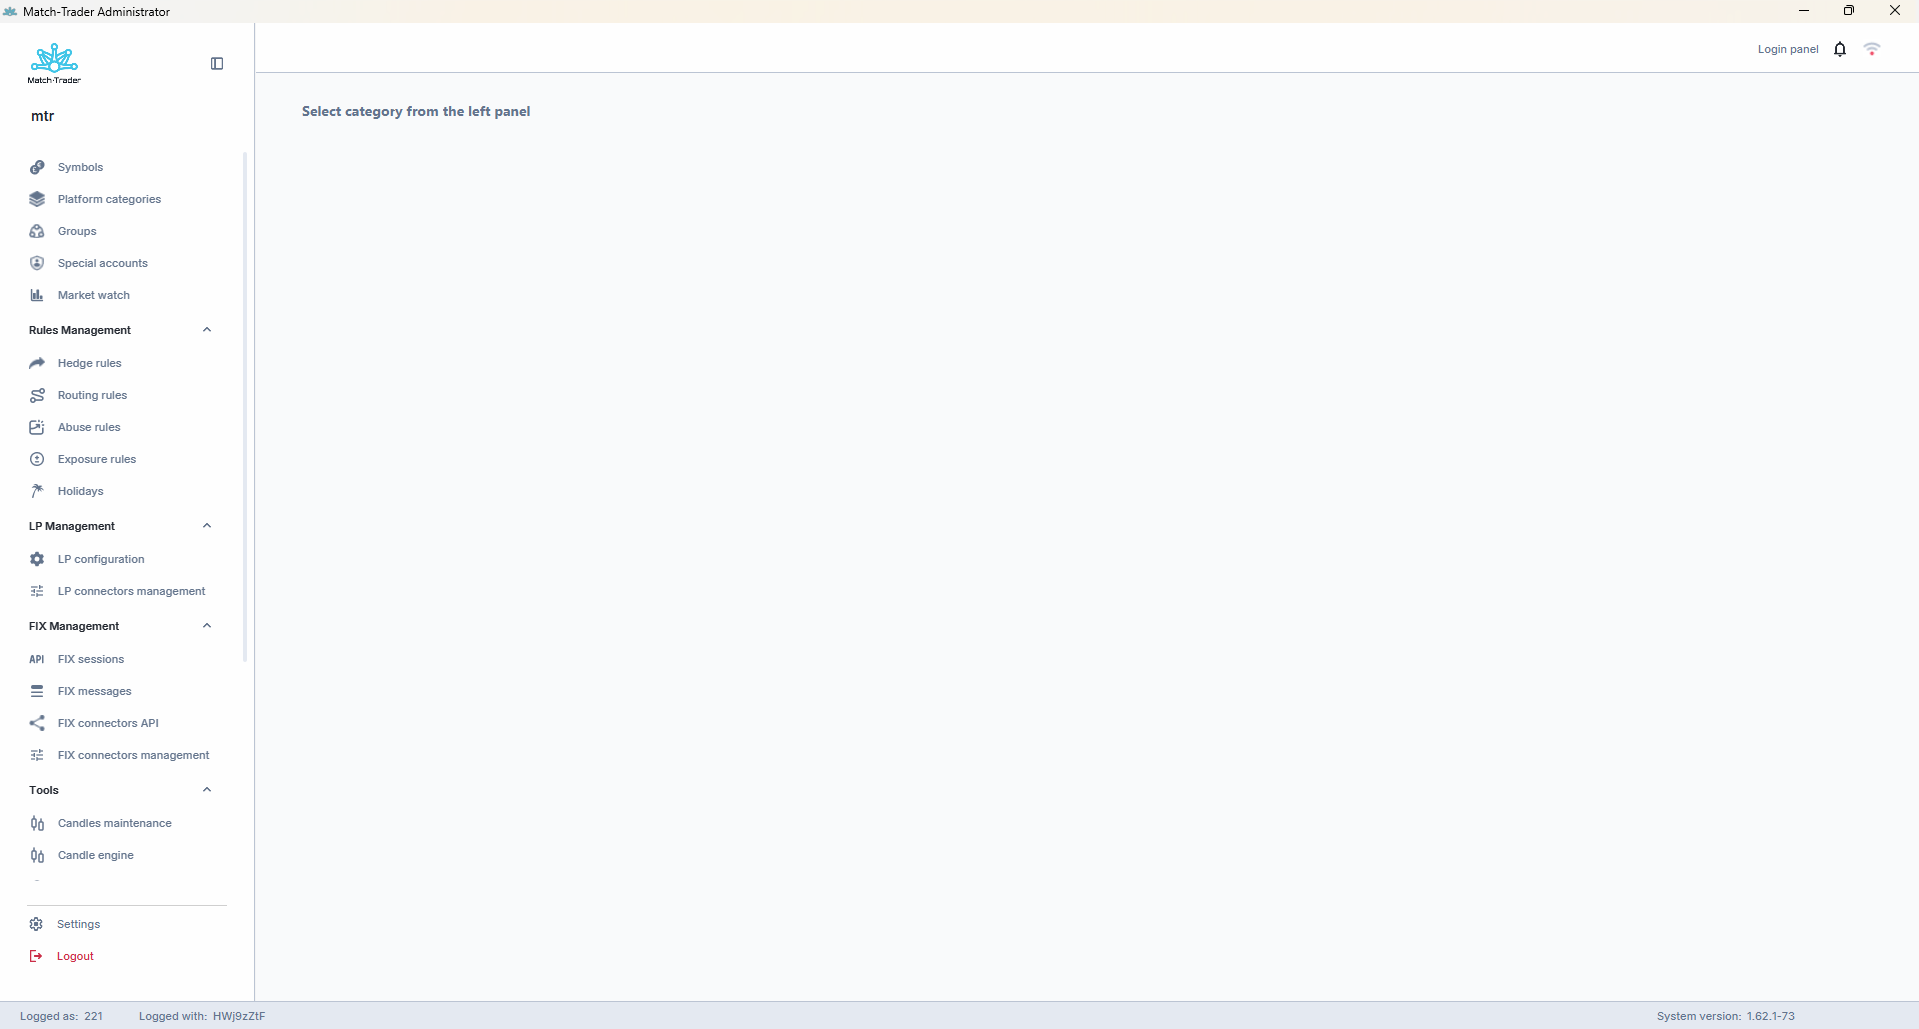
Navigation menu. The menu opens with the tabs used most often, each leading straight to a single view: Symbols, Platform categories, Groups, Special accounts and Market watch. Below them the remaining tabs are gathered into collapsible sections, so the menu stays short until you need them.
- Rules Management – the risk and routing rules: Hedge rules, Routing rules, Abuse rules, Exposure rules and Holidays.
- Connectors Management – liquidity provider and FIX connectivity: LP configuration, LP connectors management, FIX messages, FIX connectors API, FIX connectors management, FIX sessions monitoring and Non-FIX sessions monitoring.
- Tools – maintenance and diagnostics: Candles maintenance, Candle engine, Logged users, Manager sessions, System journal, Audit logs, Failed accounts, Global configuration and Automations.
- Migrations – used by the Match-Trade support team when environments are being set up or moved. It is not covered in this manual, and the section is hidden when the underlying service is not running in your environment.
Above the menu you can see the name of the environment you are connected to, together with a button that collapses the menu down to icons when you need more room for a wide table. Settings and Logout sit at the bottom of the menu. At the top of the working area you see the name of the tab you are in, with arrows for going back and forward between the views you have opened.
Top bar. On the right-hand side the application shows the most recent system notification in plain text – for example that a group was updated or a special account edited – next to a bell icon that opens the full list of notifications, and the network reliability indicator described below.
Status bar. The bottom of the window shows Logged as – the special account you are logged in as, Logged with – the name of the token used for the connection, and System version – the version of the system you are connected to. When you report a problem, this is the information to quote.
What the Wi-Fi icon means. The icon in the top bar reflects the current latency between the application and the server, and any automatic reconnection attempts. Green means ping below 100 ms and a healthy connection. Yellow, shown with one grey bar, means ping between 100 ms and 300 ms, so noticeable latency. Red, with two grey bars, means ping above 300 ms or a degraded connection. Hovering over the icon shows the current ping.
When the connection drops, the application keeps trying to reconnect for up to 30 seconds before the session is treated as disconnected; during that window the icon reflects the retry state, so you can tell temporary latency apart from a real disconnection. If reconnecting fails, you are returned to the login screen with a message explaining why.
The trading accounts counter. The main window shows how much of the server’s trading account limit is already used, in the form Trading accounts: {number of accounts}/{account limit}. The value is refreshed when you log in and then every 5 minutes. Accounts whose login and trading are blocked are not counted. On forex servers only real accounts count, on prop servers demo accounts count as well. The limit itself is changed by the Match-Trade support team.
Once the limit is reached, the system stops accepting new accounts and blocks changing an existing account’s status to active. The limit itself cannot be edited in the Admin – it is set by the Match-Trade support team – but the counter is there so you can see a limit approaching before it starts rejecting accounts.

How the tables work. Almost every view in the Admin is a table, and they all behave the same way. What you learn in one tab works in all of them, including the corresponding views in the Manager and White Label applications.
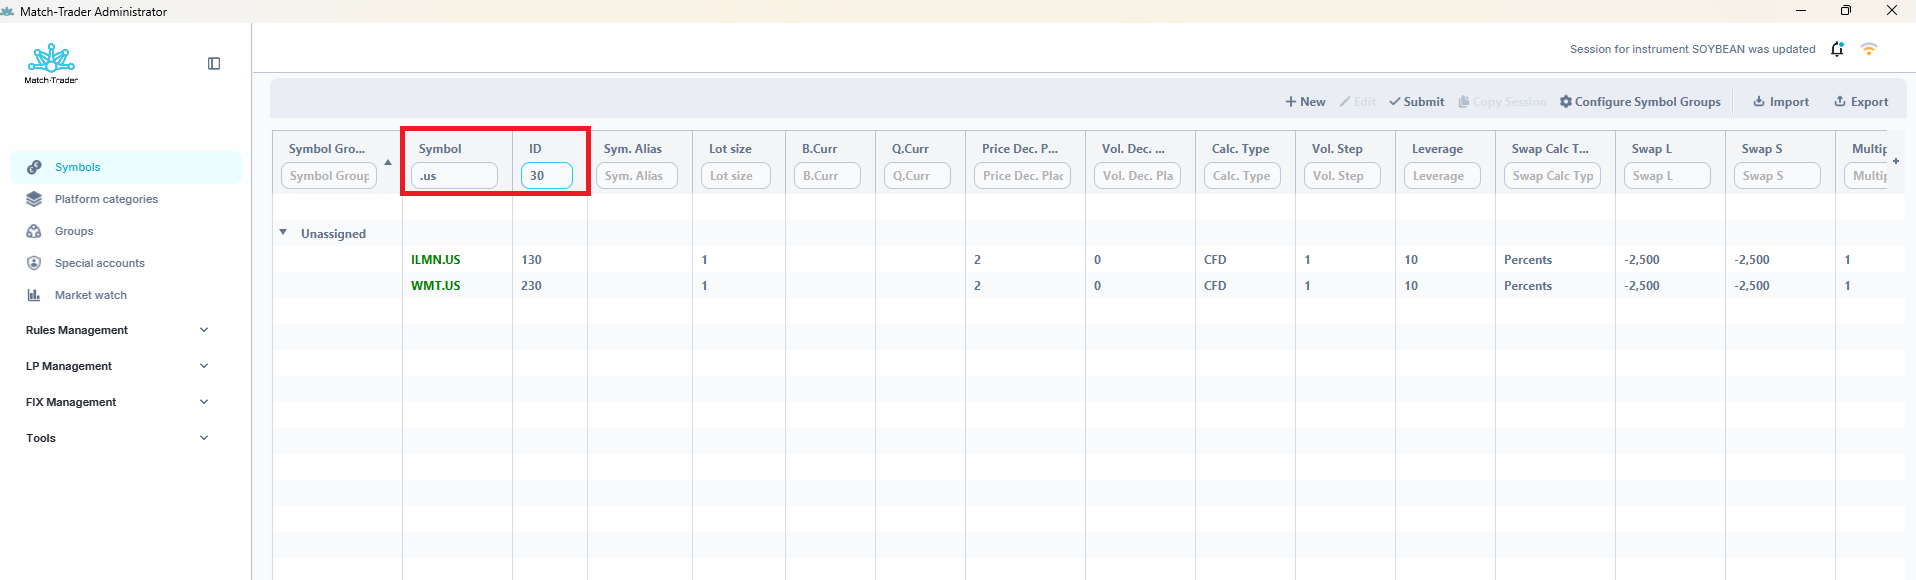
- Search per column – every column has its own search field directly under its header. Filling in more than one narrows a long list down step by step, which is usually faster than scrolling.
- Operators on number columns – number columns accept >, <, >= and <=, so you can look for everything above or below a value instead of an exact match.
- Sorting – click a column header to sort by it.
- Column configuration – you choose which columns are visible in one of two ways, depending on the table. Where there is a “+” icon at the right-hand end of the header row, it opens a list with a checkbox for every column, together with Show all, Hide all and Reset table filters, which clears all the search fields at once. Where there is a columns icon at the top right of the view, you switch between the Default view and your own Custom view, saved with Save as custom view.
- Date fields show an indicator when a date is already set, so it is obvious whether a date filter is active.
- Grouping – instrument lists in Symbols and Configure instruments are grouped by symbol group. The arrow next to a group collapses or expands it.
The lists can also be navigated from the keyboard: arrow keys move through a list, Enter opens details or confirms, ESC closes the current window and Backspace goes one step back.
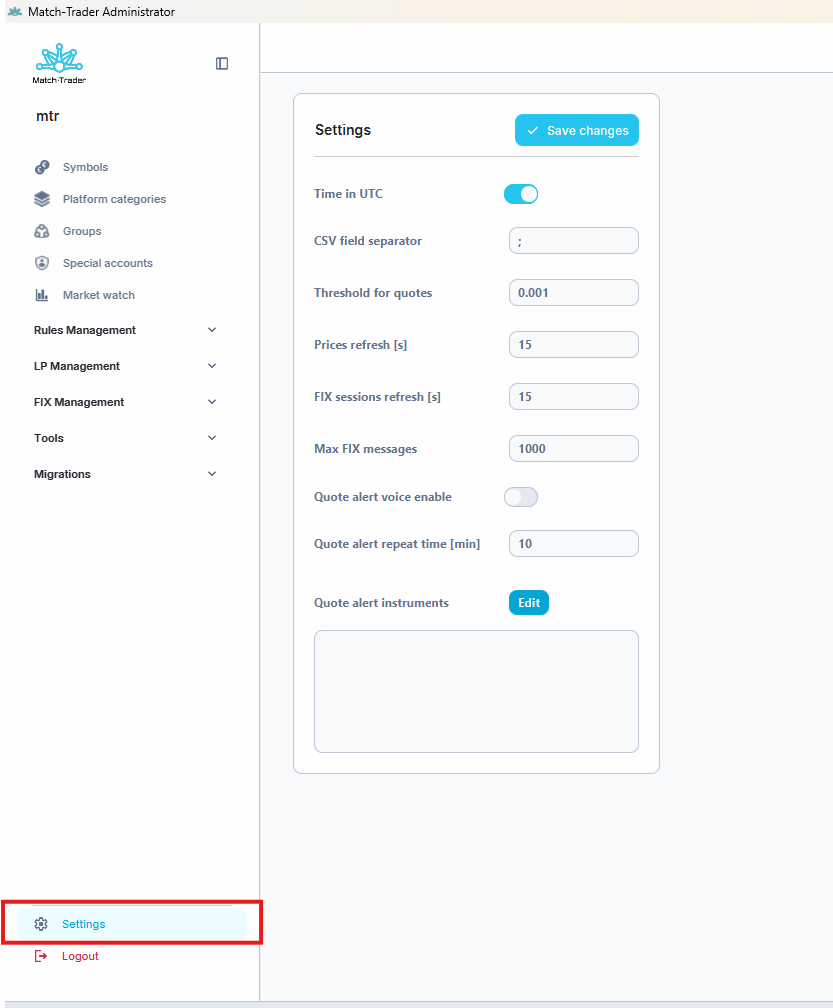
Settings. Settings at the bottom of the menu holds the settings of the application itself. They apply to your own installation, not to the environment; settings that affect the whole environment live in Global configuration under Tools. Save changes applies them.
- Time in UTC – shows times in UTC instead of your local time zone. Worth turning on when you compare notes with someone in another time zone or read logs alongside a colleague.
- CSV field separator – the character separating fields in the files you export. Set it to match what your spreadsheet application expects, otherwise an export opens as a single column.
- FIX sessions refresh [s] – how often, in seconds, the list in FIX sessions monitoring refreshes.
- Max FIX messages – how many FIX messages are kept in the view at once.
- Non-FIX sessions refresh [s] and Max non-FIX messages – the same two settings for Non-FIX sessions monitoring.
Symbols #
The Symbols tab is where instruments are configured. Everything set here is the instrument’s baseline: trading groups can override many of these values for their own clients, but if a group leaves a field empty, the value from this tab applies.
Changes made to an existing symbol take effect as soon as they are submitted and affect open positions. Treat edits on a live instrument accordingly.
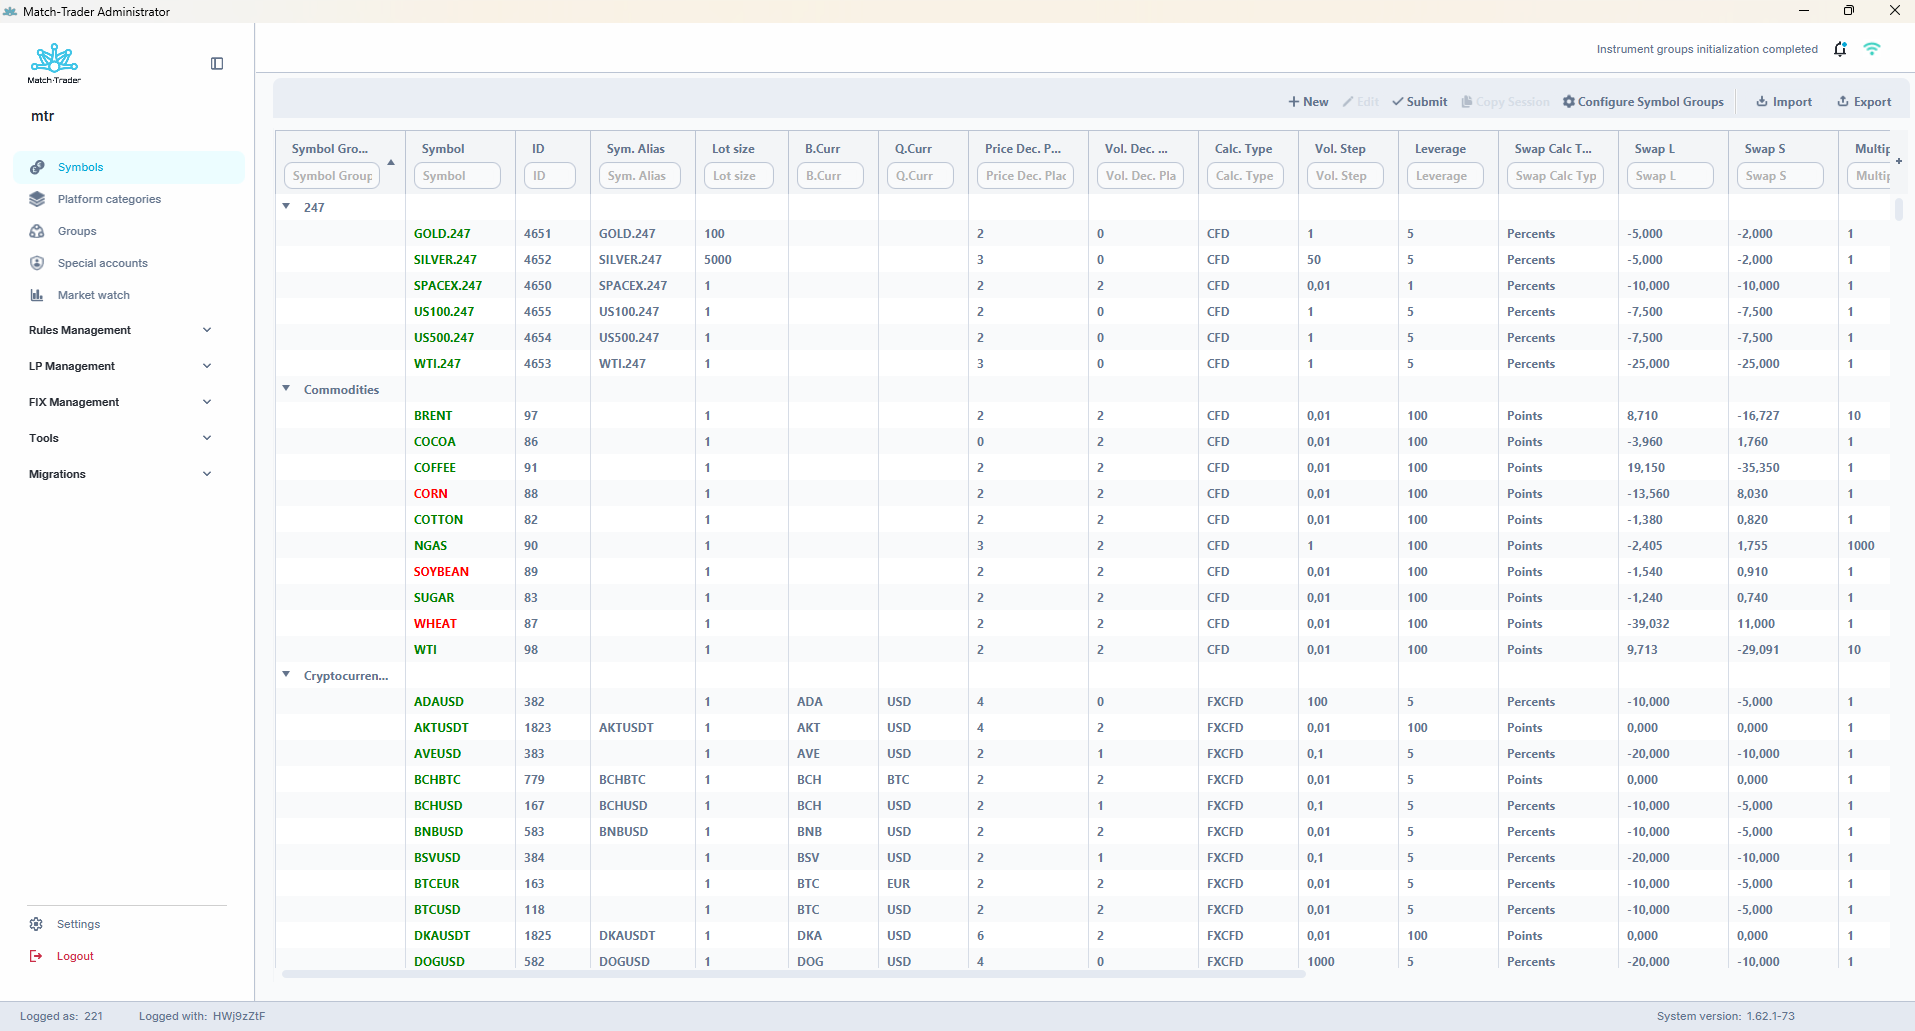
What the columns mean.
- Symbol Group – the symbol group the instrument belongs to. The list is grouped by it – see What a symbol group actually is below.
- Symbol – the name of the instrument in the system.
- ID – the unique identifier of the instrument in the system.
- Sym. Alias – the name shown to traders on the platform. Leave it empty and the Symbol name is used instead. Up to 100 characters; special characters and different alphabets are accepted, and leading or trailing spaces are removed automatically.
- Lot size – the size of one lot on the platform, also treated as the contract size. For example, if lot size for XAUUSD is 100 with Multiplier and Divider both set to 1, opening 1.00 lot opens 100 ounces of XAUUSD.
- B.Curr – the base currency, the first currency in a pair: the one being bought or sold. In EURUSD the base currency is EUR, so you are buying or selling euros.
- Q.Curr – the quote currency, the second currency in a pair: it says how much the base currency is worth. For EURUSD the quote currency is USD, showing the price of 1 EUR in USD. Base and quote currency are used only for the FOREX calculation type and are ignored for CFDs.
- Price Dec. Places – how many digits are shown after the decimal point in the instrument’s price. In other words, the precision of the instrument.
- Vol. Dec. Places – the precision of the order volume. Set to 2, a trader can change position volume in steps of 0.01 contract units.
- Calc. Type – the calculation type of the instrument. See below.
- Vol. Step – the smallest volume increment, offset by the volume decimal places. If Vol. Dec. Places is 0 and Vol. Step is 1, a trader cannot open half a position. For FOREX the default contract size is 100 000 units and the volume step is 1000, because 0.01 lot equals 1000 units.
- Leverage – the default leverage for the instrument. Set to 100, leverage is 1:100, meaning 1% of the position’s nominal value is taken as required margin. Set to 30, leverage is 1:30, meaning 3.33%.
- Swap Calc Type – how swaps are calculated: Points (charged daily) or Percents (annual rate).
- Swap L – the swap value for long positions.
- Swap S – the swap value for short positions.
- Multiplier – increases the nominal value of a position by multiplying the lot size by this value. Applies only to CFD and FXCFD.
- Divider – decreases the nominal value of a position by dividing the lot size by this value. Applies only to CFD and FXCFD. Lot size multiplied by Multiplier and divided by Divider gives the contract size: with lot size 100 for XAUUSD, multiplier 2 and divider 1, opening 1.00 lot opens 200 ounces.
- Mult. Curr. – the currency the instrument is denominated in. For GER30, for example, it is EUR.
- Description – the instrument description shown on the trading platform.
- Delay Yellow [s] – how many seconds without a new quote before the instrument is marked yellow in Market watch, meaning the price is getting stale.
- Delay Red [s] – how many seconds without a new quote before the instrument is marked red, meaning the price should no longer be relied on.
- Termination Type – used for instruments that do not run indefinitely. Expiration means the instrument stops trading on the termination date and settles. Rollover means it rolls over to the next contract on that date instead of ending. Leave it empty for ordinary instruments.
- Termination Date [UTC] – the date on which that happens, chosen from a calendar and given in UTC.
The calculation types. The Calc. Type value decides how margin, nominal value and swaps are worked out for the instrument.
- FOREX – currency pairs. Base and quote currency are used, and the default contract size is 100 000 units.
- CFD – contracts for difference, for example indices, commodities or shares. Nominal value comes from lot size together with Multiplier and Divider.
- FXCFD – used for cryptocurrencies.
- PRED – prediction markets, where the instrument settles against the outcome of an event rather than a market price. Instruments of this type work differently from the rest: leverage does not apply, swaps are always zero, only long positions can be opened and settlement follows its own process. They are traded on retail accounts, and Long Only Mode for Retail is switched on automatically when a PRED instrument is added to a group. B2B accounts can trade them only to hedge the exposure of retail clients: they can buy, and sell only to close the buy positions they hold. PRED instruments cannot be added to Platform categories.
The toolbar.
- New – opens the New Symbol window to add an instrument.
- Edit – changes the instruments you selected, one or several at once – see Changing many instruments at once below. Edit and Copy Session become available once an instrument is selected.
- Submit – saves the changes made in the table. Nothing is applied until you submit.
- Copy Session – copies the trading session of one instrument onto other instruments, which saves setting the same hours repeatedly.
- Configure Symbol Groups – manages symbol groups, described below.
- Import – uploads a configuration from a CSV file to the server.
- Export – downloads the whole configuration to a CSV file. Exporting before a bulk change gives you something to fall back on.
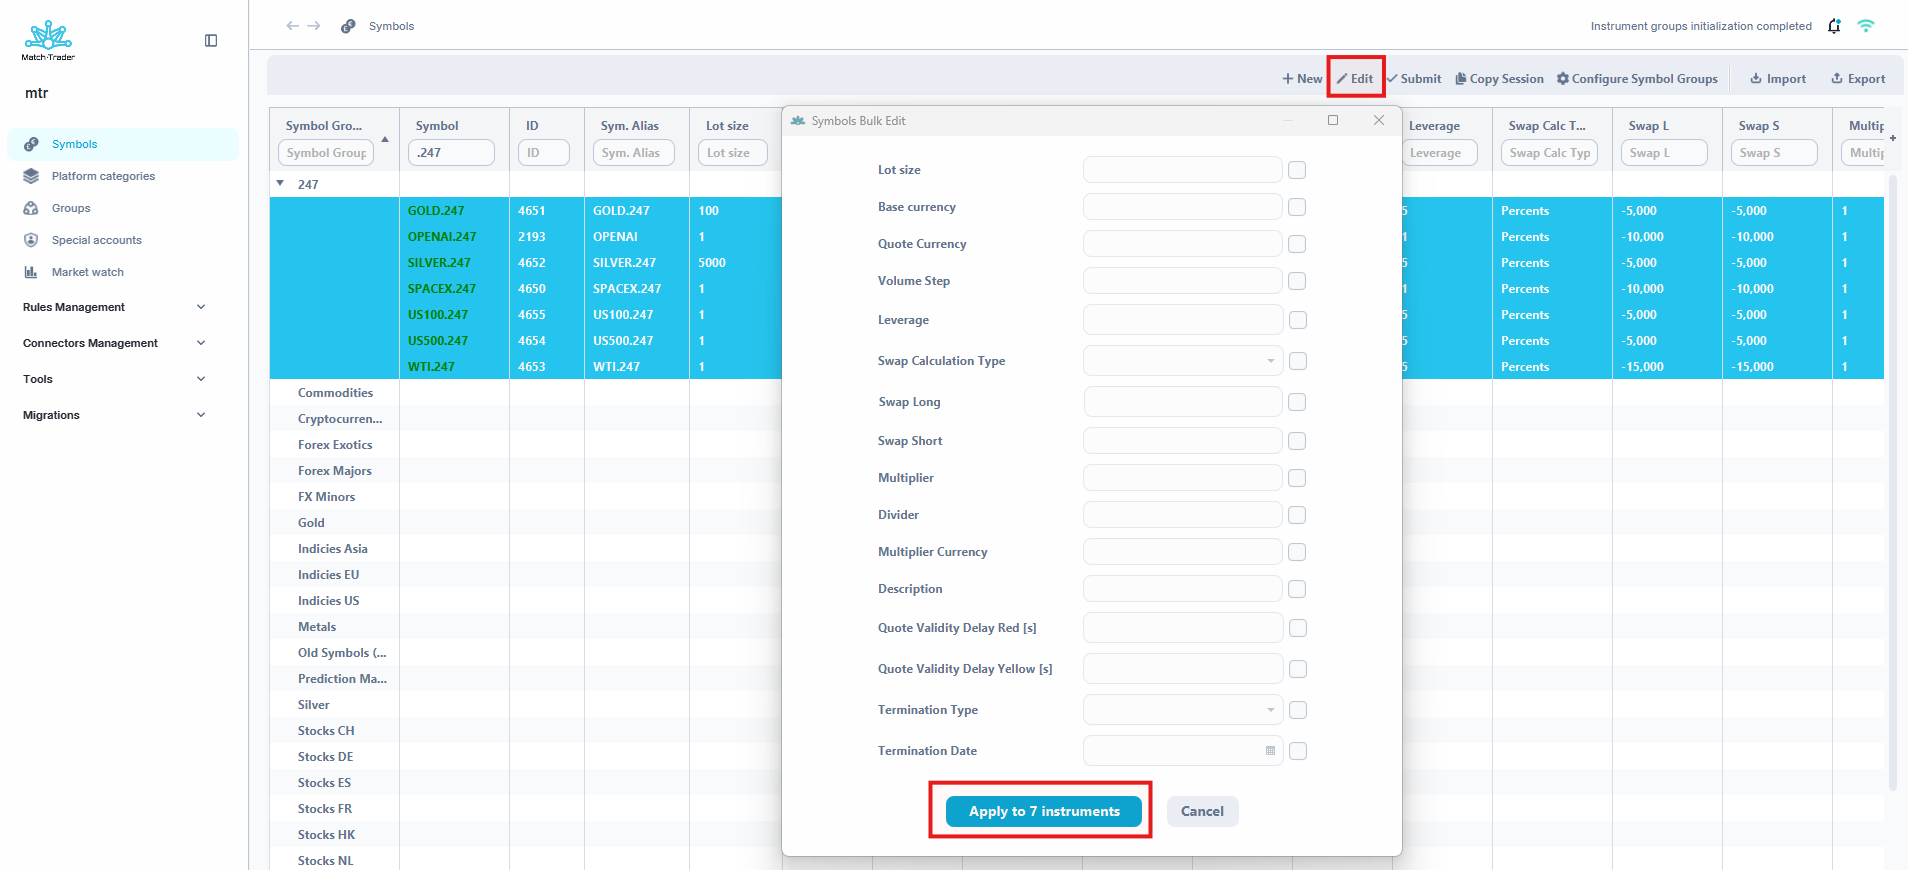
Changing many instruments at once. Select the instruments in the list – one or several – and click Edit to open Symbols Bulk Edit. It holds the fields that can be changed this way: Lot size, Base currency, Quote Currency, Volume Step, Leverage, Swap Calculation Type, Swap Long and Swap Short, Multiplier and Divider, Multiplier Currency, Description, both quote validity delays, and Termination Type and Termination Date. Tick the checkbox next to each field you want to change: only ticked fields are applied, and the button at the bottom – for example Apply to 3 instruments – says how many instruments the change will reach.
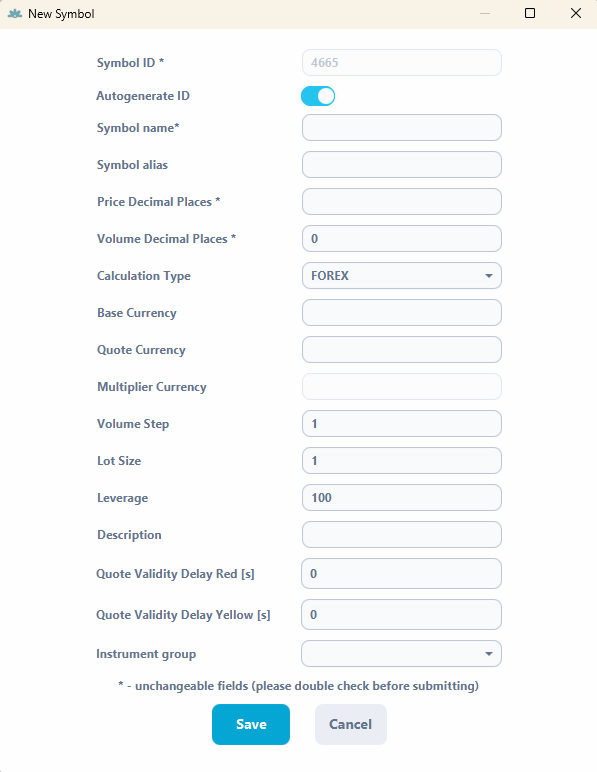
The New Symbol window asks for the basic definition of the instrument: Symbol ID and Autogenerate ID, Symbol name, Symbol alias, Price Decimal Places, Volume Decimal Places, Calculation Type, Base Currency, Quote Currency, Multiplier Currency, Volume Step, Lot Size, Leverage, Description, Quote Validity Delay Red [s], Quote Validity Delay Yellow [s] and Instrument group. Swaps, multiplier and divider, and termination are set afterwards – in the table or with Edit.
Fields marked with an asterisk – Symbol ID, Symbol name, Price Decimal Places and Volume Decimal Places – cannot be changed after the instrument is created, so check them before saving; the window reminds you of that at the bottom. Calculation Type cannot be changed afterwards either, even though it has no asterisk. Autogenerate ID lets the system assign the identifier for you, and Instrument group assigns the instrument to a symbol group straight away.
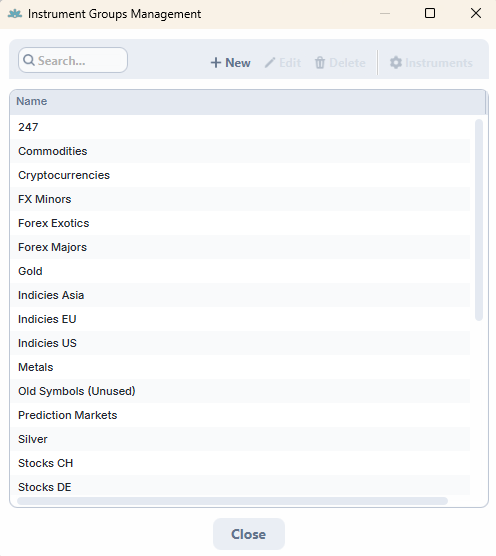
What a symbol group actually is. A symbol group is simply a label you put on a set of instruments – Forex, CFD, Crypto, or whatever grouping suits your offer. It changes nothing about how those instruments trade. Its only purpose is to let you pick out a whole asset class in one click instead of scrolling through the full list.
This matters once an environment has a few thousand instruments. Rather than searching for every crypto symbol by name, you assign them all to a Crypto group once, and from then on the group works for you wherever instruments are listed: Symbols and Configure instruments are grouped by it, the instrument filter in Market watch can narrow the list to chosen groups, and a whole symbol group can be assigned to a client group at once.
Symbol groups are managed with the Configure Symbol Groups button on the toolbar, which opens Instrument Groups Management. New adds a group, Edit renames it and Delete removes it. Instruments opens the Available and Selected lists for the selected group, where you assign instruments to it – the arrow buttons move the highlighted instruments or the whole list, and the Filter field helps find them. An instrument belongs to one symbol group at a time. The assignment is also part of the configuration exported and imported with Export and Import on the toolbar, which is the practical way to sort a large batch of instruments at once. Instruments you have not assigned anywhere are listed under Unassigned, which appears only while it holds instruments and makes it easy to see what is still left to sort. Deleting a symbol group moves its instruments there.
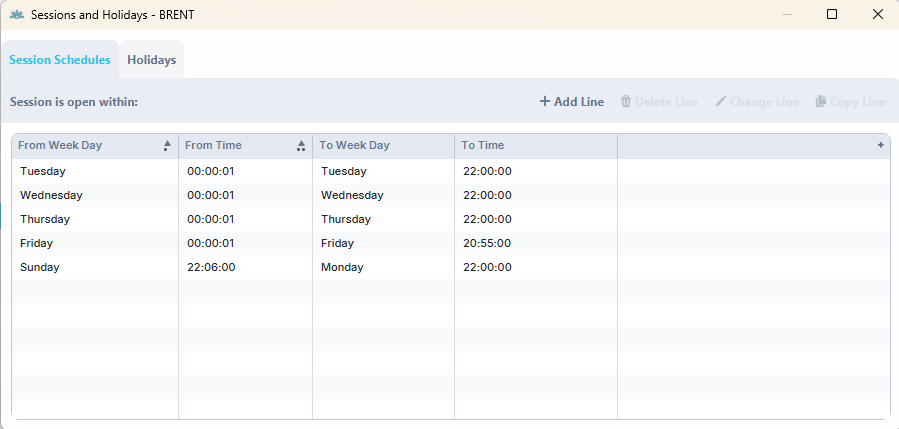
Trading sessions and holidays. Double-clicking an instrument opens the Sessions and Holidays window, where its trading hours are defined.
The Session Schedules tab lists the periods during which the session is open. Each line has a From Week Day and From Time, and a To Week Day and To Time – so a single line can span several days, for example Sunday 00:00:01 through Saturday 23:59:59 for an instrument that trades around the clock. Add Line, Change Line, Delete Line and Copy Line manage the entries; a new line is entered in the New Schedule Entry window as Start Day, Start Time, End Day and End Time. All times are in UTC.
The Holidays tab shows the exceptions that apply to this instrument – the days when it does not trade, or trades on shortened hours. Holidays override the normal schedule. The rules themselves are created and edited in the Holidays tab under Rules Management, where one rule can cover many instruments at once.
Right-clicking an instrument in the list lets you open or close its session manually, without touching the schedule. This is the quick way to react to an unplanned market closure.
Platform categories #
Platform categories decide how instruments are grouped for traders on the platform. A category is a named set of instruments – Popular, FX, Crypto, Commodities, Indices, Stocks and so on – and both the order of the categories and the order of instruments inside them is what the trader sees in the platform’s instrument list.
This is presentation only. Putting an instrument in a category does not change any of its trading parameters, and it is separate from symbol groups: symbol groups are an internal filter for your own work in the Admin, platform categories are what the trader browses.
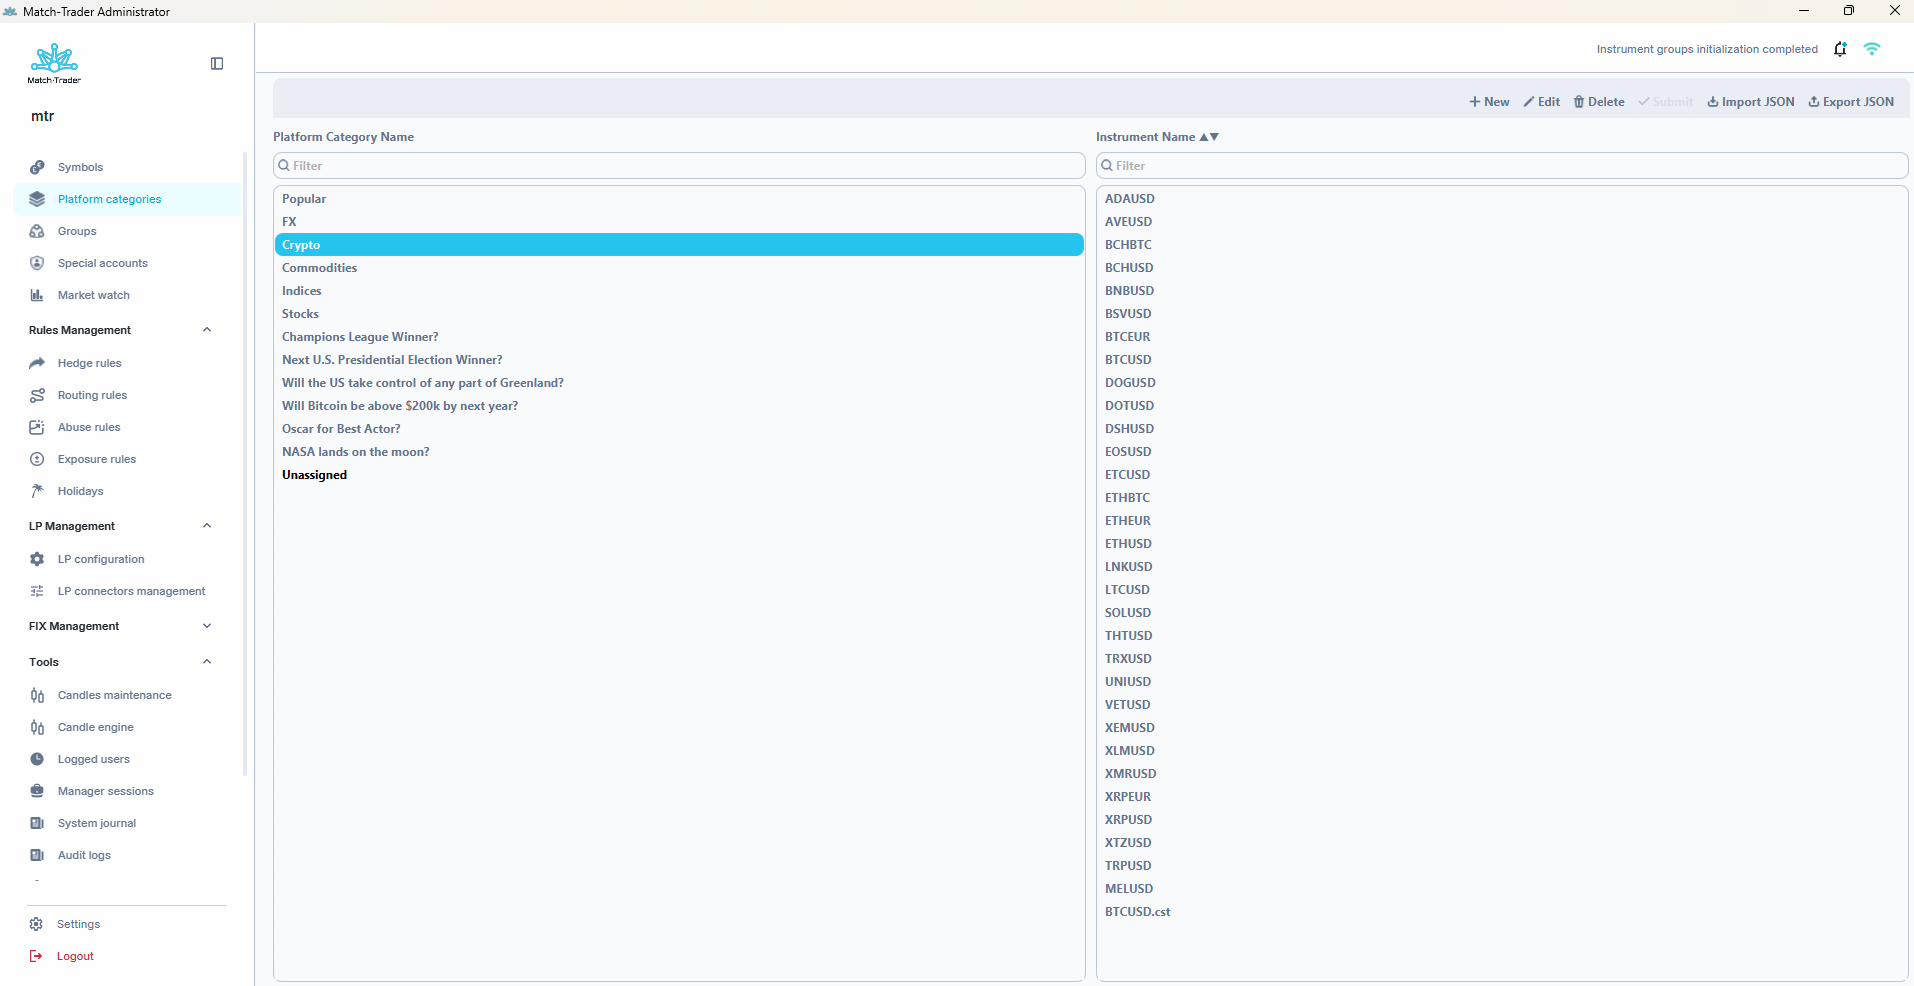
The view is split in two. Platform Category Name on the left lists the categories, Instrument Name on the right lists the instruments of the category you selected. Both lists have their own Filter field.
Creating and editing categories. New opens the Create Platform Category window. Enter a Platform Category Name, then move instruments from the Available list to the Selected list with the arrow buttons – single arrows move the highlighted instruments, double arrows move the whole list. The Filter field above the lists helps when there are a few thousand instruments to choose from. Instruments of the PRED type are not listed and cannot be added to a category.
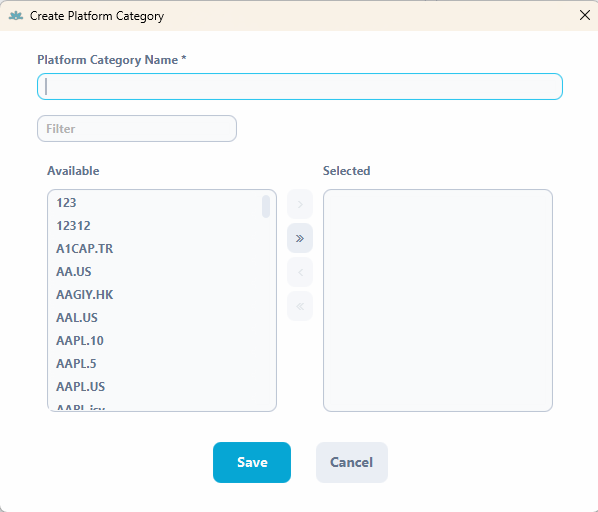
Edit changes the name of the selected category or the instruments in it. Delete removes the category, and its instruments go back to Unassigned. Submit confirms your changes – nothing reaches the platform until you submit.
Moving a finished layout to another environment. Import JSON and Export JSON move a complete category configuration between environments, which is the practical way to replicate a finished layout instead of rebuilding it by hand. The order of categories and instruments is preserved on both export and import.
Ordering. Categories and the instruments inside them are reordered by dragging them. The Unassigned category always stays at the end of the list and cannot be moved – it collects every instrument you have not placed in a category, so it doubles as a checklist of what is left to sort. Category names accept different alphabets and special characters.
Groups #
A trading group is the set of conditions a client trades on: deposit currency, leverage, commissions, stopout levels, reporting and which instruments are available. Every trading account belongs to exactly one group, so in practice the group is where you shape your offer – a demo group, a retail group and a professional group are the same platform with different group settings.
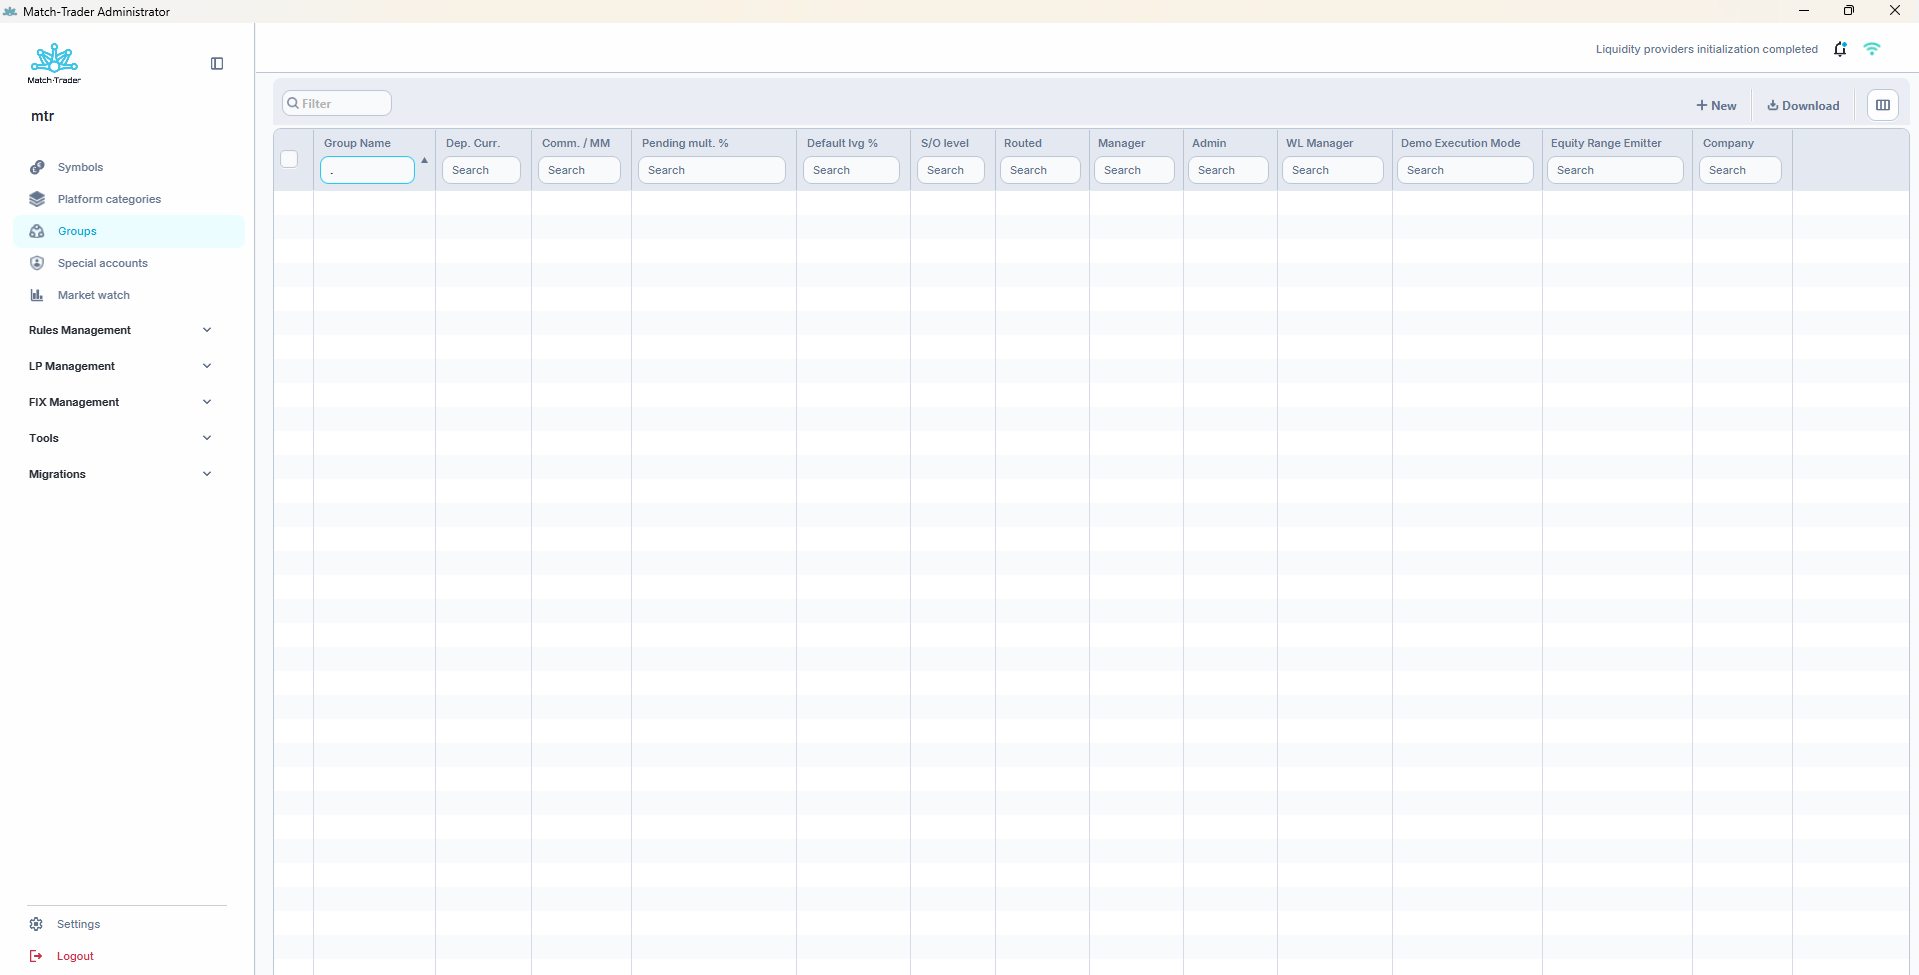
What the group list shows.
- Group Name – the name of the group.
- Dep. Curr. – the deposit currency of the group.
- Comm. / MM – the default commission per million USD traded.
- Pending mult. % – the percentage applied as margin for pending orders. Applies only to accounts in FIFO mode.
- Default lvg % – the leverage percentage every account created in the group starts with. It works together with the instrument leverage: with instrument leverage 30 and this value at 100, final leverage on that instrument is 1:30 (3.33% margin); with this value at 200, it becomes 1:60 (1.67%).
- S/O level – the level at which accounts in the group reach stopout.
- Routed – whether trades from this group are hedged with a liquidity provider.
- Manager, Admin, WL Manager – whether accounts in this group hold the Manager, Admin or White Label Manager role. These are the groups used for staff accounts rather than clients.
- Demo Execution Mode – whether the group executes orders without consuming liquidity. Explained below.
- Equity Range Emitter – has to be enabled for prop trading groups so that trading rules can be monitored.
- Company – the name of the broker company the group belongs to.
More columns. The columns icon at the top right lets you add columns that are hidden by default – Dep. Curr. Dec. Places, Agent Comm, Proc. delay and Assigned Symbol Groups – and keep the layout as your Custom view.
New creates a group. Download exports the list. Double-clicking a group opens Group Details, where everything else is configured. Right-clicking a group ticks it and opens a menu with Edit group, Copy group and Delete group. With several groups ticked, the menu offers Bulk edit group instruments, Bulk edit EOD/EOM and Bulk edit swaps config instead, which apply the same settings to all of them at once.
The Group Details window is organised into tabs: Main Configuration, Swaps, EOD/EOM, Restrictions, Archiving, Group History and Instruments History. Two buttons at the top open separate windows – Configure Instruments, available once the group has been saved, and Configure SMTP – and Save and Cancel apply or discard everything you changed across the tabs.
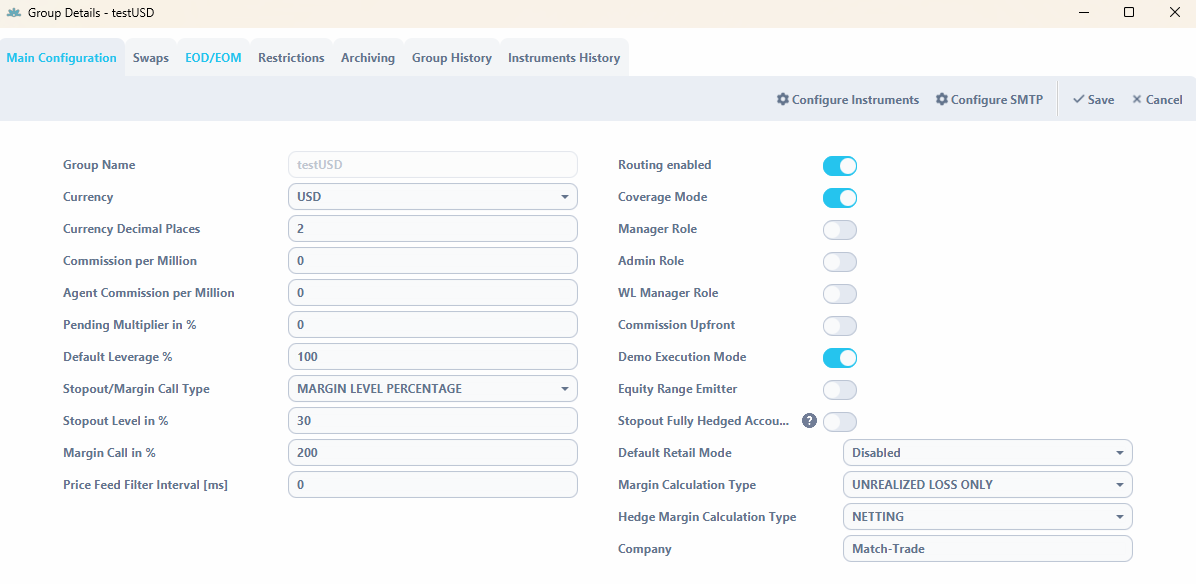
Main Configuration.
- Group Name – the name of the group. It cannot be changed after the group is created.
- Currency – the deposit currency of the group.
- Currency Decimal Places – the precision used for the deposit currency.
- Commission per Million – the commission charged for one million of turnover in this group.
- Agent Commission per Million – the part of that commission which goes to agent accounts. The agent commission is included in the broker commission: set 10 here as Commission per Million and 2 as Agent Commission per Million, and the broker receives 8 while the agent receives 2 per million.
- Pending Multiplier in % – the percentage applied as margin for pending orders. Applies only to accounts in FIFO mode.
- Default Leverage % – the leverage percentage assigned to every account created in the group. See Leverage configuration for the full calculation.
- Stopout/Margin Call Type – how stopout is calculated. ABSOLUTE EQUITY USD triggers stopout when equity falls to a fixed amount: a trader with a balance of $5000 whose equity, meaning balance including open positions, drops to $3000 or below – with the level set to 3000 – has positions closed after roughly 2 seconds, beginning with the largest loss. MARGIN LEVEL PERCENTAGE triggers when the ratio of equity to used margin falls to the configured percentage: with the level at 30%, positions are closed after roughly 2 seconds, starting with the largest loss, until the level is back above 30% or all positions are closed. OFF switches stopout and margin call off for the group.
- Stopout Level in % – the level at which stopout is triggered, in the unit set by the type above.
- Margin Call in % – the level at which clients receive a margin call notification. Set to 50, accounts are notified when their margin level drops to 50% or lower.
- Price Feed Filter Interval [ms] – delays execution of trades in milliseconds. Used against scalping.
- Routing enabled – allows orders from this group to be routed to a liquidity provider. The group also has to be configured in Routing rules.
- Coverage Mode – used when hedging exposure with an external liquidity provider, so that netted exposure is reflected correctly in the position summary. When you are fully hedged, the position summary should show no exposure.
- Manager Role, Admin Role, WL Manager Role – whether users in this group hold the Manager, Admin or White Label Manager role.
- Commission Upfront – charges the whole commission when the trade is opened, rather than splitting it between opening and closing.
- Demo Execution Mode – orders are executed at market prices without affecting the order book, so they do not consume available liquidity. Orders are processed under the Fill or Kill rule: they are either filled completely or rejected. If an order exceeds available liquidity the system cannot determine an execution price and returns a Not enough liquidity error. Execution prices use the volume weighted average price. For example, with order book lines of 5, 10 and 15 lots, an order for 40 lots is rejected, while an order for 29 lots is executed and the order book stays unchanged.
- Equity Range Emitter – has to be enabled for prop trading groups in order to monitor trading rules.
- Stopout Fully Hedged Accounts – stops out clients whose positions have a total margin of 0 and equity below 0. Available only when Hedge Margin Calculation Type is set to NETTING, which is why the option appears inactive on groups set to another type.
- Default Retail Mode – when enabled, accounts newly created in this group work in retail mode; when disabled, they are created in FIFO mode. Existing accounts are not affected. In FIFO mode, First In First Out, positions cannot be opened in opposite directions on the same instrument: with a 1.0 lot buy on EURUSD, opening a 0.3 lot sell partially closes the buy and leaves 0.7 lot. Take Profit and Stop Loss are also unavailable in FIFO mode.
- Margin Calculation Type – UNREALIZED LOSS ONLY means free margin equals equity counting unrealised loss, minus margin. UNREALIZED PROFIT LOSS means it counts both unrealised loss and unrealised profit.
- Hedge Margin Calculation Type – how margin is calculated when an account holds opposite positions on the same instrument. NETTING calculates it after positions are netted, so with 2 lots of EURUSD buy and 1 lot of EURUSD sell open on the account, margin is calculated on 1 lot. LARGER_LEG takes the side with the larger total margin, so the same case is margined on the 2 lots bought. BOTH_SIDES adds up the margin of every position, even opposite ones: a 1 lot buy margined at 1,000 USD and a 1 lot sell margined at 1,100 USD require 2,100 USD. It is not applied to B2B accounts. Changing the type recalculates margin on all accounts in the group.
- Company – the name of the broker company the group belongs to.
EOD/EOM controls the daily and monthly reports sent to clients in this group.
- Always Generate Account Snapshot – captures and stores account snapshots regardless of the report settings below.
- EOD Reports Mode and EOM Reports Mode – whether daily and monthly reports are sent, and in what form: 0=Off, 1=Basic or 2=Extended.
- Account Snapshot Generation Time – the time of day the reports are generated, in UTC.
- Exclude Empty EOD Report and Exclude Empty EOM Report – stop reports being sent to clients who had no trading activity in the period.
Restrictions caps how many positions a client may hold at once. Under Maximum number of open positions for retail clients, Open Positions Limit Enabled switches the limit on and Open Positions per Client sets how many open positions each retail client may have. With the limit off, the value is ignored.
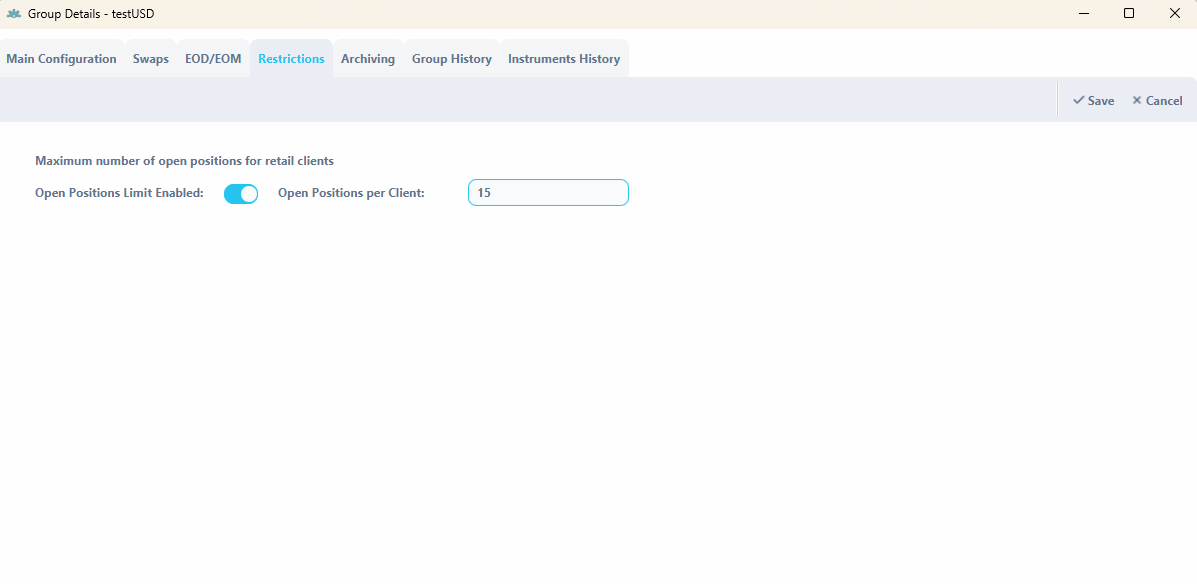
Archiving deletes trading accounts that have been inactive for too long. Delete Inactive Accounts After sets the period – a day, a week, a month, three months, half a year or a year – or switches archiving off with disabled. An account counts as inactive when it has submitted no orders within that period. Accounts with access rights to archive narrows it down to accounts with the selected access rights – Full access, Login & Trading Disabled, Trading disabled, Close only and Locked close only; accounts with a right you have not selected are left alone.
Archiving runs once a day. Before an account is deleted, its pending orders are cancelled, its open positions are removed and its balance and credit are set to zero – so switch it on only where that is acceptable, typically on demo groups.
Group History shows what was changed on the group within the period set in From and To – Get data loads it – with Event type, Message holding the details of the change, Admin ID identifying the admin or system that made it, and Token Name. Instruments History shows the same for changes made to individual instruments within the group. These two tabs are the quickest way to answer “who changed this group, and when” without going through the logs.
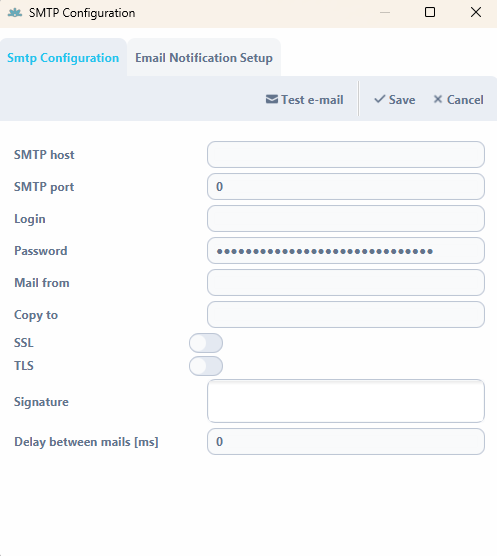
Configure SMTP opens a separate window where you set the mail server used to send this group’s reports and notifications – end of day and end of month reports, stopout and margin call messages.
- SMTP host and SMTP port – the mail provider’s host and port.
- Login and Password – the mailbox credentials.
- Mail from – the address the messages are sent from.
- Copy to – an address that receives a copy of every report.
- SSL and TLS – which encryption the connection uses.
- Signature – the signature added to outgoing mail.
- Delay between mails [ms] – the pause between messages, in milliseconds. Useful when the provider rate-limits sending.
A Test e-mail button at the bottom checks that the settings work before you rely on them. A second tab, Email Notification Setup, controls whether messages about deposits and withdrawals, credit in and out, and margin calls are sent.
Configure instruments #
The Configure Instruments button in Group Details opens the instrument settings for that one group. This is where a group stops being a set of general conditions and becomes a concrete offer: which instruments the group can trade at all, and on what terms.
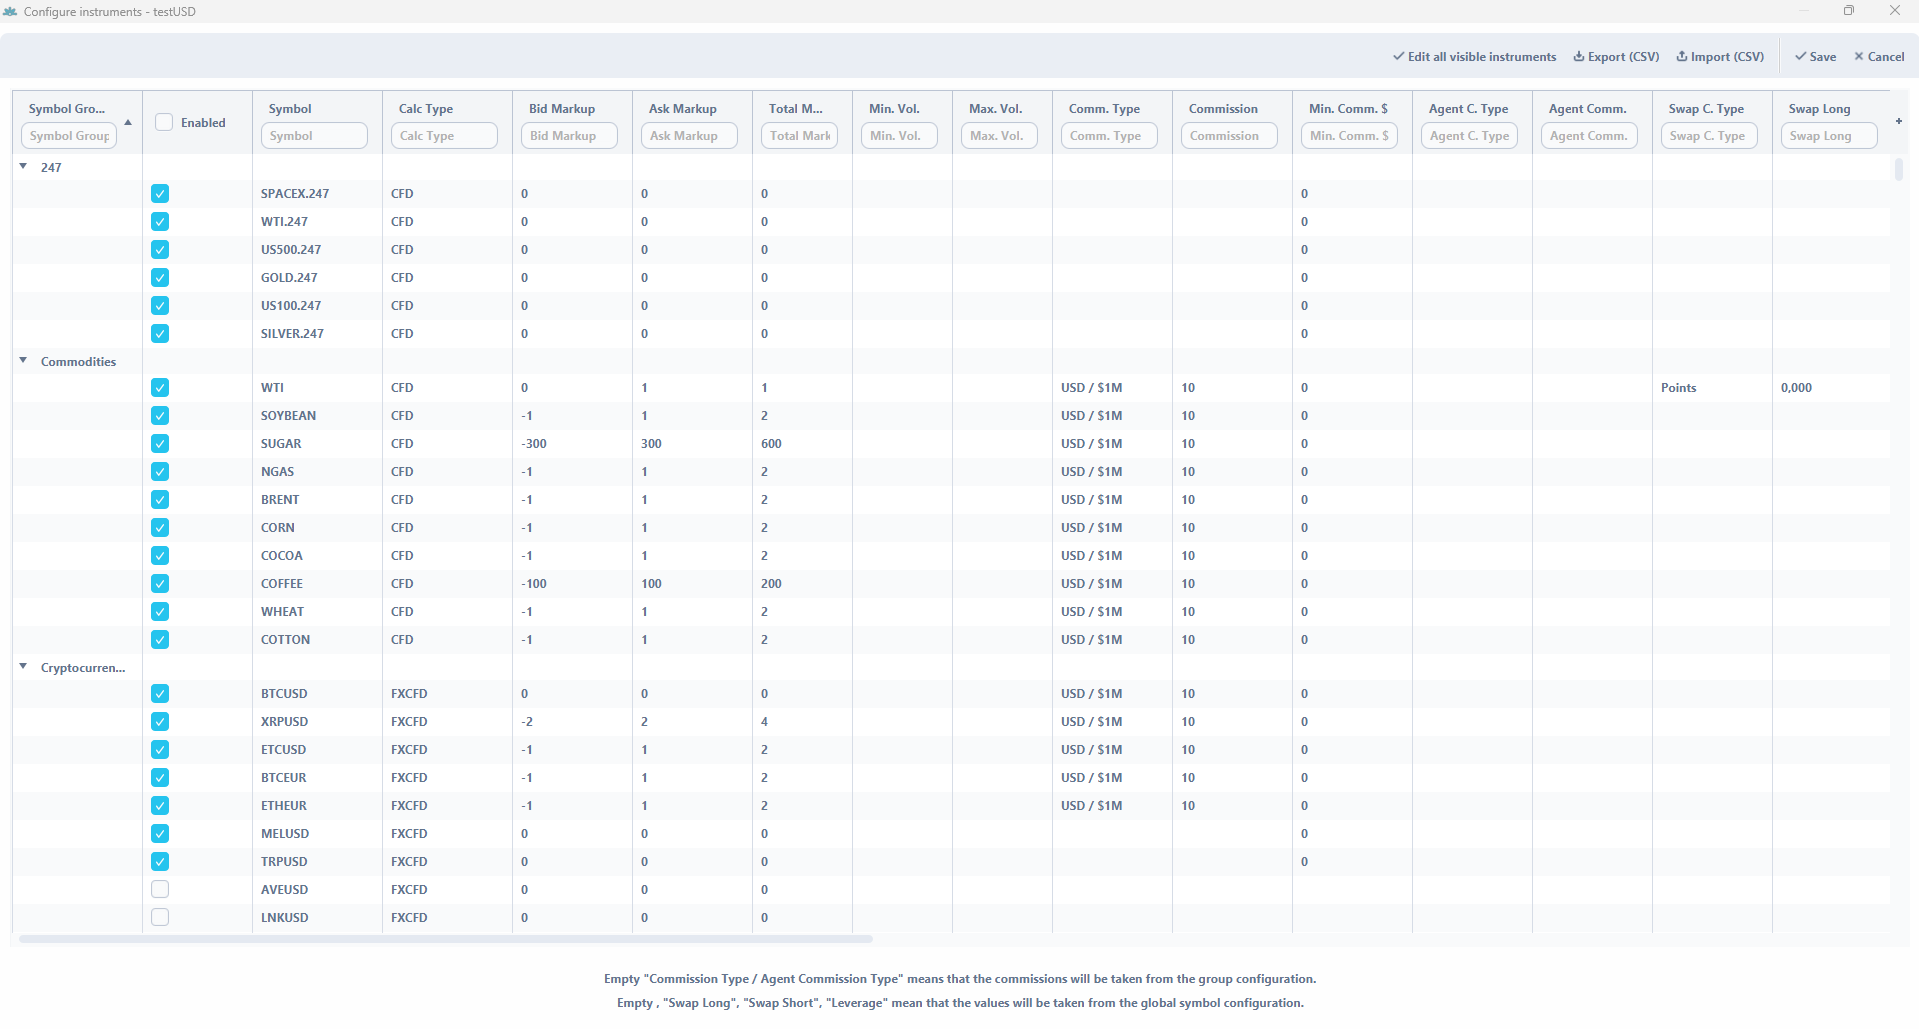
An empty field means “inherit”, not “zero”. This is the single most important thing to understand about this window, and it saves a lot of confusion later. Leave Commission Type or Agent Commission Type empty and the commission is taken from the group configuration. Leave Swap Long, Swap Short or Leverage empty and the values are taken from the instrument’s own configuration in the Symbols tab.
Fill a field in and it overrides the inherited value for this group only. So if you want one group to trade EURUSD on tighter leverage than everyone else, you set it here rather than changing the instrument globally. The application shows the same reminder at the bottom of the window.
Instruments are listed grouped by their symbol group, so you can collapse everything except the asset class you are working on.
Deciding whether an instrument is available.
- Enabled – whether the instrument is quoted and tradable in this group at all. This is the master switch; the checkbox in the column header switches it for all instruments in the list.
- Disable Trading – keeps sending live prices for the instrument but blocks trading on it. Use this rather than Enabled when you want clients to keep seeing the market but not act on it.
- Close Only Mode for Retail – existing positions can be closed but no new ones opened. Applies to retail accounts.
- Long Only Mode for Retail – only buy positions can be opened on the instrument. Applies to retail accounts. It is switched on automatically when an instrument of the PRED type is added to the group.
Price and volume.
- Bid Markup – the markup applied to the bid price, in whole points. It is entered as a negative value, because lowering the bid is what widens the spread on that side: -2 lowers the bid by 2 points.
- Ask Markup – the markup applied to the ask price, in whole points, entered as a positive value: 2 raises the ask by 2 points.
- Total Markup – how much the two markups widen the spread together, calculated for you as Ask Markup minus Bid Markup: with -2 and 2 it is 4. It is the widening of the spread the client actually sees. Markups set at provider level in LP configuration are applied before these, so the client’s spread is the raw spread plus the provider-level markup plus this one.
- Min. Vol. – the smallest position size, in lots. Set to 0.1, a trader cannot open less than 0.1 lot.
- Max. Vol. – the largest position size, in lots. Set to 1, no single position may exceed 1 lot. Note that this caps individual positions, not the total: a trader can still open several of them. To cap the total, use Max. Exposure $ below or an exposure rule.
Commission.
- Comm. Type – how the client commission is calculated on this instrument. The available types are USD / $1M, USDc / Contract, USDc / Lot, 1/10% (permills) and Points. Each one is explained with its formula and a worked example in Commission configuration below.
- Commission – the value of the commission, in the unit implied by the type.
- Min. Comm. $ – a floor on the commission. If the calculated amount comes out below this, this value is charged instead.
- Agent C. Type and Agent Comm. – the same two settings for the agent’s share. Setting the agent commission per instrument here is one of two possible methods; the other is per group. Use only one method per group – see Commission configuration.
Leverage.
- Leverage – custom leverage for this instrument in this group. Left empty, the value from the Symbols tab applies. Set to 100, leverage is 1:100, meaning 1% of the position’s nominal value is required as margin; set to 30, it is 1:30, meaning 3.33%.
- Fixed Leverage – decides whether the value above is final or still multiplied by the account’s Leverage %. With account Leverage % at 200 and instrument leverage at 30: unchecked gives a final ratio of 1:60 (1.67%), checked gives 1:30 (3.33%). Check this box when you need a hard limit on an instrument regardless of what the account is set to.
Swaps.
- Swap C. Type – how swaps are calculated for this instrument in this group: Points (daily) or Percents (annual).
- Swap Long and Swap Short – the swap values for long and short positions. Left empty, the values from the Symbols tab apply.
- Swap Markup (%) Long and Swap Markup (%) Short – a percentage markup applied on top of the swap value. Negative values down to -100% are allowed, which lets you reduce swaps instead of increasing them. The formula and worked examples are in Swaps and swap markups below.
- Total Swap Long and Total Swap Short – the resulting swap after the markup is applied, calculated for you.
- Swaps multipliers – whether the per-day multipliers from the group’s Swaps tab apply to this instrument. If this box is not checked, those settings are ignored for it – this is the most common reason a configured three-day swap does not appear.
- Swap Schedule Type – whether swaps are charged every given number of Days or Hours.
- Swap Schedule Value – how many days or hours, in the unit chosen above.
- Swap Free Days – how many days after a position is opened no swaps are charged. Set to 7, the first swap is charged on the eighth day after the trade was opened.
Risk. Max. Exposure $ sets the maximum exposure, in USD, that a single client in this group may hold on this instrument. Above this value the client cannot increase the position further. For limits that span several instruments or whole groups, use Exposure rules instead.
Changing many instruments at once. Editing a few thousand instruments one by one is not realistic, so the window has tools for it. They respect the per-column search fields, which is what makes them safe: filter the list first, confirm you are looking at exactly the instruments you mean, then act.
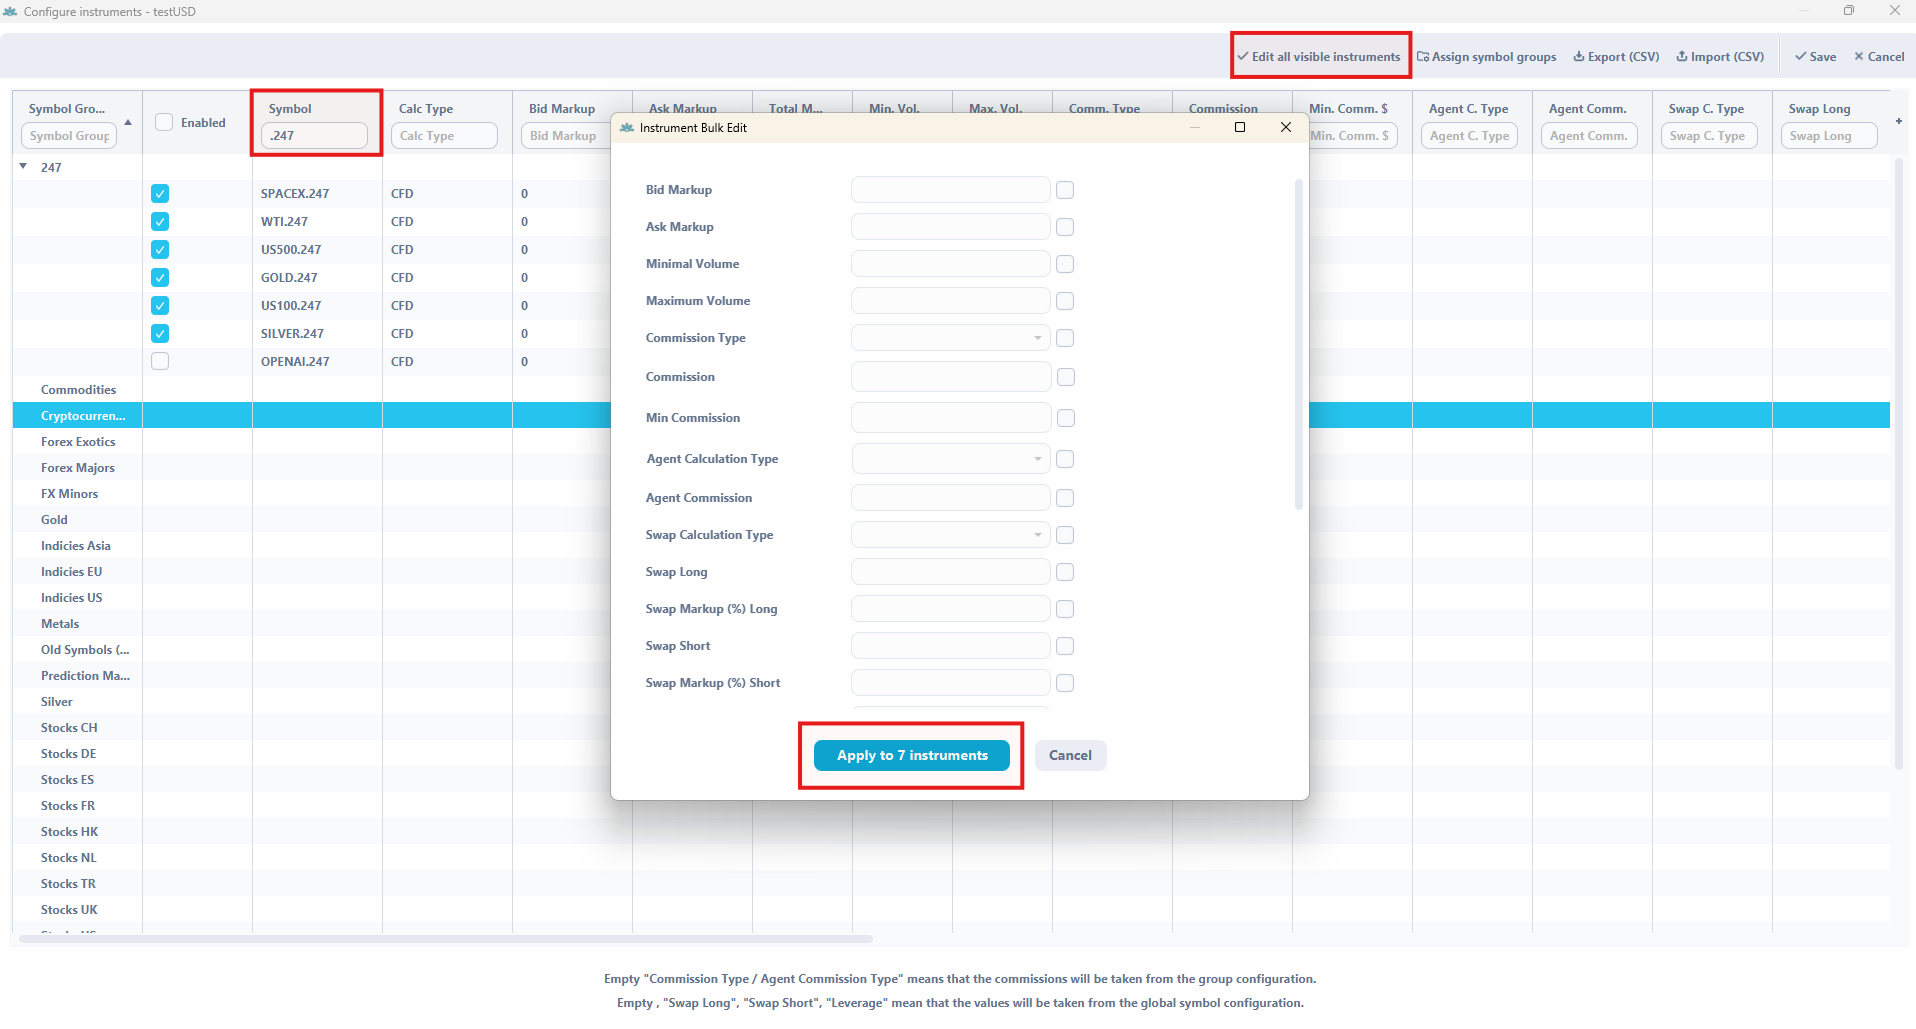
- Edit all visible instruments – opens Instrument Bulk Edit for every instrument currently displayed. Tick the checkbox next to each field you want to change and enter the value: only ticked fields are applied, and the button at the bottom says how many instruments will be affected – for example Apply to 7 instruments. Because it works on what is displayed, the filter you applied beforehand is what defines the scope.
- Assign symbol groups – links whole symbol groups to this client group, described below.
- Export (CSV) – downloads the current configuration. Worth doing before any bulk change, both as a starting point for editing and as something to fall back on.
- Import (CSV) – uploads an edited file to apply the changes.
Save applies everything; Cancel discards it. Nothing takes effect until you save.
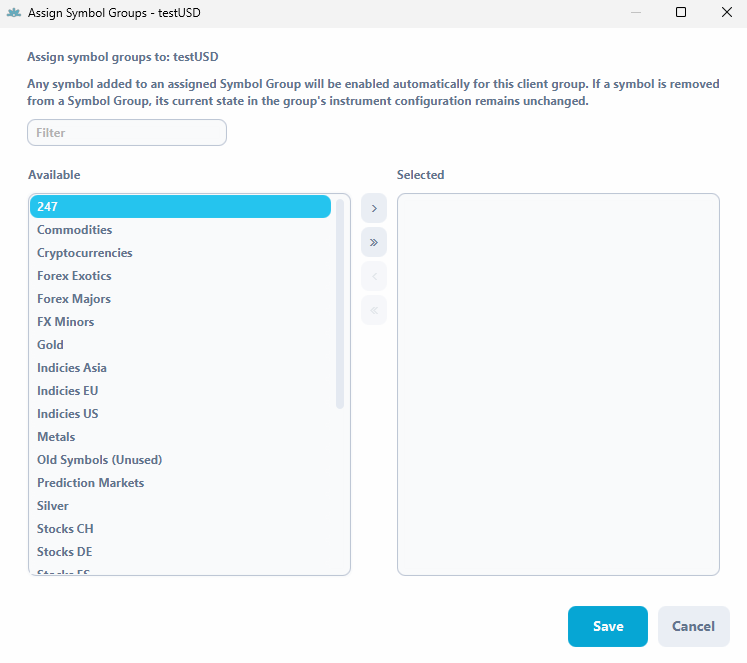
Enabling new instruments automatically. Assign symbol groups opens a window with Available and Selected symbol groups for this client group. Any instrument later added to a selected symbol group is enabled for the client group automatically – useful when new instruments appear regularly, such as new prediction markets, because nobody has to switch them on group by group. If an instrument is removed from the symbol group, its current state in the client group stays as it is. Which symbol groups a client group has assigned can be shown in the group list with the Assigned Symbol Groups column.
Swaps and swap markups #
A swap is the financing cost of holding a position overnight. Three separate things decide what a client is actually charged: the swap value, the markup applied to it, and the schedule that says when it is charged. They are configured in different places, which is why swaps are the setting most often reported as “not working”.
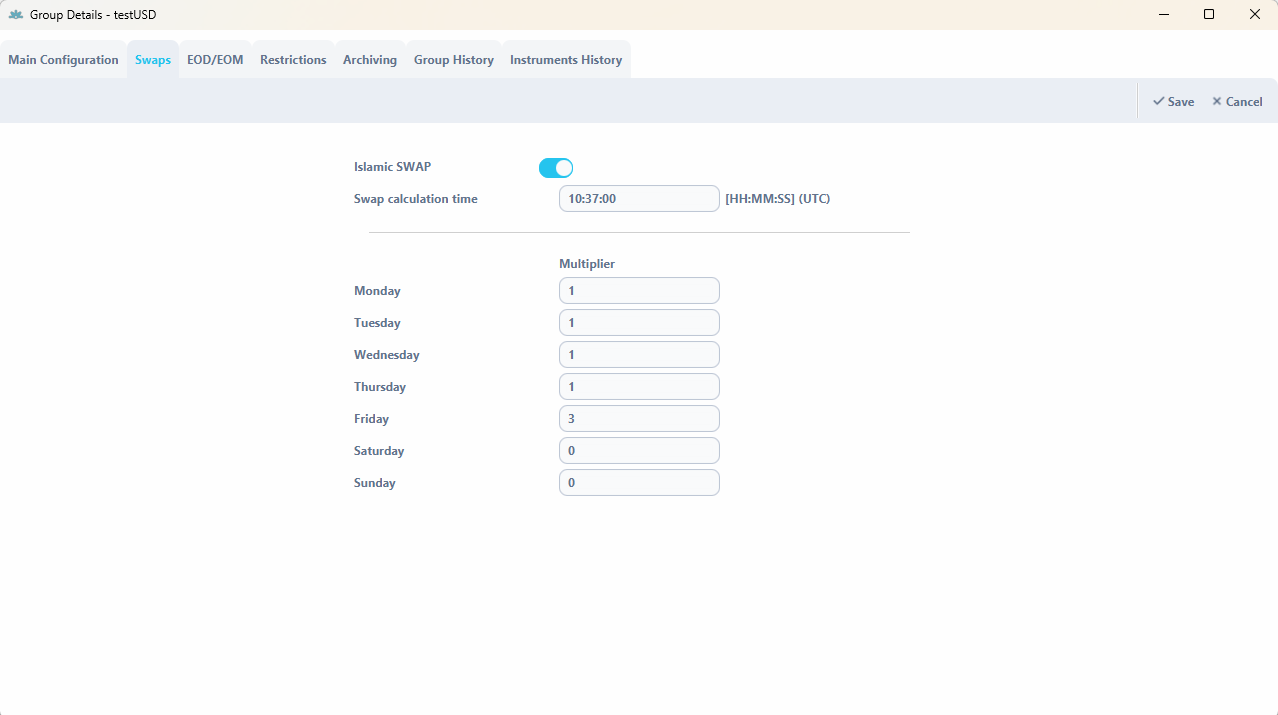
The Swaps tab. The Swaps tab in Group Details holds swap multipliers for individual days of the week. This is how a three-day swap is set up: enter 3 in the multiplier field for Friday and 0 for Saturday and Sunday. The weekend is then charged in one go on Friday and nothing is charged while the market is closed, so clients do not get margin calls or stopouts over the weekend because of swaps. All days start at 1, which charges the normal daily swap. Swap calculation time sets the time of day, in UTC, at which swaps are charged on client accounts.
If a three-day swap does not appear, check this first. For the multipliers to work, the Swaps multipliers box has to be checked for the instrument in Configure Instruments. Without it the day multipliers are ignored for that instrument.
Islamic SWAP, when enabled, presents swaps to the client as a deposit or withdrawal with the comment storage fee, containing the position and the instrument, instead of as a swap.
How the swap markup is calculated. Swap markups are set per instrument in the group’s instrument settings, in Swap Markup (%) Long and Swap Markup (%) Short. The final swap charged to the trader is:
Final Swap = Swap – (|Swap| × SwapMarkup / 100)
The absolute value in the formula is the part that matters. It means the direction of the markup is the same no matter whether the underlying swap is positive or negative. A positive markup always works in the broker’s favour – it reduces the swap paid to the trader, or increases the swap charged to the trader. A negative markup always works in the trader’s favour – it increases the swap paid to the trader, or reduces the swap charged to the trader.
Four examples, covering both signs of both values:
- Swap = 1000, markup = 20% → final swap = 800
- Swap = 1000, markup = -20% → final swap = 1200
- Swap = -1000, markup = 20% → final swap = -1200
- Swap = -1000, markup = -20% → final swap = -800
Markups act as a multiplier on the swap value taken from the group or instrument configuration – they never change the base swap value itself, which is why Total Swap Long and Total Swap Short are shown separately in Configure Instruments. Negative values are accepted down to -100%, so the same field can be used both to widen and to discount swaps.
The markup fields are available both when editing a single instrument and in a bulk edit, and the same settings are available with White Label access, kept in sync.
When swaps are charged. Swap Schedule Type and Swap Schedule Value in Configure Instruments decide the frequency, and the group’s Swap calculation time decides the starting point. With Schedule Type HOURS, Schedule Value 3 and Swap calculation time 00:00, swaps are charged every 3 hours starting from midnight. With Schedule Type DAYS and the same value and time, they are charged every 3 days at midnight.
Swap Free Days delays the first charge: set to 7, a position opened today is charged its first swap on the eighth day. This is separate from the schedule – the schedule governs the rhythm once charging has begun.
Commission configuration #
There are two commissions in the system and it is worth keeping them apart from the start. The broker commission is what you charge the client. The agent commission is the share of it that goes to an introducing broker. The agent commission is not added on top – it is taken out of the broker commission.
Put 10 in Commission per Million and 2 in Agent Commission per Million, and per million traded the broker receives 8 and the agent receives 2.
Setting the commission your clients are charged.
- Open the Groups tab.
- Double-click the group you want to set the commission for. Group Details opens.
- Enter the value in Commission per Million and save. A confirmation appears.
The commission is calculated as:
(commission per million / 1 000 000) × (nominal value of instrument × lots traded × exchange rate to USD)
The exchange rate only comes into it when the nominal value is in a currency other than USD.
For example, a client trades 1 lot of AUDUSD. The nominal value of AUDUSD is 100 000 AUD, the AUD rate to USD is 0.73, and Commission per Million is set to 10:
(10 / 1 000 000) × (100 000 × 1 × 0.73) = 0.73
That is the commission for opening the trade. The same calculation runs again when the client closes it, so the total commission on the round trip is 1.46.
Why this matters on an A-book group. If you charge your clients 20 USD per million on an A-book group and you are charged 10 USD per million on the hedge side, the difference is your margin on those clients.
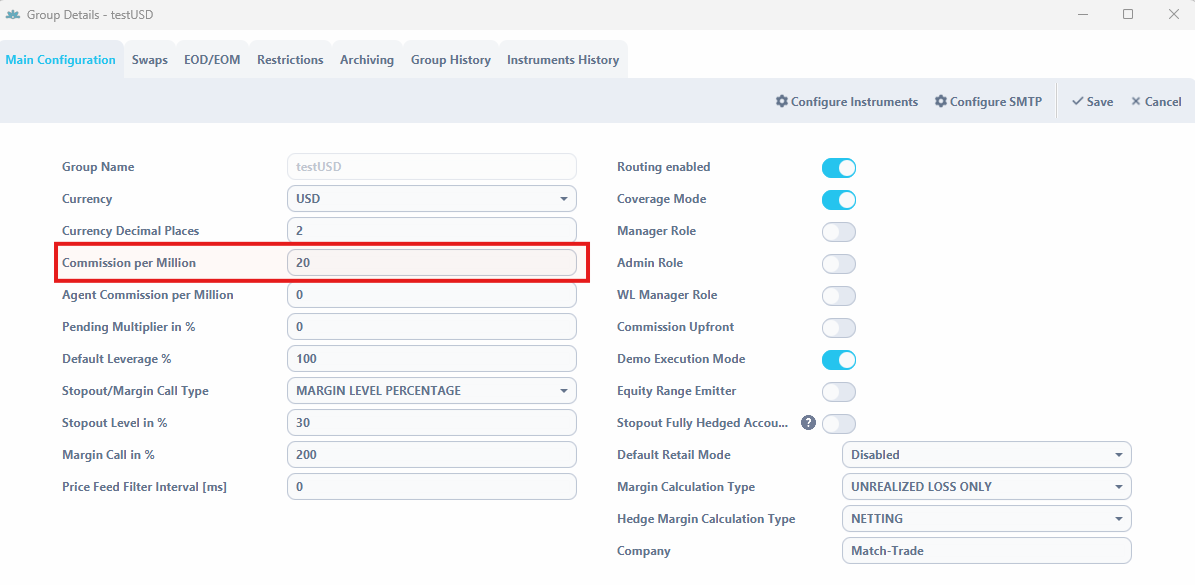
Two warnings before you set up the agent commission. Both of these cause real problems in practice.
- Do not set the agent commission in both Client Office and the Admin. If you do, the agent is paid twice. Pick one application and configure it there only.
- Use only one method per group. The agent commission can be set for the whole group or per instrument, and mixing both within one group is not supported.
Method one – for the whole group. Open Groups, double-click the group, enter the value in Agent Commission per Million and save. It is calculated with exactly the same formula as the broker commission, so 1 lot of AUDUSD with the rate at 0.73 and the value set to 10 gives 0.73 on opening and 1.46 on the round trip.
Method two – per instrument. Open Groups, double-click the group, then click Configure Instruments. For each instrument you can set Agent C. Type, which decides how the commission is calculated, and Agent Comm., which is the value. Save to confirm.
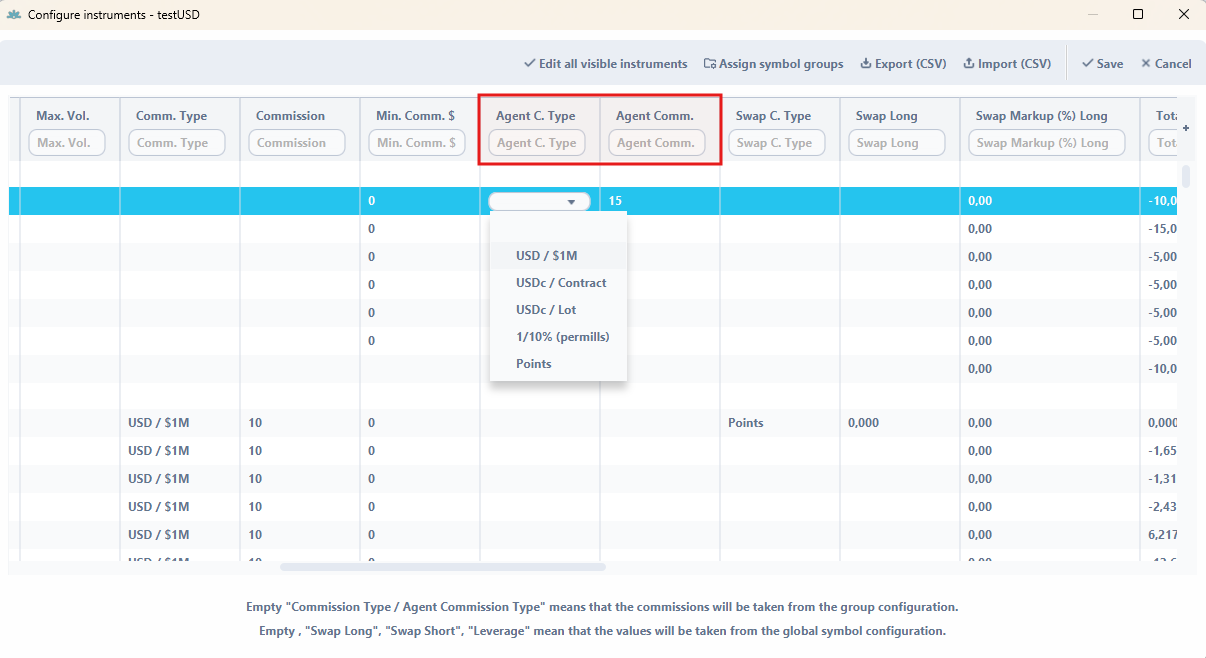
The five commission types. The same five are available for both the client commission and the agent commission. The difference between them is what the value is measured against – turnover, contract size, lots, nominal value or points – and that changes the order of magnitude of the number you enter, which is where mistakes happen.
USD / $1M – set per one million USD traded by the client.
(commission value / 1 000 000) × lots traded × nominal value of instrument × exchange rate to USD
Example: the type is set to 10. The client opens 1 lot of EURUSD, nominal 100 000 EUR, with the rate at 1.18 USD per EUR. (10 / 1 000 000) × 1 × 100 000 × 1.18 = 1.18 on opening, and another 1.18 on closing if the rate has not moved.
USDc / Contract – set in US cents per contract, meaning per instrument lot size traded.
commission value × instrument lot size × lots traded
Do not use this type for forex instruments. Their lot size is 100 000, so the smallest possible commission on 1 lot would be 1000 USD.
USDc / Lot – set in US cents per lot traded.
commission value × lots traded
Example: the type is set to 3 for AUDCAD, so 3 cents per lot. The client opens 1 lot: 0.03 × 1 = 0.03 USD.
1/10% (permills) – set at 0.1% per nominal value traded.
commission value × 0.1% × lots traded × nominal value of instrument × exchange rate to USD
Example: the type is set to 5 for GBPNZD. The client opens 1 lot and the GBP rate to USD is 1.3111. 5 × 0.1% × 1 × 100 000 × 1.3111 = 655.55. Note how large this comes out – this type is easy to misjudge.
Points – set as a points value per lot traded.
commission value × instrument point value × lots traded
Example: the type is set to 3 for AUDCAD, whose point value is 0.75641. The client opens 2 lots: 3 × 0.75641 × 2 = 4.54 USD. The easiest way to check an instrument’s point value is on the trading platform itself, through the information button on the instrument.
Leverage configuration #
Leverage is not set in one place. Three settings combine into what the trader actually gets, which is why the leverage on an account rarely matches any single number you can see on screen:
- Leverage on the instrument, in the Symbols tab – the baseline for that instrument everywhere.
- Leverage on the instrument within a group, in Configure Instruments – overrides the baseline for that group only.
- Leverage % on the trading account, taken from the group’s Default Leverage % when the account is created.
The Fixed Leverage checkbox in Configure Instruments decides whether the third setting is applied at all. Checked, the instrument leverage is final and the account’s Leverage % is ignored. Unchecked, the two are combined as below.
Calculating the final leverage.
final leverage in % = (100 / (account Leverage % × instrument leverage)) × 100%
The result is the percentage of the position’s nominal value taken as required margin. To express it as a ratio, divide 100 by that percentage.
Take BTCUSD, with the account’s Leverage % at 200 and the instrument leverage in the client’s group at 10:
(100 / (200 × 10)) × 100% = 5%
5% of the nominal value is required as margin, which corresponds to a ratio of 1 : (100 / 5) = 1:20.
What that means for a real position. Taking the same configuration – account Leverage % 200, instrument leverage 10, so an effective 1:20 – and opening 1 lot of BTCUSD, meaning 1 BTC, at a price of 65 679 USD:
margin required = nominal value × effective margin percentage = 65 679 × 5% = 3 283.95 USD
So roughly 3 284 USD of margin is held for that position.
Reading it the other way round. It is often easier to sanity-check a configuration from the instrument value alone. With the account’s Leverage % at 100, the instrument leverage translates directly into the familiar ratio: 100 gives 1:100, meaning 1% margin; 30 gives 1:30, meaning 3.33% margin.
Raising the account’s Leverage % above 100 loosens leverage, lowering it tightens leverage. With instrument leverage at 30: an account Leverage % of 100 gives 1:30 (3.33%), while 200 gives 1:60 (1.67%). This is the mechanism to use when you want one client on tighter or looser terms than the rest of their group without touching any instrument settings.
Special accounts #
Special accounts are the staff accounts – the manager, admin and White Label Manager logins used to operate the platform, as opposed to the trading accounts your clients use. This tab is where they are created and where their permissions are set.
The main view lists every manager, admin and White Label Manager with their Login ID, Name, Group and Remarks, whether they are Blocked, and the Manager Rights and Manager Groups they hold – shown as [ALL] or [NONE] where that applies. New creates an account, Download exports the list. Double-click an account to open it, or right-click it to choose Edit special account or Delete special account; with several accounts ticked, Bulk edit special accounts changes them all at once.
An account has to be created in a group carrying the matching role – a manager account in a group with Manager Role enabled, an admin account in a group with Admin Role enabled, a White Label Manager account in a group with WL Manager Role enabled. If the role is missing on the group, the account cannot be created there. The Client Group list in the account window shows the groups you can choose from.
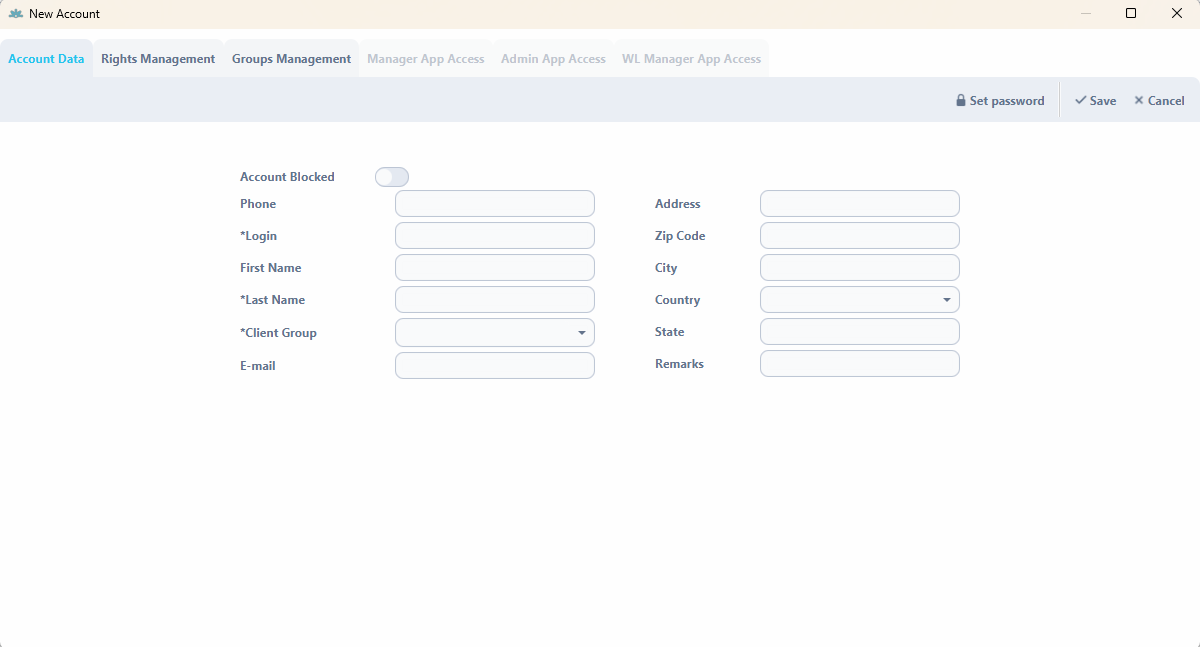
Account Data holds the account’s own details. Login, Last Name and Client Group are required; First Name, Phone, E-mail, Address, Zip Code, City, Country, State and Remarks are optional. Account Blocked blocks the account. Set password opens a window where you enter the password twice; leave the password unset and one is generated for you and shown after you confirm – note it down at that point, because it is not displayed again. The Login cannot be changed once the account exists.
Rights Management decides what the account may do. Available rights are on the left, granted rights on the right, and the arrow buttons move them between the lists. Every account can have a different combination, so a dealer, a back-office user and a risk manager can share one application with quite different capabilities.
Some rights permit an action, others make a whole tab visible in the Manager application:
- Deposits – add deposits to trading accounts.
- Withdrawals – make withdrawals from trading accounts.
- Add Account – create new trading accounts.
- Modify Account – change existing trading accounts.
- Delete Account – remove trading accounts.
- Reports – generate reports from the Manager application.
- Trading – execute transactions on a client account from the Manager application.
- Position Edit – edit open positions.
- Edit Historical Data – modify closed trades.
- Routing Monitor – makes the Routing Monitor tab visible in the Manager application.
- LP Routing Summary – makes the LP Routing Summary tab visible, where hedged positions are listed.
- Hedge Monitor – makes the Hedge Monitor tab visible.
- Hedge Summary – makes the Hedge Summary tab visible.
- Modify Hedge LP Volume – adjust the volume held on the hedge side.
- Personal Data – view clients’ personal data. Worth granting deliberately rather than by default.
- Account Rules – makes the Account Rules tab visible in the account details in the Manager application, listing the routing, hedge and abuse rules that apply to the account.
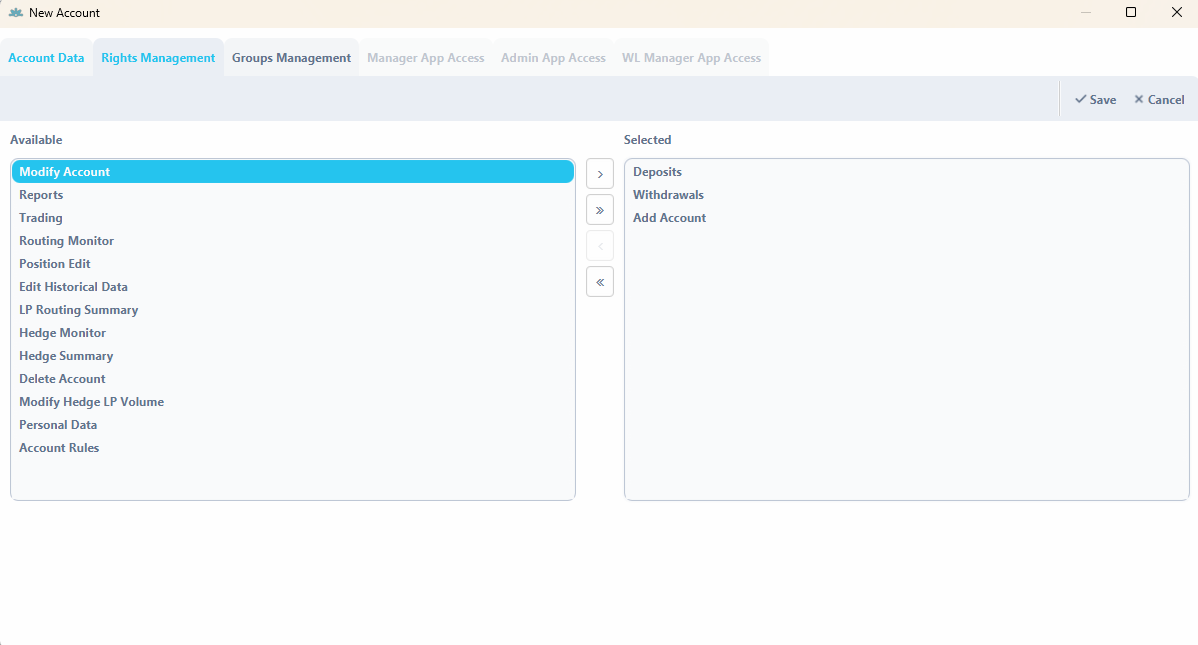
Groups Management decides which client groups the account can see. Rights say what someone may do; this says who they may do it to.
- Create Group Pattern – enter a group name or pattern and click Add. Special characters such as * and ! are supported, which is what makes patterns worth using: one pattern keeps working as new groups are added.
- Group Patterns – the patterns assigned to the account. Delete removes the selected one, Delete All clears the list, and Move Up and Move Down change the order.
- Selected groups and Available Groups – the result: the groups the patterns currently give the account access to, and the ones they leave out, each with its total and its own Filter.
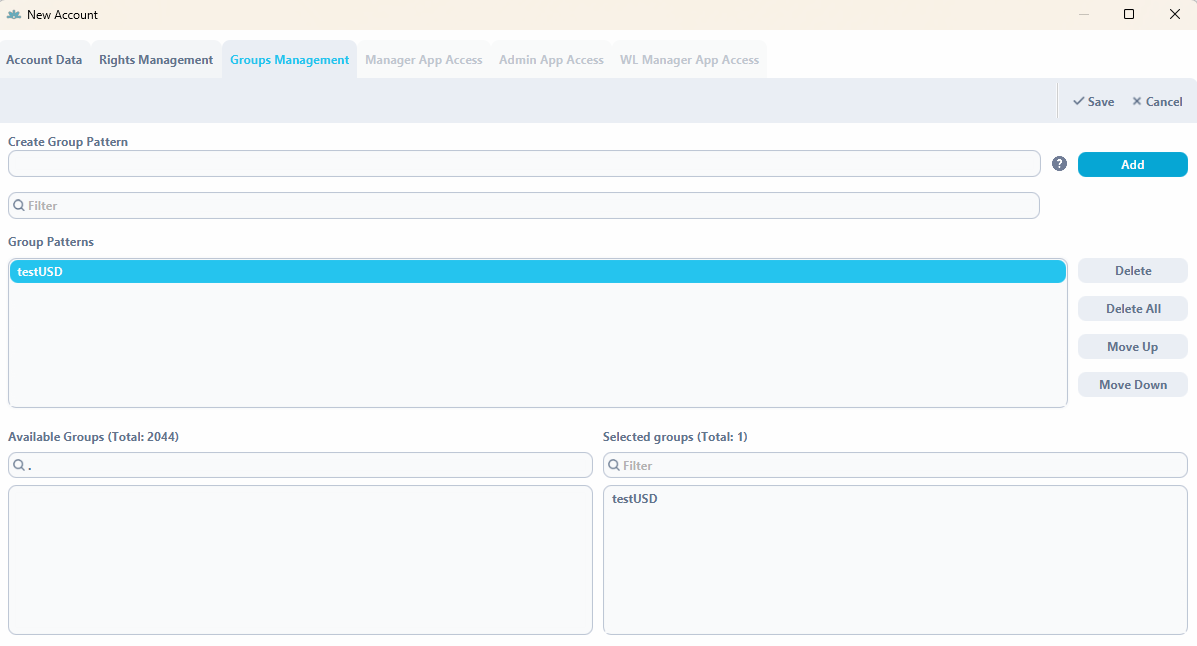
Manager App Access, Admin App Access and WL Manager App Access hold the access tokens for each application. Only the tab matching the role of the account’s group is active – an account in a WL Manager group, for example, gets WL Manager App Access. New asks for a Token Name and whether the token should be Disabled; a Token and an Hmac are then generated, and both are needed to log in. Update, Delete and Refresh manage existing tokens, and the list shows each token with its Create Time and whether it is disabled.
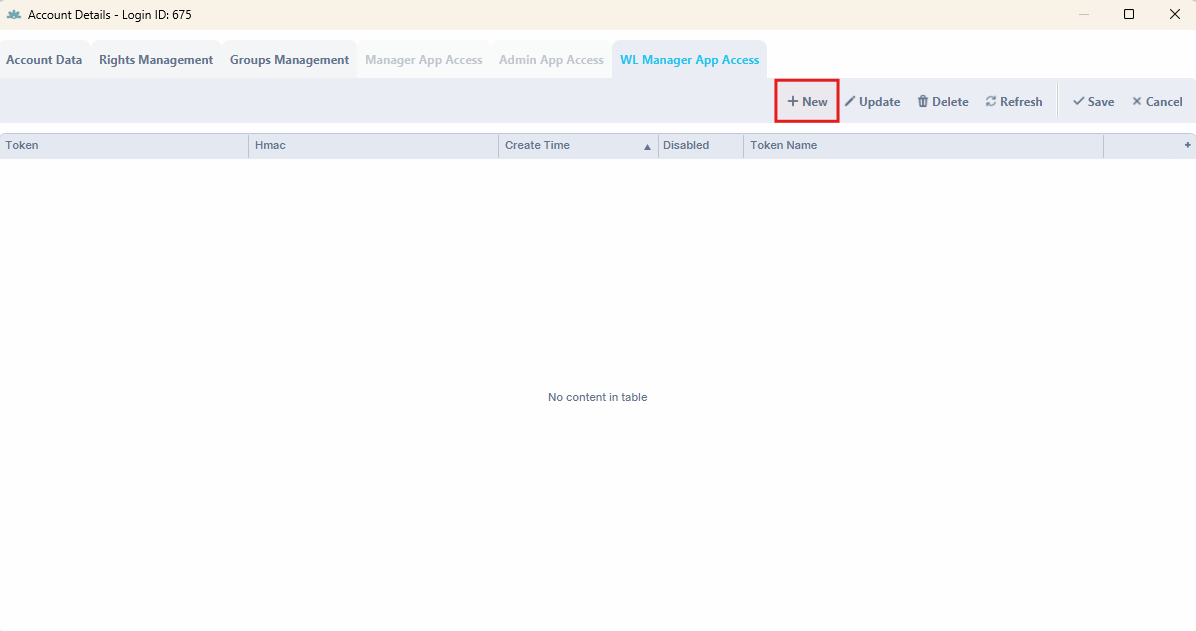
Market watch #
Market watch shows the prices the system is receiving from every configured liquidity provider, with your markups applied. Instruments assigned to a provider are listed even when they are not quoting at that moment, which is the point: it lets you tell an instrument that is not configured apart from one that is configured but silent.
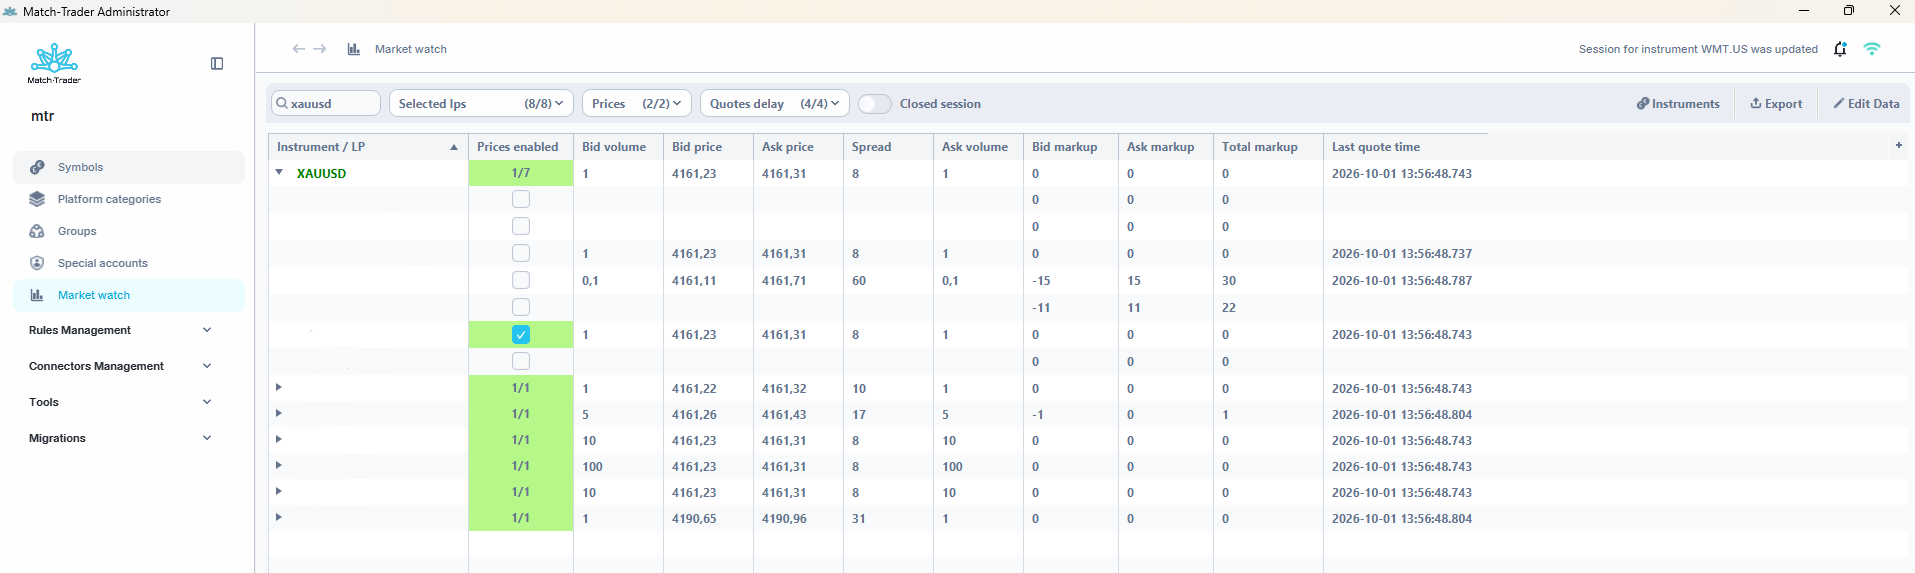
Each row is one instrument. Expanding a row shows the individual providers feeding it, each listed by name with its LP ID in brackets and with its own prices and a checkbox in Prices enabled – so you can see at a glance which provider is quoting and which is not.
What the columns show.
- Instrument / LP – the instrument name, shown in green while its trading session is open and in red when it is closed; expand it to see the providers behind it.
- Prices enabled – how many of the instrument’s providers currently have prices enabled, shown as a ratio such as 1/4. The cell is coloured by quote delay, so the column can be scanned: green when quotes arrive on time, yellow or red when they are delayed past the instrument’s Delay Yellow [s] or Delay Red [s] threshold, and no colour when no quote has arrived at all.
- Bid volume, Bid price, Ask price, Spread and Ask volume – the best available order book line, in that order: the spread, meaning the difference between ask and bid, sits between the two prices.
- Bid markup, Ask markup, Total markup – the markups applied on top of the provider’s price. Total markup is calculated for you.
- Last quote time – when the most recent quote arrived. This is the column to look at when a price looks wrong.
In the order book view the Aggregated section is shown in bold and in a different colour, so it stands out from the individual provider lines beneath it.
Choosing what is displayed.
- Instruments – opens Market Data Instrument Filter with Available instruments and Selected instruments lists. Move instruments between them to decide what Market watch shows; Search for instruments and Instrument group narrow the lists, so you can work through one asset class at a time, and Filter data applies the choice. A selection can be saved as a named set and picked again from Saved instrument set, and Default set marks the set used by default. Saved sets are stored locally on your computer rather than per environment, so the same sets can be picked whichever environment you log in to.
- Selected lps – narrows the view to chosen liquidity providers, each listed with its LP ID.
- Prices – shows providers with prices Enabled, Disabled or both.
- Quotes delay – narrows the view by quote status: No quote, No delay, Yellow and Red.
- Closed session – off by default. Turn it on to include instruments whose trading session is currently closed.
Market watch hides quotes older than the value set for the provider in Filter quotes older than [Ms] in LP Setup. The rest of the system – profit and loss, stop loss and take profit, stopout, candles and the platform itself – rejects such quotes as well, so what Market watch shows matches what is really accepted.
Editing markups. Edit Data switches the table into edit mode, where markups can be changed for several providers and instruments at once, and a provider’s prices can be switched on or off for an instrument with its checkbox in Prices enabled. While edit mode is active the rows stop refreshing, so incoming quotes no longer move the field you are typing in. Submit saves the changes and Cancel leaves edit mode without them. Export saves the current view to a file.
Clearing an order book. Right-click an instrument and choose the clear order book action to drop the order book for that one instrument across all providers. The action asks for confirmation first, because it affects live quoting.
Adjusting the price of a closed instrument. For an instrument whose trading session is closed, Adjust Price lets you set its bid and ask price by hand. The new price is sent on to the connected services and applied in the system, so that exposure and pending orders on client accounts are calculated on an up-to-date price while the market sends no quotes.
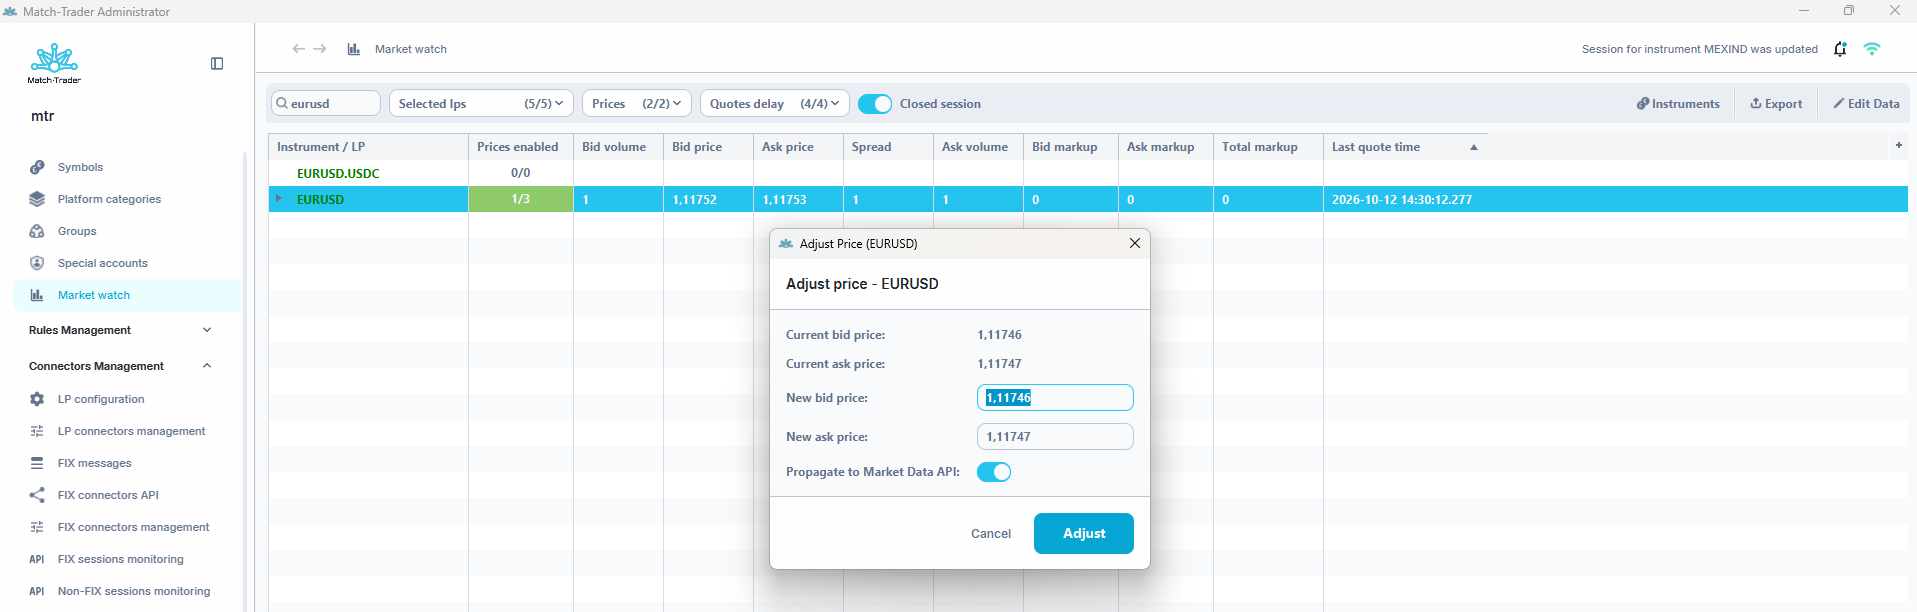
If an instrument is not visible. An instrument that seems to have disappeared from Market watch is usually filtered out rather than broken. Check these five things, in this order, before looking anywhere else:
- the Instruments window – it may be sitting in Available instruments instead of Selected instruments;
- the Instrument group filter inside that window;
- the Closed session toggle – if the instrument’s session is closed and the toggle is off, it is hidden;
- the Prices and Quotes delay filters – an instrument whose prices are disabled, or whose quotes are delayed or missing, may simply be filtered out;
- the provider’s Filter quotes older than [Ms] setting in LP Setup – quotes older than that are not displayed at all.
Rules Management #
Rules Management gathers the five tabs that decide how much risk you keep and how much you pass on: the two ways of sending trades to a liquidity provider, the handling of abusive accounts, exposure limits and the trading calendar.
Routing rules or hedge rules? This is the distinction most often confused, and it is worth settling before reading further. Both send trades to a provider, but they do it at different moments.
- Routing rules work before execution. The client’s position opens only if there is enough margin to open the hedging position on the provider’s account. No margin on the provider side means the client’s order does not go through.
- Hedge rules work after execution. The client’s position opens regardless of whether the hedging position can be opened on the provider’s account. Execution happens in your system first, and the order is then sent on.
Because of that, the two use different provider configurations: routing rules need a provider set up in LP Setup, hedge rules need one set up in Hedge LPs. Both are in LP configuration.
Working with the rule tabs. Every rule tab has New for adding a rule and Delete for removing the selected one, and most also have Refresh. Pattern fields accept a comma-separated list, with * as a wildcard and ! to exclude an entry – the rule windows show the example !EURUSD,GBPJPY,EUR* – and the list button next to a pattern field lets you pick groups or instruments instead of typing them.
Hedge rules #
Hedge rules also send trades to an external liquidity provider – and they can cover individual accounts as well as whole groups – but they use the after-execution model: the client’s position opens regardless of whether there is enough balance to open the hedging position on the provider’s account. The provider has to be configured in Hedge LPs first.
- Rule Name – the name of the rule.
- Pattern type – CLIENT ID when the rule applies to trading account numbers, GROUP NAME when it applies to client groups.
- Login/Group filter – which accounts or groups are routed.
- Symbol filter – which instruments are routed.
- Original Account Id Filter – optional. Limits hedging to orders that carry one of the listed original account IDs – typically orders arriving through the FIX connectors API on behalf of an external account; other orders matching the rule are not sent on. Left empty, the rule works on the account and instrument filters alone.
- Matched with LP filter – optional. Limits hedging to orders that were matched with the listed liquidity providers when they were executed.
- Coverage % – what percentage of the trades is covered on the provider’s side. 100 means one to one.
- Hedge every trade – ticked by default for a new rule. Every trade matching the rule is sent to the provider, whatever the exposure accumulated on the rule, and Hedge threshold (lots) is not used. With it ticked, automatic adjustment is not available.
- Hedge threshold (lots) – with Hedge every trade off, how many lots stay on your own book. Anything above this amount is routed to the provider.
- Hedge to LP – the provider defined in Hedge LPs.
- Comment – free text for your own notes.
- Auto adjustment enabled – when the volume held on the provider’s side no longer matches what the rule requires, the system sends a correcting order to the provider automatically.
- Adjustment retry count – how many times a correction that failed is retried.
- Retry interval (sec) – the pause between those attempts.
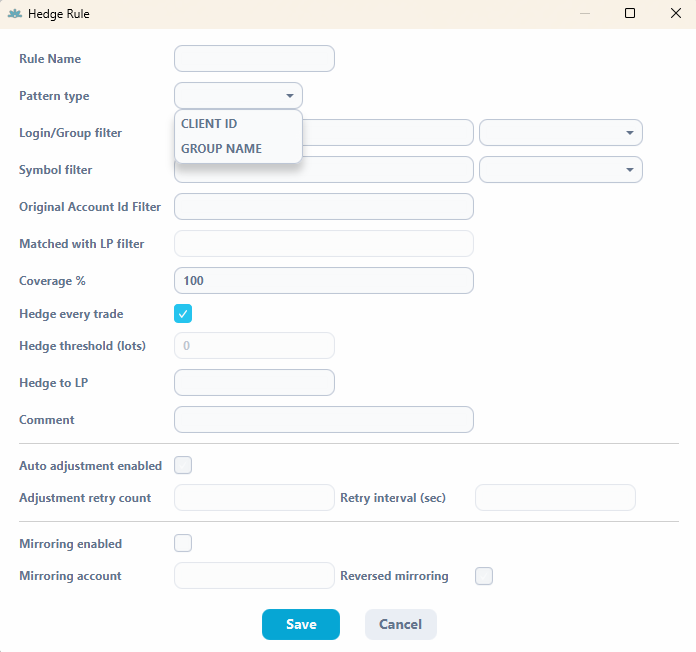
When hedging stops working, check the connection first. The Hedge LPs view shows the state of the connection to each external router in its Connection column – see LP configuration. A disconnected router explains far more incidents than a misconfigured rule does.
Mirroring hedged transactions.
- Mirroring enabled – copies hedged transactions to a designated mirror account. Turning it on makes the two fields below available.
- Mirroring account – the trading account the transactions are mirrored to. It has to be a valid account in the Match-Trader and Manager ecosystem. The mirrored volume matches the volume actually sent to the hedge provider, so after Coverage % and the threshold have been applied – not the client’s original volume.
- Reversed mirroring – when off, mirroring copies the same direction, so buy becomes buy and sell becomes sell. When on, it copies the opposite direction: buy becomes sell and sell becomes buy.
Mirroring is triggered only for transactions that are actually hedged, based on the execution reports coming back from the hedge provider. If the provider rejects the order, no mirror transaction is created. For partial fills, each fill creates a separate position on the mirror account.
The system also prevents loops: if a mirrored trade on the target account would itself match a hedge rule, the mirroring is blocked, so a mirror cannot feed a hedge that feeds another mirror.
Routing rules #
Routing rules decide which groups are routed to an external liquidity provider or bridge. They use the before-execution model described at the start of this section: the client’s position opens only if there is enough margin to open the hedging position on the provider’s account. If there is not, the client cannot open the position at all. The provider has to be configured in LP Setup first.
- Sequence – the order in which rules are evaluated. Lower numbers take precedence over higher ones.
- LP ID – the provider defined in LP Setup.
- Group Pattern – the groups sent to that provider.
- Symbol Pattern – the instruments hedged with that provider. * selects all of them.
- Broker Group – assigns a White Label Manager group, so that White Label Manager accounts can see this rule and modify it. They can then choose which instruments to hedge and set up routing schedules for the days and hours they want their clients’ trades hedged. A rule with no assignment here is not visible at White Label level at all.
- Comment – free text for your own notes about the rule.
- Coverage Percent – what percentage of the trades is covered on the provider’s side. 100 means the provider covers them one to one.
- Status and State – whether the rule is currently active, and whether it is enabled in the system.
- Rule Disabled – switches off this one rule without deleting it.
- Enabled On Specific Time – makes the rule active only during chosen times of the week, entered as lines in the schedule below it with Add Line, Change Line, Delete Line and Copy Line. Times entered in the schedule are validated, so an impossible value such as 25:00:00 is rejected rather than saved.
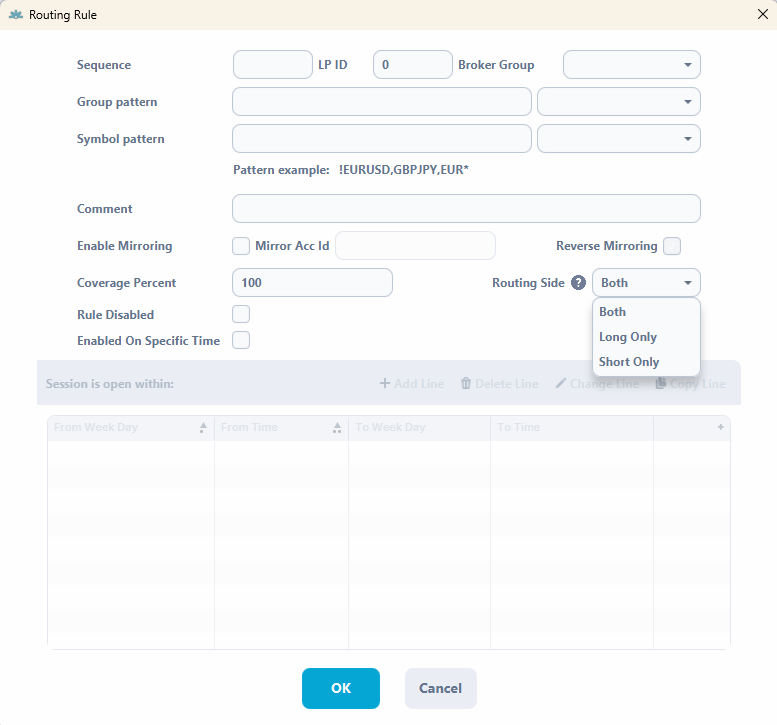
Routing only one direction. Routing Side limits the rule to one trade direction. It works correctly only for retail client accounts – on B2B accounts it leads to incorrect routing, which the tooltip next to the field also warns about. In the list, the setting is shown in the Routing Side column, hidden by default.
- Both – the default. Buy and sell orders are both routed.
- Long Only – only buy orders are routed. Sell orders stay unrouted but can still be opened on the client account.
- Short Only – only sell orders are routed. Buy orders stay unrouted but can still be opened on the client account.
Closing positions on the provider’s side works regardless of this setting. If an order’s direction does not match the configured side, the order is not routed and no further routing rules are evaluated for it – so a one-sided rule high in the sequence stops the chain for the other direction, which is easy to overlook when a rule seems not to fire. The Routing Monitor takes this into account and does not report discrepancies caused by a deliberately unrouted side.
Mirroring trades to another account.
- Enable Mirroring – copies trades from the A-book account to another account in the Manager application.
- Mirror Acc Id – the account the trades are copied to. This is not the hedge account.
- Reverse Mirroring – opens the opposite positions on the mirroring account instead of matching ones.
What a White Label Manager can change here. Routing rules are one of the three tabs available with White Label access, but two fields are locked there: a White Label Manager cannot edit LP ID or Group Pattern. The rest of the rule – the instruments, the coverage, mirroring, switching the rule off and its schedule – can be changed as usual.
Abuse rules #
Abuse rules are a risk and routing control for individual accounts whose trading harms liquidity or execution quality. The difference from routing rules is the level they work at: routing rules operate on whole groups, while abuse rules target single client logins. That lets you isolate one account without changing anything for the rest of its group. Abuse rules are checked before routing rules: an order caught by an abuse rule is routed by it, and only an order that matches no abuse rule goes on to the routing rules. Hedge rules work independently of both.
- Sequence – the order in which abuse rules are evaluated, as with routing rules.
- Abuse Account ID – the trading account whose orders the rule applies to. When orders reach you from another platform – for example from a broker connected to you – this is the account that carries them, and Original Account ID Pattern narrows the rule down to individual clients behind it.
- Instrument Pattern – which instruments the rule applies to. Accepts exact names such as XAUUSD or US100cash, and patterns such as *cash.
- Original Account ID Pattern – the original account IDs carried by the orders, meaning the logins of individual clients on the platform the orders come from. Also accepts patterns, for example 2744*, as well as exact IDs. Left empty, the rule catches only orders that carry no original account ID.
- LP ID – which liquidity provider or internal pool handles the routed trades.
- Status – whether the rule is ACTIVE or INACTIVE.
- State – whether the rule is ENABLED or DISABLED in the system.
- Coverage Percent – what portion of the orders the rule covers. 100 means all orders, a lower value routes only that percentage.
- Comment – free text for your own notes about the rule.
- Enable Mirroring, Mirror Acc Id and Reverse Mirroring – copy the routed trades to a mirroring account, as described for routing rules.
- Rule Disabled – switches off this one rule without deleting it.
- Enabled On Specific Time – makes the rule active only during the times of the week entered in its schedule.
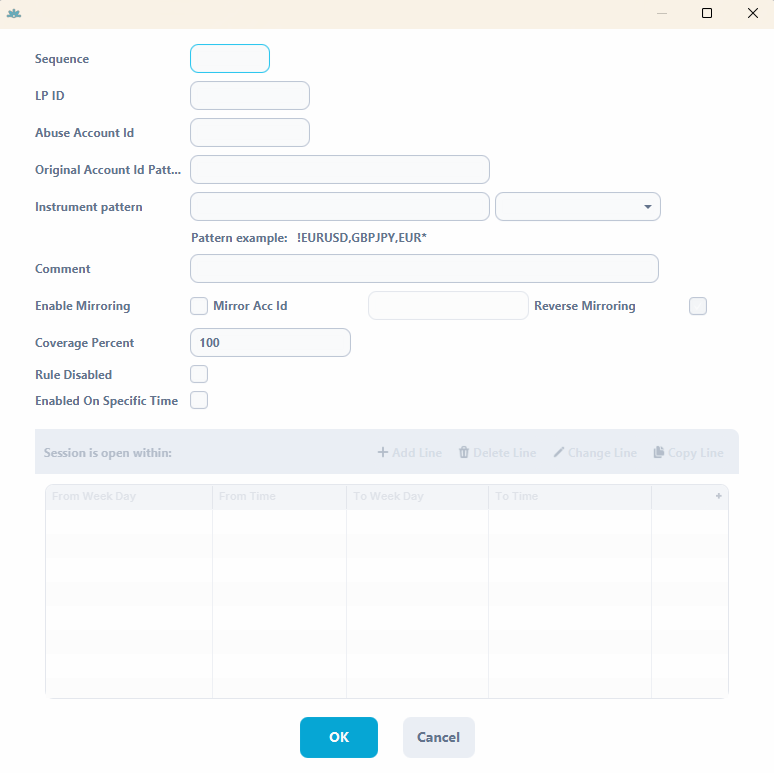
Exposure rules #
Exposure rules cap how much of an instrument a client or a whole group may hold. Where Max. Exposure $ in Configure Instruments limits one instrument in one group, exposure rules work across accounts, groups and instrument patterns, so they are the tool for portfolio-level limits.
- Rule ID – the identifier of the rule.
- Pattern type – CLIENT ID when the rule applies to individual accounts, GROUP NAME when it applies to groups.
- Login/Group Pattern – the account IDs or group names the rule covers.
- Symbol Pattern – the instruments the rule covers.
- Exposure Type – how exposure is measured. See below.
- Max Exposure Value – the limit itself. What the number means depends on the exposure type.
- Current Exposure – the net exposure currently held under the rule: positive when buy positions prevail, negative when sell positions prevail.
- Free Exposure (BUY / SELL) – how much room is left in each direction before the limit is reached. A negative value appears only when the limit has actually been exceeded, for example after it was lowered below the exposure already held. Both exposure columns are refreshed when you open the tab, after you edit a rule and with Refresh.
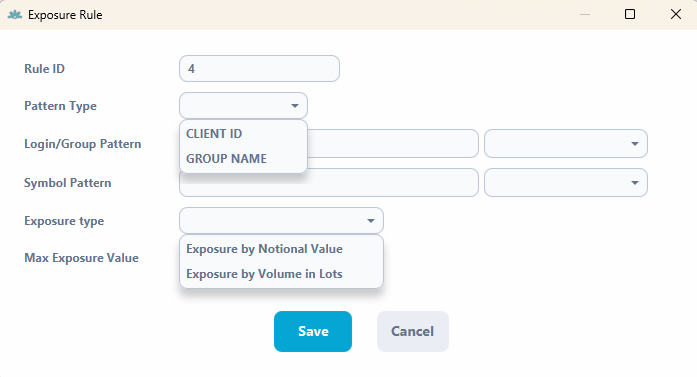
Measuring by value or by lots. A rule can be evaluated in one of two ways, chosen in Exposure Type.
- Exposure by Notional Value – caps the total nominal value of open positions, calculated as lot size × price × number of lots. The limit is a monetary amount.
- Exposure by Volume in Lots – caps the total volume of open positions expressed in lots, regardless of the instrument’s price. The limit is a number of lots.
Which one to pick depends on what you are protecting against. A notional limit follows the market: if the price doubles, the same number of lots consumes twice the limit. A lots limit does not move with price, which makes it predictable on volatile instruments where a notional cap can be reached unexpectedly. Both directions, buy and sell, are taken into account.
Instruments with different lot sizes and decimal places are handled correctly, so one rule can span a mixed set of instruments. Max Exposure Value is stored and enforced exactly as entered, with no rounding – this applies both to nominal amounts and to fractional lots, so a limit of 1.25 lots means 1.25 lots.
When several rules apply. The same account, group or instrument can be covered by more than one rule; the lowest limit is the one enforced. Exposure is netted across all the accounts a rule covers, which can also affect closing orders: closing a position on one account can raise the net exposure of the rule and be rejected for that reason. Keep that in mind when one rule covers several accounts.
Holidays #
The Holidays tab disables trading sessions for chosen instruments on specific days. It exists so that session hours and the trading calendar can be kept separate: you set the normal weekly hours once in Symbols, and handle public holidays and non-trading days here without touching them.
A holiday overrides the standard session for the instruments it covers. Select the day and tick All Day Close, and the session is disabled for them for the whole day. If the instrument should not be closed for the whole day, set an opening and closing time instead – that covers shortened sessions, such as a half day before a public holiday.
- Day – the date the holiday rule applies to, entered as Start Day in the rule window.
- Name – a name for the holiday, so you can tell later what a given rule was for. Worth filling in properly: a calendar of unnamed dates is hard to maintain.
- Symbol Pattern – the instruments the holiday applies to. Patterns let one entry cover a whole asset class.
- All Day Close – closes the session for the entire day. With this on, the opening and closing times are not used.
- Open Time – when the session opens on that day, in UTC, for a shortened session.
- Close Time – when the session closes on that day, in UTC.
- Status – whether the rule is active or inactive today.
New opens the rule window with Name, Symbol pattern, Start Day, All Day Close, Open Time and Close Time. Copy creates a new rule based on the selected one, which is quicker when the same holiday has to be set up again – for another asset class or another year.
The Holidays tab of the Sessions and Holidays window, opened by double-clicking an instrument in Symbols, shows which of these rules apply to that instrument – the quickest way to check the calendar of a single instrument.
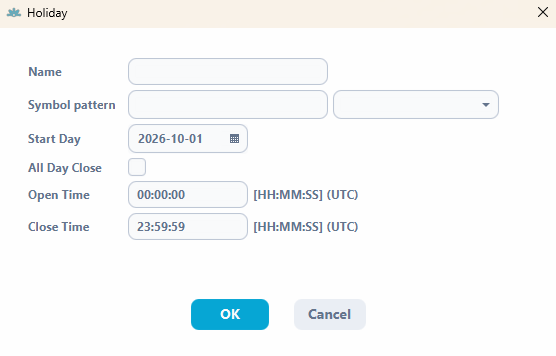
Connectors Management #
Connectors Management gathers everything that connects the platform to liquidity providers and external trading systems. LP configuration is where a provider exists as far as the platform is concerned – its identifier, its address, which instruments come from it and what you add on top. LP connectors management and FIX connectors management configure the connectors themselves: how instrument names map between the two sides, and how quotes are filtered and reshaped before they reach the platform. FIX connectors API holds the tokens used by FIX connectors, and FIX messages, FIX sessions monitoring and Non-FIX sessions monitoring are for watching what the connections are doing.
LP configuration #
The tab is divided into two views, LP Setup and Hedge LPs, which share one toolbar: New adds a provider, Delete removes the selected one, Refresh reloads the list, Submit saves your changes, and Instruments opens the instrument settings of the selected provider.
LP Setup is where the providers used by routing rules are added and edited, and where you say whether a provider is used for external or internal hedging. New opens Create LP with the same fields as the columns below.
- LP Client ID – the unique identifier of the connector, entered as LP Id when the provider is created.
- LP Name – the name of the provider as configured in the system.
- Routing Address – the address of the connector used for hedging.
- Filter quotes older than [Ms] – the age, in milliseconds, at which a quote from this provider is treated as stale. See Filtering delayed quotes below.
- Internal Routing – hedges A-book positions onto an internal Match-Trader account instead of an external provider. With this option, LP Client ID has to be the trading account login.
- Legacy Router – ticked, the provider is connected through the old router; unticked, through the current one. Leave it unticked when the provider’s account is in non-netting mode, meaning buy and sell positions may be open on it at the same time – only the current router supports that. The option replaced Retail Router and works the other way round: a provider that had Retail Router ticked now has Legacy Router unticked.
- Connection – the state of the connection to the provider’s router: CONNECTED or DISCONNECTED.
Configuring the instruments of a provider. Select a provider and click Instruments to open Instruments configuration for LP. This is where you decide which instruments come from that provider and on what terms. For each instrument, Hedge On/Off and Prices On/Off decide whether it is hedged with the provider and whether its prices are taken from it, Markup Bid and Markup Ask add your markup, and Clear Order Book on Red Price Delay clears the provider’s order book for the instrument once its quotes reach the red delay status, so that nothing is executed on prices left behind by a provider that has stopped quoting. Add symbol and Delete symbol change the list, and Save applies it.
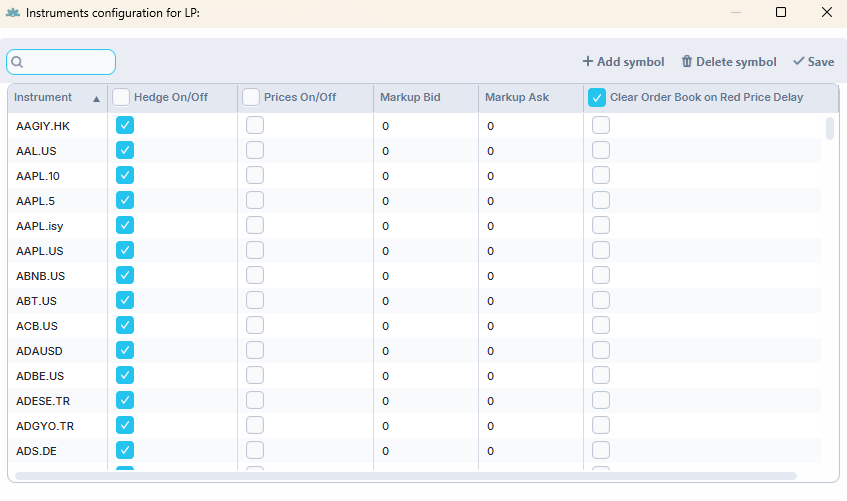
Why markups here and markups on a group are not the same thing. Markups set here are applied at provider level: they are added to the raw spread and work globally, and any markup configured on a group is then applied on top of that. This layering is what makes the setting useful for a Full-server License broker who also serves White Labels – you set your own margin once at provider level, and each White Label adds theirs above it.
For watching the prices themselves – which provider is quoting, how stale a quote is, what the resulting spread looks like – use Market watch. It also lists instruments that are configured but not currently quoting.
Hedge LPs is where hedge provider connections are added and edited. The difference from LP Setup is the execution model: a hedge provider uses the after-execution model, so the order is executed internally first and then sent on as a market order. A position on the A-book trading account therefore opens whether or not there is enough balance to open the hedging position on the provider’s account.
- Hedge LP ID – the unique identifier of the provider.
- Hedge LP Name – the name of the provider as configured in the system.
- Hedge LP Type – INTERNAL routes A-book positions to an internal Match-Trader account, in which case Hedge LP ID has to be the trading account login; EXTERNAL routes them to an external provider account.
- Hedging Address – the address of the connector used for hedging.
- Connection – the state of the connection, as in LP Setup.
Hedge providers and the router type. For a hedge provider the router type does not have to be set by hand. When the connection is initialised, the system asks the connector which router it uses and picks the matching path on its own; if the connector does not answer in time, both are started in parallel and the correct one is chosen from the response. A hedge provider can therefore be moved between routers without a configuration change on your side.
For a hedge provider, Instruments opens Instrument config for Hedge LP, a shorter list where Hedge On/Off decides which instruments are hedged with it. Add symbol, Delete symbol and Save work as they do for LP Setup.
Checking a connection. When routing or hedging stops working, check the Connection column in LP Setup and Hedge LPs first. A DISCONNECTED router points at the connection itself rather than at anything in the rules, which saves going through routing rules looking for a fault that is not there.
Filtering delayed quotes. Filter quotes older than [Ms] sets the age at which an incoming quote from the provider is treated as stale and ignored, which reduces the risk of acting on a price that no longer reflects the market. The same threshold controls what Market watch displays, so the view matches what the system actually accepts and processes.
LP connectors management #
This tab holds the configuration of the liquidity provider connectors themselves. Select the connector at the top of the window – Refresh reloads it and Delete LP removes it – then the session you want to work on, and use the tabs below to configure it: Symbols, Calculated Symbols, OB Generations, Account Mapper, Bad Tick Filter, Spread Config, Markup Config, Tick Injector, Weights and History. Changes are saved only when you press Submit, and each tab supports export and import of its own configuration – which is the practical way to move settings between environments. On import, entries that already exist are left untouched and only missing ones are added, so an import cannot silently overwrite a value you set by hand.
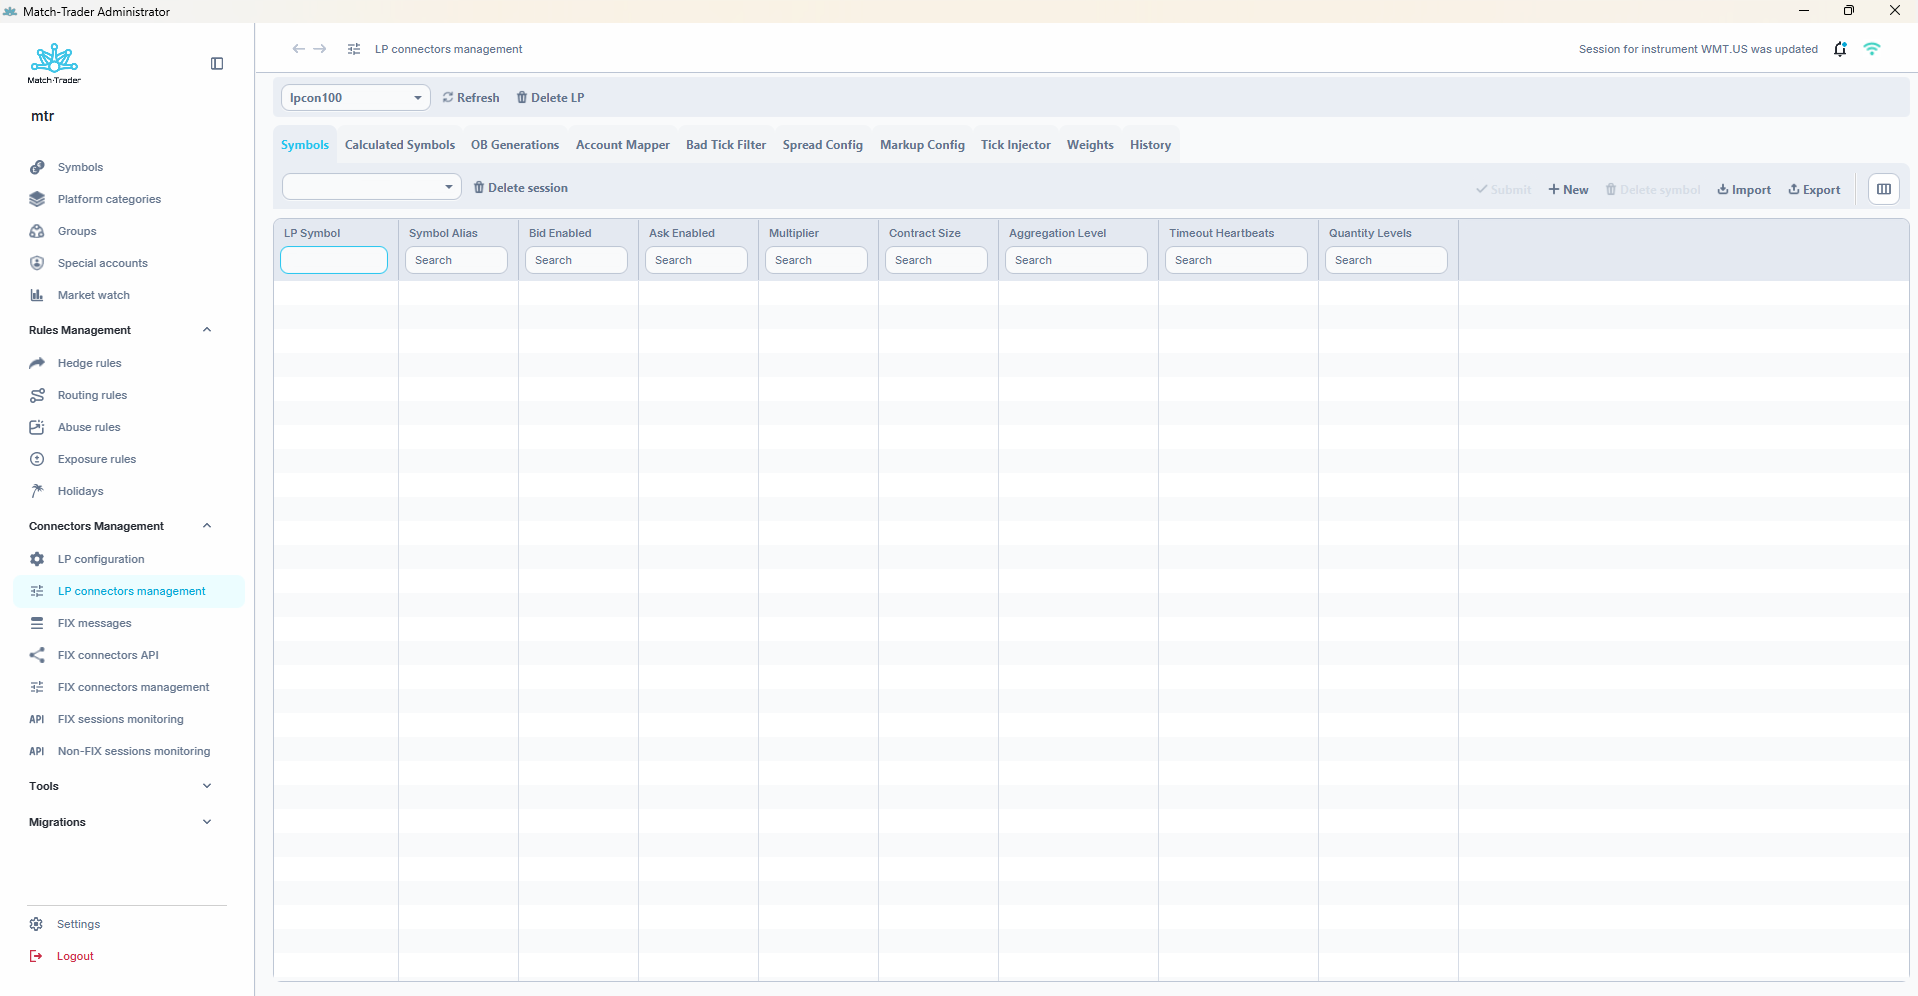
Symbols maps the provider’s instrument names onto the instruments used in the platform, and sets the basic quoting parameters for the selected session. Each line is one provider instrument.
- LP Symbol – the instrument name on the provider’s side, for example AUD/USD.E.FX.
- Symbol Alias – the matching instrument name in the platform, for example AUDUSD.
- Bid Enabled / Ask Enabled – whether that side of the quote is active for the instrument.
- Multiplier – rescales values such as prices and quotes.
- Contract Size – the contract size assigned to the instrument.
- Aggregation Level – the aggregation level. Used only by one driver, so it is left at 0 in most setups.
- Timeout Heartbeats – relates to the session timeout and heartbeat handling.
- Quantity Levels – the configuration of levels. Also used only by one driver.
Symbols are configured per session rather than per connector, because the same instrument can need different parameters on a quoting session and on an order session.
New opens the Symbol Editor with the same fields, plus a few optional ones that only some providers need: Price Decimal Places, Security ID, Security ID Source and Security Type. Price Decimal Places set here applies to the connector only – the precision of the instrument on the platform always comes from Symbols, and quotes from the connector are rescaled to it.
Calculated Symbols defines synthetic instruments – ones whose price is derived from other data rather than quoted directly, for example by inverting a pair or applying a multiplier.
- MTR Symbol – the name the calculated instrument gets in the platform.
- Symbol Alias – the source instrument the calculation is based on.
- Inversion – whether the quote is inverted, so that X/Y becomes Y/X.
- Multiplier and Price Multiplier – multipliers affecting value and price conversion respectively.
- OB Size – the depth of the order book for the calculated instrument.
- Default Volume – the default volume, used when generating depth levels.
- Contract Size – the contract size for the instrument.
- Price Decimal Places – the price precision.
OB Generations configures order book generation – the automatic creation of market depth levels for an instrument, based on volume rules and markups.
- Symbol Alias – the instrument the generation applies to.
- Volume Calc Type – how volume is calculated for subsequent levels, for example Normal or Always Increase.
- Decimal Places – precision used for the generated values.
- Max Lines – the maximum number of levels in the order book.
- Volume Change Step – the volume change between levels.
- Volume Decrease Steps / Volume Increase Steps – the list of steps for subsequent levels, which is what shapes the volume ladder.
- Markup Low / Markup High – the markup applied to the lower and upper range of levels.
- Change First Line Volume / Change First Line Spread – control the first level, the one closest to market, separately from the rest.
- Force First Line Volume / Force First Line Spread – force specific values on that first line.
Account Mapper redirects orders from one account onto another on the connector. Each entry is a From Account and To Account pair, added in the Account Mapping Editor; several entries can point to the same To Account, which is how accounts are consolidated into one at connector level.
Bad Tick Filter blocks quotes whose price moves further than you allow, so that a single bad tick from a provider does not reach the platform. A quote that breaks the configured limit is not passed on.
- Symbol Alias – the instrument the filter applies to.
- Allowed Percent / Allowed Points – the largest accepted price change on a quote, as a percentage or in points. You can set either or both.
- Burst Threshold – how many quotes may be filtered in a row before the wider burst limits take over.
- Allowed Percent Burst / Allowed Points Burst – the wider limits used once that threshold is passed.
- Decimal Places – precision used when comparing prices.
- Block Empty OB – when ticked, empty order books – such as those sent when the connector starts or shuts down – are blocked instead of being passed on to the platform.
Why the burst limits exist. So the filter does not fight a genuine market move. An example: with Burst Threshold 5, Allowed Percent 5 and Allowed Percent Burst 10, a run of quotes each differing by 8% has its first five blocked; from the sixth onwards the 10% limit applies, so they are let through. After one normal quote the counter resets. Filtered ticks are recorded in the connector logs.
The filter checks quotes after everything else the connector does to them – calculated symbols, order book generation and the spread checks – so the limits apply to the prices that would actually reach the platform.
One thing to watch: the symbol alias is not checked against the platform’s instrument list, so a typo in the alias means the filter never matches anything and simply does nothing.
Spread Config controls the spread accepted on the order book and what happens to lines outside it.
- Symbol Alias – the instrument the configuration applies to.
- Min Spread and Max Spread – the accepted spread range.
- Min Spread Action and Max Spread Action – what to do with a line that breaks the limit. Delete Line removes the order book line, Change Spread corrects the spread to the allowed value.
- Decimal Places – precision used for the comparison.
Markup Config applies markups on the connector: prices passed on to the platform include the markup, while prices sent back to the provider do not. Markups are configured per instrument and apply to quotes, execution reports and limit orders.
They are configured separately for two purposes – Price, used for the quotes published to the feed, and Trade, used for the prices at which orders are executed. Each has a bid and an ask markup defined as a min and max range, and the system draws a value from the relevant range: from the Price range for quotes, from the Trade range for executions. Set min equal to max and the markup is simply a fixed value. You can configure only Price, only Trade, or both, but whichever you use has to be filled in completely.
In the table this gives eight markup columns – Bid Min Markup Trade, Bid Max Markup Trade, Ask Min Markup Trade, Ask Max Markup Trade and the same four for Price – next to Symbol Alias and Decimal Places.
For pending orders the limit price sent to the provider is adjusted by the Trade markup, so that settlement stays consistent between the client and the provider.
Tick Injector lets you push a quote onto an instrument by hand. It is meant for operational situations where a price has to be forced onto an instrument that is not quoting at that moment.
The view has two parts: the form at the top, and Tick Inject History below it, listing the ticks injected for the selected connector – Time, Symbol, the prices and volumes, User ID and Token – with the usual filtering and sorting. In the form, QFX Symbol lists the instruments currently available on the platform – both provider instruments and calculated ones – and you enter the Bid Price, Ask Price, Bid Volume and Ask Volume; Inject tick sends it.
All fields are required; an incomplete form is rejected with a validation message, an instrument that does not exist is not accepted, and injecting a tick has to be confirmed.
Be aware of how far the effect reaches. An injected price appears immediately in Market watch together with the order book, is included in the candle history that can be downloaded for the instrument, and is applied to clients’ open positions, so it changes their net profit. Trading on such an instrument is possible until the order book runs out, at which point orders are rejected with a not enough liquidity message.
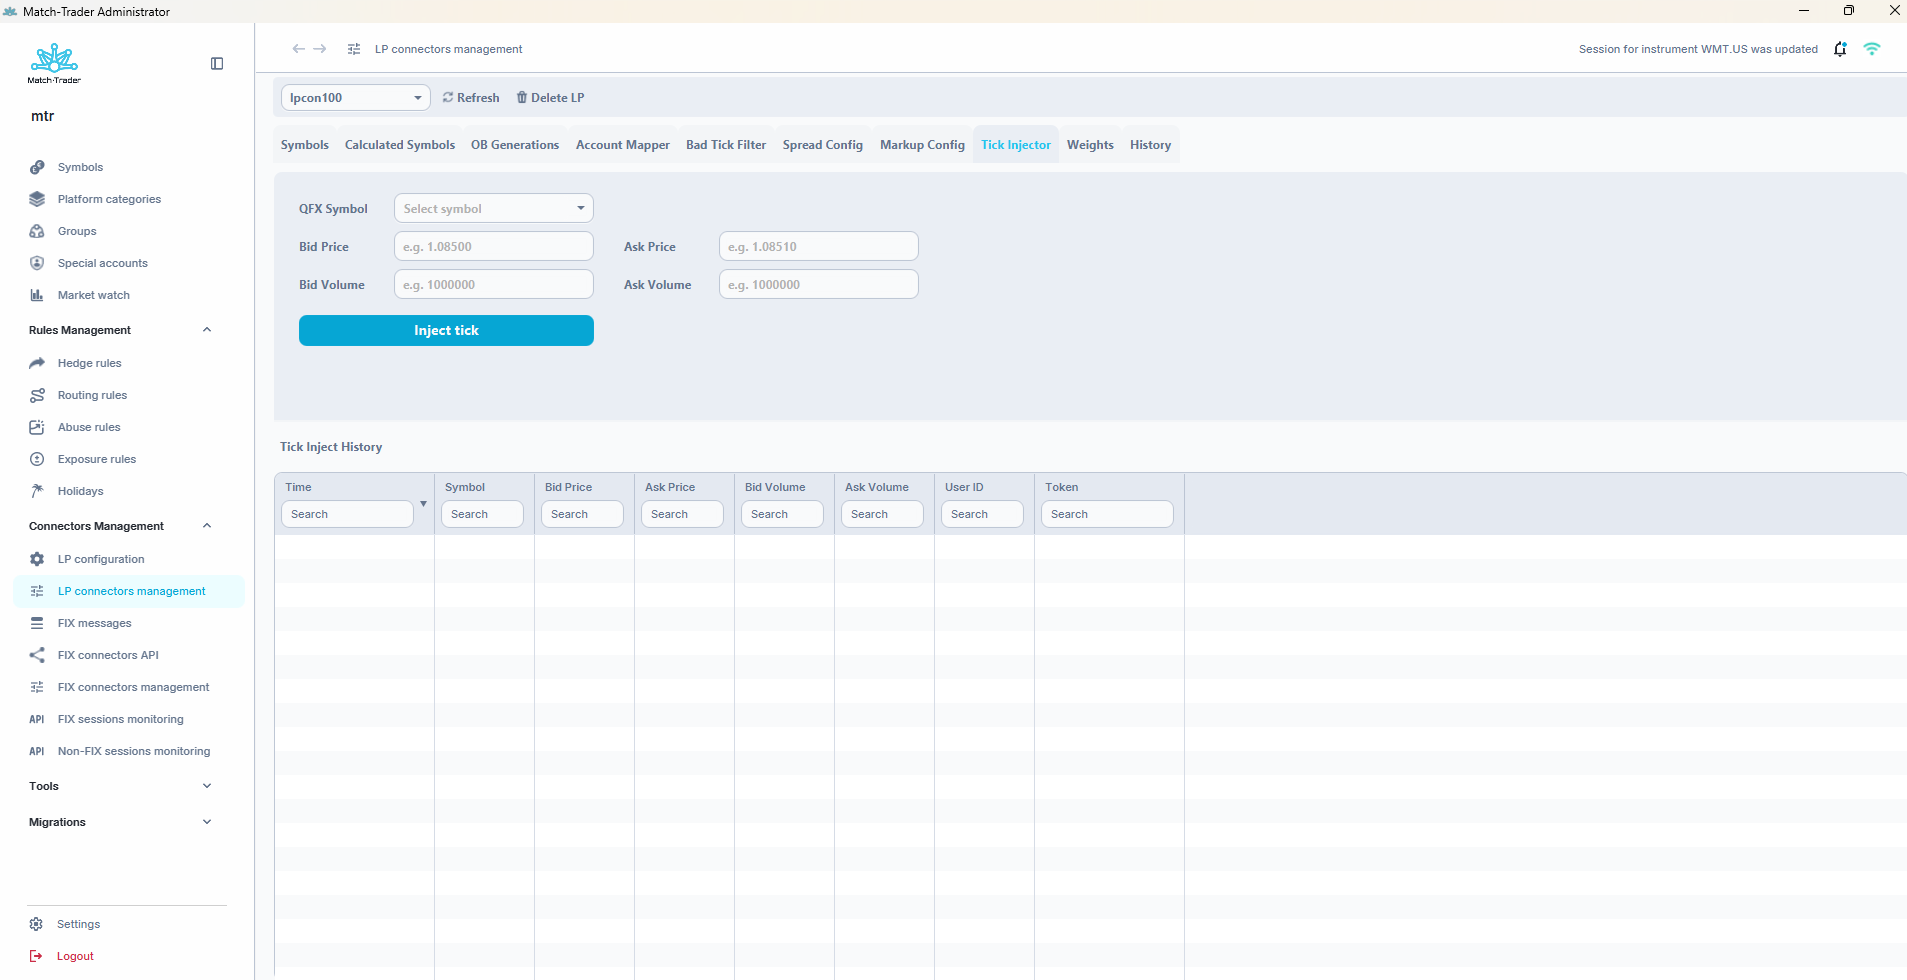
Weights is used when the connector builds one weighted order book out of several quoting sessions – for example several providers quoting the same instrument. Each provider’s order book gets a weight based on how much volume it offers close to the top of the book and how reliably it delivers fresh quotes, and the outgoing order book blends the providers’ levels according to those weights. The weighted mode itself is switched on in the connector setup by the Match-Trade support team; this tab holds its parameters.
- Update Interval and Start Max Delay – two settings for the whole connector, shown above the table: how often, in milliseconds, the weights are recalculated and a new weighted order book is sent, and how long after a restart a provider has to deliver its first quote before its weight is set to zero.
- Symbol Alias – the instrument the settings apply to.
- Distance – the price distance from the top of the book within which a provider’s volume is measured.
- Min Refresh and Max Refresh – the range from which the number of measurements used for each weight update is drawn. Min Refresh cannot be higher than Max Refresh.
- Sample Size – how strongly a new measurement changes the weight: the higher the value, the more slowly the weight moves.
- Book Timeout – after how many milliseconds without a new quote a provider’s order book is treated as stale and its weight starts to drop.
- Book Timeout Easing – how gradually the weight drops while the book stays stale: the higher the value, the more gradual the drop.
- Min Depth – the minimum order book depth used when the providers’ levels are blended.
An instrument missing from Weights does not quote. In weighted mode every instrument needs its own entry here. Without one, its quotes are not passed on even though the provider keeps sending them, and in Market watch it looks as if the instrument were not receiving ticks at all. When you add an entry, only Symbol Alias and Distance are required; the other fields start with default values. If you delete every entry, Update Interval and Start Max Delay go back to their default values as well.
History records every change made to the connector configuration, so a change can be traced back to the person and the moment it was made. It shows Time, Admin ID identifying the admin or system that made the change, Token Name, Config Type saying which configuration was changed, and LP Session.
FIX messages #
This tab shows the FIX messages exchanged with the FIX applications, which is where you go to confirm what was actually sent and received rather than what the system reports afterwards.
The list starts empty. Retrieve Messages asks what to load: the Fix Application, the session, the direction of the messages – incoming, outgoing or both – and the time range. The application and session lists can be searched, which helps on environments with many sessions. Messages are kept for 30 days.
The result shows Date, Direction, Sequence and Message. The search field above the list narrows it further, and Export (CSV) saves it to a file.
FIX connectors API #
This tab holds the API tokens that FIX connectors use to connect to the platform. Its Api Tokens view lists each token with its Token, Hmac and Description.
Create asks for a Token Description and generates a new Token and Hmac; Update, Delete and Refresh manage the existing ones. If you need a FIX connection for an external trading system, contact the Broker Support Team so that the proper configuration can be prepared.
FIX connectors management #
This tab holds the configuration of the FIX connectors themselves. It works the same way as LP connectors management: select the connector at the top of the window, then the session, and configure it in the tabs below. Refresh reloads the view and Delete fixcon removes the selected connector, while Delete session next to the session selector removes just that session.
The toolbar is shared by the tabs: New adds an entry, Bulk Edit and Bulk Delete act on several entries at once, Delete removes the selected one, Import and Export move the configuration in and out as a file, and Submit saves. As everywhere else in the application, nothing is applied until you submit.
Symbols maps instrument names between the external system and the platform, and sets the markup and volume limits applied on that mapping.
- Target Symbol – the instrument name on the external system’s side.
- Symbol Alias – the matching instrument name in the platform.
- Divider – divides the value, used when the two sides quote the instrument on a different scale.
- Max Negative Markup and Max Positive Markup – the limits on the markup that may be applied to the quote in each direction.
- Volume Increase Percent and Volume Decrease Percent – by how much the volume may be adjusted upwards or downwards.
- Volume Change Step – the step by which the volume changes.
Applying one mapping to several sessions at once. New and Bulk Edit open the FIXCon Symbol Editor, which contains the same fields plus a Sessions selector at the top. The selector is a multi-choice list of the connector’s sessions with a search field and a Select All option, and the counter next to it shows how many are currently selected. This is what makes the editor worth using: one mapping can be applied to several sessions in one go instead of being repeated session by session.
Account Mappings redirects orders from one account onto another on the connector. Each entry is a pair: From Account and To Account. Before adding a mapping, choose the Account Field in the field next to the session selector – TAG1 or TAG448, the FIX tag the From Account is read from. Without it, New stops with an Account Field must be selected! message. Delete mapping removes the selected pair.
Settlement Dates defines when instruments settle, which matters wherever the settlement day – not just the trading session – has to be known.
- Symbol – the instrument the entry applies to.
- Plus Days – how many days after the trade the settlement falls.
- Tick Over Time Zone – the time zone, chosen from a list, in which the roll to the next settlement date is evaluated.
- Tick Over Time – the time of day at which that roll happens, for example 17:00.
- Holidays – the days excluded from the count, so that settlement does not land on a non-working day. Dates are added one at a time with Add and removed with Remove selected.
History records every change made to the connector configuration, with Time, Admin ID identifying who made the change, Token Name, Config Type saying which configuration was changed, and FIX Session.
FIX sessions monitoring #
This tab lists the FIX applications connected to the system and the state of their sessions.
At the top, FIX Application selects the application whose sessions you want to look at – the list contains the applications configured in your environment, for example fixcon or LP connectors such as lpcon100. Next to it, Connected sessions shows how many sessions of that application are currently connected out of the total configured, for example 2/12, which is the quickest way to see that something is down without reading the table. The search field on the left narrows the list.
Each session is listed with its Port, Last Logon, Name, Target ID, Status, Type – TRADING or QUOTING – and Update Interval. Status is normally CONNECTED, shown in green, or NOT_CONNECTED. Selecting a session and using Login, Logout, Reset or Disconnect acts on that session directly. The list refreshes on its own, as often as FIX sessions refresh [s] in Settings says.
Changes waiting to be applied. When the configuration of a session has been changed on the connector side – for example its address or connection parameters – the session shows PENDING_CHANGES, in orange, until the change is applied. Selecting such a session turns Disconnect into Apply Changes. The button works like Disconnect, so expect the session to drop and connect again; where the connector can list what has changed, the list is shown first and you confirm it with Submit.
At the bottom of the window, Events shows what has happened on the selected session – logons, logouts, resets and disconnections – and Messages shows the messages exchanged on it, with a search field, a Direction filter and Download. Messages are collected only while the Messages tab is open. These two tabs are the first place to look when a session connects and immediately drops.
Checking what a session is actually running with. Double-clicking a session opens a window with its current configuration. This is the quickest way to confirm the live configuration rather than what you believe was set.
The Update Interval column sets how often, in milliseconds, the feed is refreshed and sent to the platform. At 100, the feed is refreshed every 100 milliseconds, so at most 10 ticks per second can appear. Enter a value only for the quoting session.
Non-FIX sessions monitoring #
Non-FIX sessions monitoring does the same for LP connectors whose sessions do not use the FIX protocol – for example providers connected over WebSocket or REST – so that the status of every connection can be checked in one place.
Select the connector in LPCon to list its sessions with ID, Name, Type, Status, Driver and Update interval [ms]. Reset resets the selected session.
Below the list, the messages exchanged on the selected session are shown with Timestamp, Protocol, Direction and Message. They can be narrowed with the search field and the Protocol and Direction filters – INCOMING or OUTGOING – and saved with Download. As with FIX sessions, messages are collected only while you are watching them. How often the view refreshes and how many messages it keeps is set in Settings, with Non-FIX sessions refresh [s] and Max non-FIX messages.
Tools #
Tools gathers the maintenance and diagnostic tabs – price history, environment settings, the logs, and the accounts that need attention. Two of them are worth knowing well: Global configuration, because it holds settings that affect the whole environment, and System journal, because it is where most questions about “why did this happen” are answered.
Candles maintenance #
Candles maintenance is where the chart history for an instrument is inspected and corrected. A candle that is wrong – a spike from a bad tick, a gap left by a feed interruption – stays on the client’s chart until it is fixed here, so this is the tab to use after any incident that affected prices.
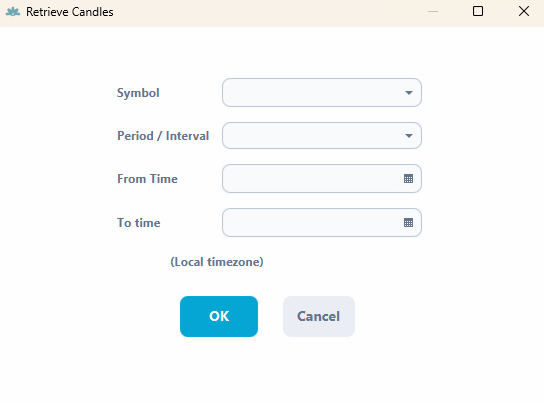
The header shows what you are looking at: the Symbol, the Period, meaning the candle interval, and Count, the number of records retrieved.
The toolbar.
- Retrieve – opens Retrieve Candles, where you choose the Symbol, the Period / Interval – from M1 up to MN1 – and the From Time and To time, entered in your local time zone. The view starts empty; nothing is loaded until you retrieve.
- Copy – copies the selected records.
- Export (CSV) – downloads the retrieved history. Worth doing before correcting anything, so you have the original values.
- Import (CSV) – uploads history to the server for the instrument, which is how a longer stretch of missing candles is filled in.
- Submit – saves the corrections you made in the table.
The columns.
- Start time (UTC) and Start time (current TZ) – when the candle opens, shown both in UTC and in your own time zone side by side, so incident times reported by clients do not have to be converted by hand.
- BidO, BidH, BidL, BidC – the open, high, low and close of the bid price within the candle.
- AskO, AskH, AskL, AskC – the same four values for the ask price.
- The count columns next to each side – how many ticks the candle was built from. A candle built from very few ticks is often the one worth checking.
Each column has its own search field, so a suspect value can be found without scrolling through a long history.
Global configuration #
Global configuration holds the settings that apply to the whole environment, as opposed to the ones in Settings that apply only to your own copy of the application. It is divided into three tabs – Kafka settings, Kafka status and Global settings – and Refresh reloads them.
Please leave these settings as they are. They are maintained by the Match-Trade team, and changing them affects how the whole environment behaves. They are documented here so you can read them and understand what an environment is set to – not so they can be adjusted.
Kafka settings controls the data the system streams out through Kafka – to the database that stores the history and to external services. Each section has its own Submit changes button.
- Persistence settings – how each type of historical data is written to the database, set separately for Filled Orders, Cancelled Orders, Ledgers, Lp Exec Reports, Account Snapshot, Rejected Orders, Added Orders, Balance Snapshot and Active Order Price Edited, for example to Both or Persistence Service Only.
- Trading statistics emitter settings – Trading statistics emitter enabled sends trading statistics, such as changes in client positions and totals per instrument, to external services. It works only when it is also enabled in the server configuration; otherwise the option is greyed out.
- Ticks streaming settings – Ticks streaming enabled streams the prices received by the system to external services, for example for tick charts on the platform.
- State replication settings – Client equity replication enabled sends the current equity of client accounts to external services, and Client equity event push interval (MS) sets how often: within each interval only the latest update is sent.
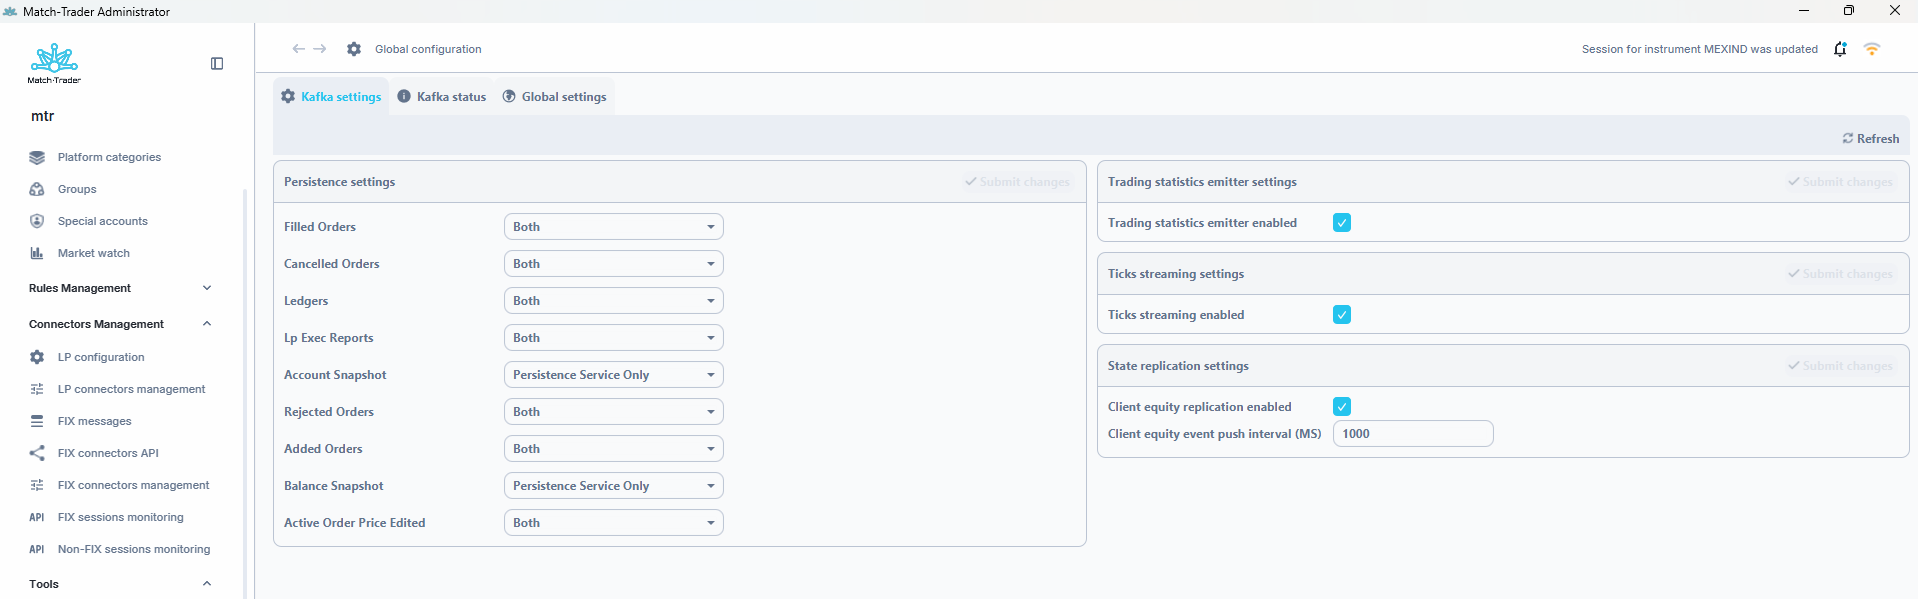
Kafka status shows whether each of these data streams is working – RUNNING, TURNED OFF, CONNECTING or FAILED. For client equity you can also send the current state again or restart the replication.
Global settings holds the remaining settings of the environment:
- Global Trusted Market – decides whether the market is always treated as trusted. Turned off, at least one provider quote has to be present in the order book for a given instrument before market orders can be executed and before pending orders and stopouts can be triggered – which is normally the right choice for forex. Turned on, the market is always trusted, so market and pending orders can be executed regardless of whether provider orders are present.
- Legacy Snapshots – keeps compatibility with older versions of the risk engine.
Audit logs #
Audit logs records what people did in the Admin, Manager and White Label Manager applications. Every request that changes something is logged, whether it came from the application interface or through the API. Requests that only read data are not logged.
This is the tab that answers “who changed this, and when” – a setting that is suddenly different, a position that was edited, a group whose configuration no longer matches what you expected.
Choosing what to load. The list starts empty – you say what you are looking for before anything is loaded. The filters sit at the top of the view:
- Application – Admin, Manager or WL Manager; you can select more than one.
- Operation Type – the kind of operation. The list of available types depends on the applications you selected.
- From and To – the time range, next to a tooltip reminding you how far back logs are kept.
Refresh loads the entries for the chosen filters and Export (CSV) saves them to a file. Once the entries are loaded, every column has its own search field – that is how you narrow the result to one staff account, one token or a message containing a given account or position number. The number of entries loaded is shown at the bottom of the view.
The columns.
- Date – when the operation was performed.
- Application – the application in which the operation was performed.
- Operation Type – what was done, for example a position being opened.
- Message – the detail that makes the entry usable: the account and position number for a position operation, the type of change for a position edit, the group name for a group edit, the instrument name for an instrument edit.
- Special Account ID – the staff account that performed the operation.
- Token Name – the token used.
- IP – the address the request came from.
Results are paged, so there is no cap on how many entries a query can return. Logs are kept for three months back, and the tooltip next to the filters says the same.
If a query returns nothing, widen the time range first, then check the application and operation type, and confirm which token the person was using.
Automations #
Automations runs prepared scripts against client accounts on a schedule, instead of repeating the same operation by hand. A job pairs a script with a condition deciding which accounts it applies to, and an interval deciding how often it runs.
If the tab is not in your menu, the automation service is not running in that environment – the tab is hidden when there is no connection to it.
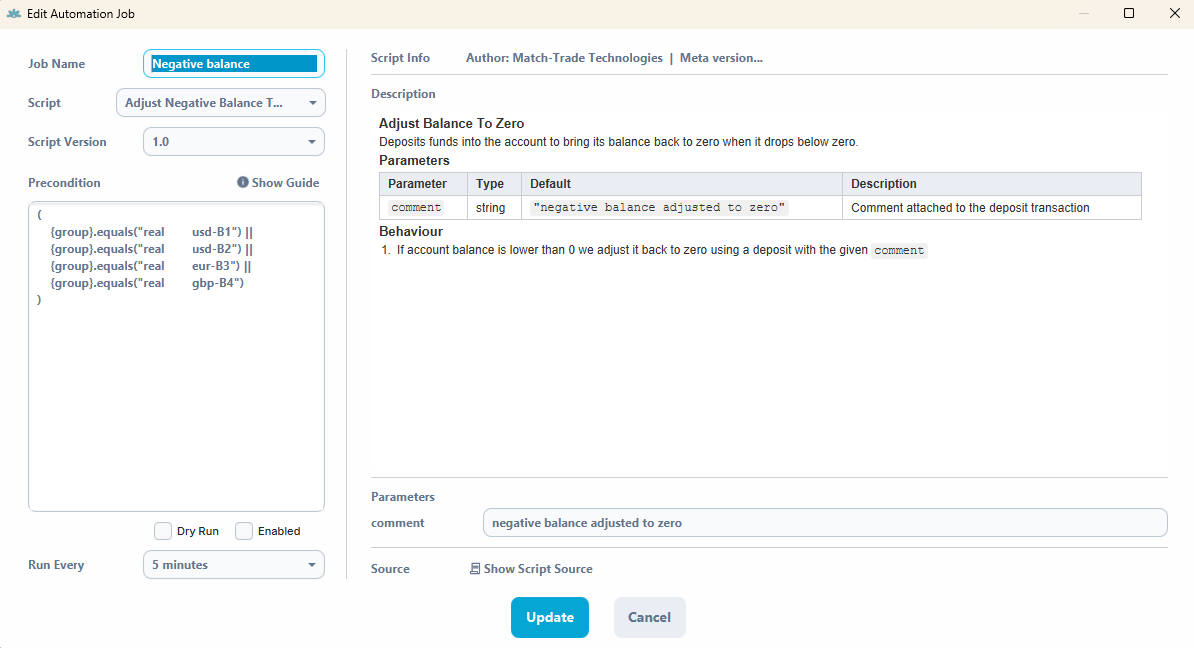
The main view lists the jobs with their Name, Status – Active or Disabled – Run Every, Script Name, Script Version, Dry Run, Enabled and Issues. Create Job adds a job and Refresh reloads the list; everything else is reached through the right-click menu on a job. Note that the list does not refresh on its own, only when you ask it to.
Configuring a job. Create Job opens Create Automation Job:
- Job Name – a unique name for the job.
- Script – the script to run, chosen from the scripts available in your environment – for example Adjust Negative Balance To Zero, Charge Credit Interest, Set Leverage Ratio Percent or Zero Credit When Equity < Credit.
- Script Version – the version of that script. To change a script already in use, publish a new version rather than editing the existing one, so that running jobs are not altered underneath you.
- Precondition – the condition an account has to meet for the script to run against it, for example balance > 100 or group = test. The Show Guide button next to the field lists the available values and operators.
- Dry Run – simulates the job: it runs on schedule and its logic executes exactly as written, but nothing reaches the platform. Start every new job with it ticked, check the results in System journal, and untick it only once the job does what you expect.
- Enabled – whether the job runs at all; ticked by default for a new job. A disabled job is ignored completely: no conditions are evaluated and no scripts run, not even in a dry run.
- Run Every – how often the job checks its condition and runs. The shortest interval is one minute, and Cron expressions are also accepted.
The right-hand side of the window describes the selected script: Script Info and Description say what it does, Parameters lists the values it needs – they appear once you select a script and its version – and Show Script Source displays the script itself.
Preconditions are case sensitive. A group name written with different capitalisation than in the configuration simply does not match, and the job reports that no accounts qualified rather than an error. Check the spelling before assuming the script is broken.
A job with an empty precondition applies to every account. Enabling one shows a confirmation window – read it, because there is no condition limiting what the script will touch.
The result of every execution, dry runs included, is recorded and can be reviewed in System journal.
System journal #
System journal shows the server logs. Where Audit logs answers who changed a setting, the journal answers what the system did with an order – and it is the tab that resolves most client complaints about a trade. Logs can be exported to CSV or TXT.
What is on the screen.
- Count – how many records the current query returned. The limit is 2000, so if you cannot find what you are looking for, narrow the time range or add filters rather than scrolling.
- Timestamp – when the operation was executed.
- Level – the severity of the entry. INFO is normal operation and status updates. WARN is something that could cause problems later but is not affecting operation now. ERROR is an unexpected or critical problem. DEBUG is detailed diagnostic information, normally enabled only while investigating an issue.
- Service name – which service produced the entry. Useful as a filter to cut the volume down.
- Log – the entry itself.
To find something you retrieve the logs first, choosing the log level, the service name, the time range and the text to search for.
How to trace a single order. The most useful thing you can do here is follow one order from beginning to end. Take the order number, put it in the filter field, set the period in which it was executed and retrieve the logs. You then have the whole life of that order in one list.
The entries carry the details you need to identify the trade: the trading account login, the instrument, the volume, the take profit and stop loss prices, and the order number. Markers worth recognising:
- Order added from the risk engine – the order was opened on the account without any problem.
- Order rejected – the order did not go through. The entry says why, most often not enough liquidity or not enough margin.
- An entry from the internal routing engine – the client is in an A-book group, so the position was hedged and has a matching position on the hedge account.
- A manager identifier on a closing entry – the position was closed from the Manager application rather than by the client, and the identifier tells you which staff account did it.
An A-book client cannot close a position. This is almost always a discrepancy: the position on the hedge account no longer has its counterpart, because it was closed manually or hit a stopout there. The client gets a rejection. Filter by the order number and retrieve again – the count of entries grows, and among the new ones you will find the manager and the time at which the hedge position was closed, followed by an entry saying the client’s position cannot be closed because its equivalent on the hedge account does not exist. An internal routing error points at the link between the client and the hedge account rather than at the client’s own account.
A client cannot log in to the platform. Usually the wrong password. Filter by the client’s email over the period they were trying. You will see the failed attempt, and then the successful one if there was one. The last entry for the session also shows the client’s IP address, which is worth noting when a client reports access problems from one location only.
A client cannot open a position. Usually not enough free margin for the volume they are attempting. The rejection entry states it directly, and the volume in the entry often makes the cause obvious on its own.
You can also work from the account rather than the order: put the account login in the filter field, in quotation marks so that only an exact match is found, and add a service name to keep the volume down. That returns every operation related to that account in the period.
Other tools #
The remaining tabs under Tools are short.
Candle engine is a separate tab next to Candles maintenance, working through one common candle data provider, so retrieving, uploading and correcting candles all go through the same mechanism. Propagate to higher intervals, when enabled, carries a correction made on one interval over to the higher intervals built from it, which keeps the chart consistent instead of leaving a fixed one-minute candle contradicting the hourly one above it. The toolbar has Retrieve, Import (CSV), Export (CSV), Delete and Update; Update becomes available once you have changed something.
Logged users lists the clients currently logged in, with their connection type, login time, expiration time and session token.
Manager sessions lists the staff sessions currently connected – everyone using the Manager application – with the Manager ID, Creation Time, Session Status, Connection ID and Token Name. Count shows how many sessions there are, and Refresh reloads the list.
Failed accounts lists accounts that stopped working for technical reasons – for example an account the system failed to load or create correctly – with Account Id, Group Name and Fail Time. Restart selected restarts the selected accounts, and an account that restarts correctly disappears from the list. It is worth checking this tab after a bulk account creation, or when operations on one particular account keep timing out.