Redirections and notifications #
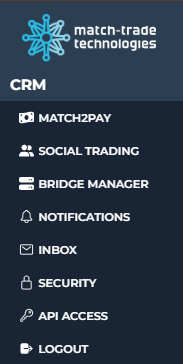
At the top bar of the Back Office, you can find shortcuts to other Match‑Trade products and to your personal account settings.
Product redirections:
- Match2Pay – opens the Match2Pay payment processor panel, where you can:
- Monitor crypto payments in real time
- Review transactions processed by other payment providers integrated with Match‑Trade
- Check payment statuses and troubleshoot failed payments
- Social Trading – opens the Social Trading admin panel, where you can:
- Add and manage Money Managers
- Configure and edit performance/incentive fee settings
- Monitor Money Managers’ performance and earnings
- Bridge Manager – opens the Bridge Manager panel, where you can:
- Monitor trades being hedged to liquidity providers
- Review hedge positions and their current state
- Manually manage hedge trades when needed
Account‑level settings:
- Notifications – In the Notifications tab, you can configure CRM notifications for your user account, including which events you want to be notified about
- Security – in the Security tab, you can manage security settings for your account, including:
- Two‑factor authentication settings (2FA)
- API Access – In the API Access tab, you can manage your personal API credentials:
- Generate new API tokens
- View existing active tokens
- Set token permissions
Broker Analytics #
The Broker Analytics tab provides a summary of your clients’ trading activity and funding, helping you quickly assess overall performance and trends.
In this tab, you can:
- Monitor clients’ trading performance, including:
- Total trading volume
- Profit/loss generated by clients
- Track net deposits, i.e., total deposits minus withdrawals
- Filter all statistics by date range to analyze different time periods
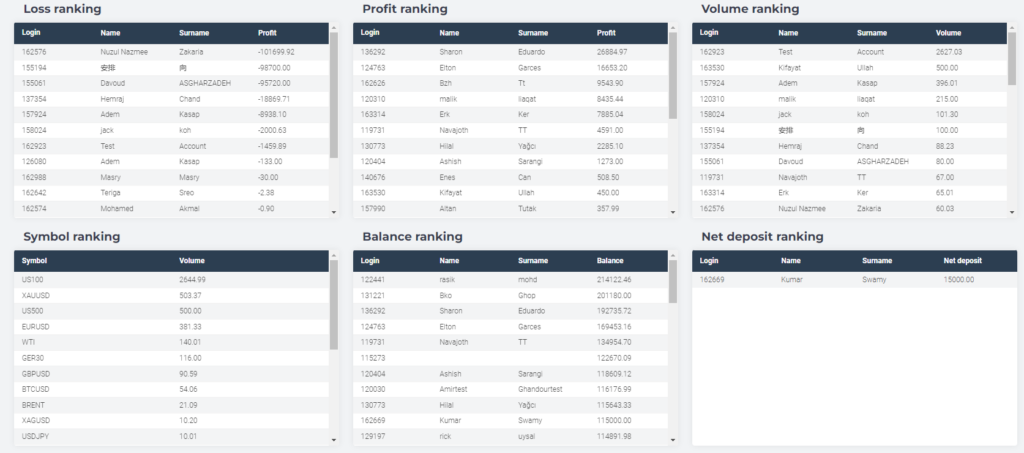
- View rankings that highlight top-performing clients or segments
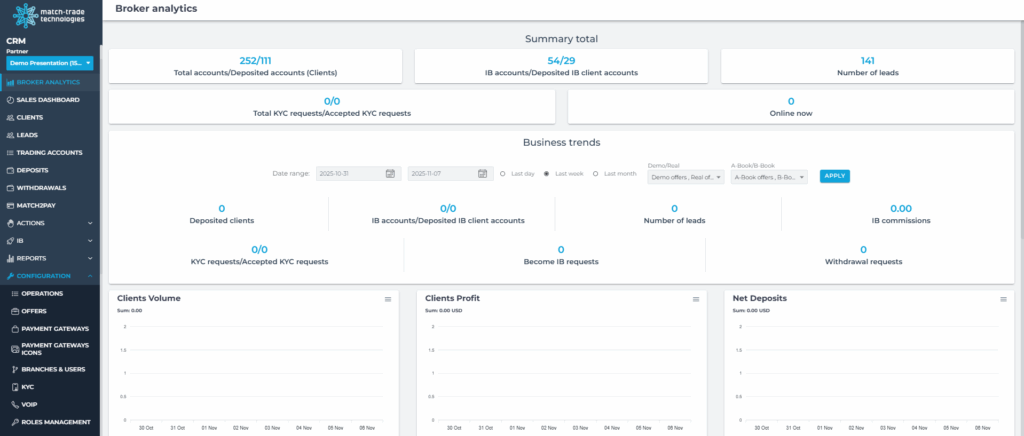
Key Components:
- Date Filter
- Performance Summary
- Trading Volume – total volume generated by your clients within the selected period.
- Client P&L – combined profit and loss of all clients’ closed positions.
- Net Deposits – sum of all deposits minus all withdrawals for the selected time frame.
- Rankings (bottom section) – at the bottom of the page, you can see various rankings that help identify key clients and trends, for example:
- Top clients by volumeTop clients by profit/lossTop clients by net deposits
Sales Dashboard #
The Sales Dashboard tab gives a quick overview of your sales team’s performance and lead funnel. You can track how many new leads were acquired, how many of them made their first deposit, and how leads are distributed across different stages.
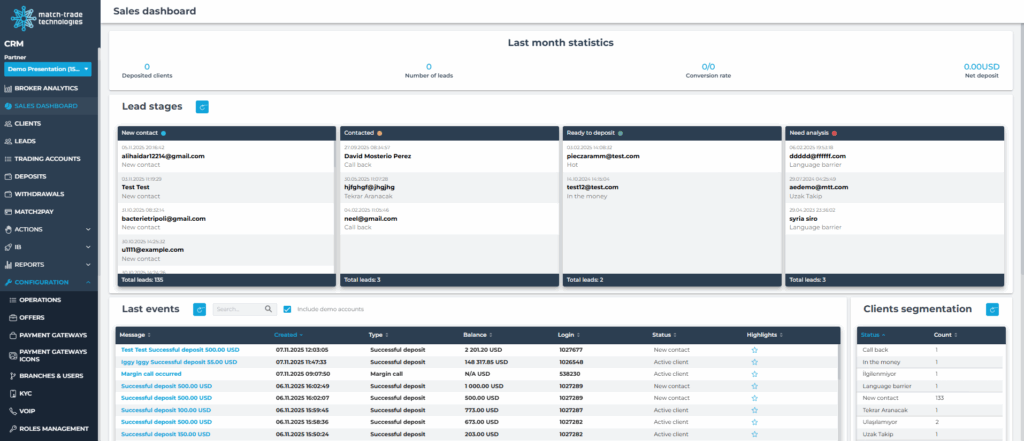
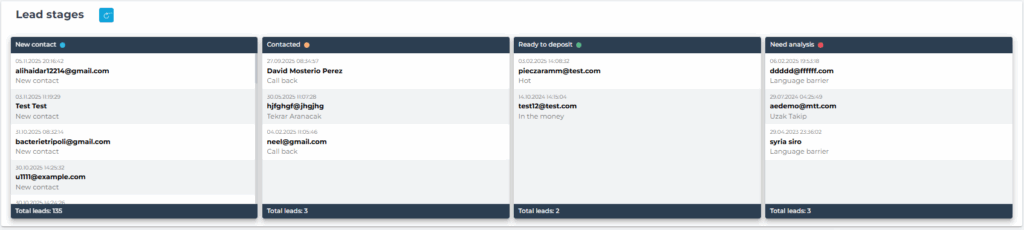
Lead Stages:
- Shows how many leads are currently in each stage/group, based on their lead status.
- Helps you understand where leads are concentrated in the funnel (e.g. New, Contacted, Qualified, FTD, Lost).
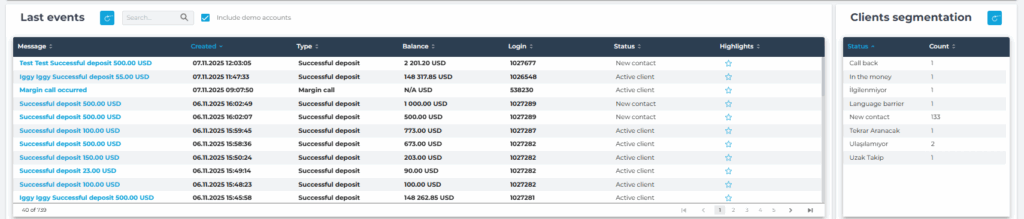
Last Events:
- Displays the most recent trading and payment events related to your leads and clients.
- Useful for identifying fresh activity that may require immediate sales follow‑up.
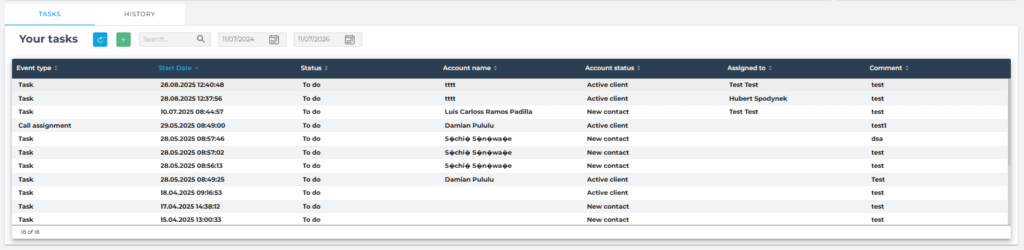
Tasks Management:
- You can view tasks assigned to you and, if you are a manager, tasks assigned to your team members.
- Regular users: see only tasks assigned to them.
- Managers: see tasks assigned to themselves and/or their team (depending on permissions configuration).
- You can add new tasks directly from the Sales Dashboard, for yourself or for other team members (if permissions allow).
- History Subtab
- The History subtab displays tasks with the status “Done”.
- Use it to review completed activities and verify past actions taken for specific leads or clients.
Clients tab #
In the Clients tab, you can view and manage your clients’ information, including:
- Personal data (contact details, country, language, etc.)
- Account details (trading accounts, roles, lead information, assigned manager, status, etc.)
This section is the main place for searching, reviewing, and working with client profiles.
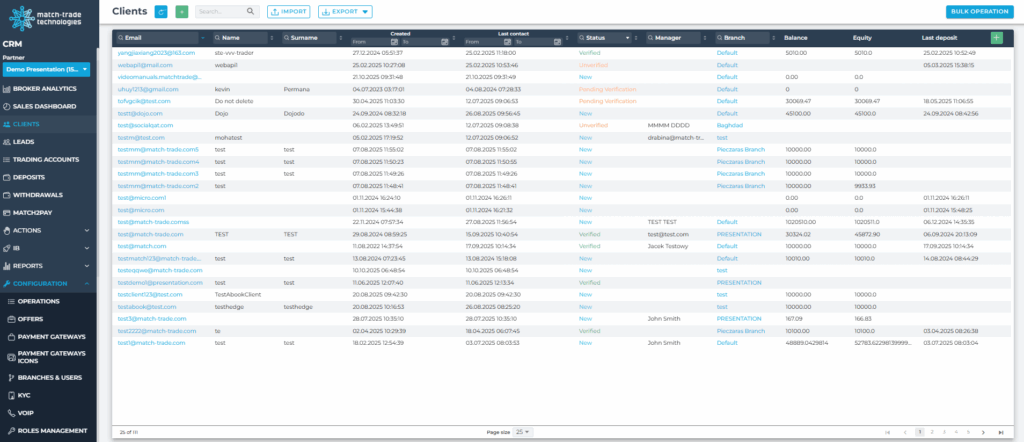
Searching for Clients #

You can easily find any client using the search panel, which offers multiple filtering options for faster results.
You can search by:
- Email address
- Name
- Surname
- Status (e.g., Active, Inactive, Blocked – depending on configuration)
- Manager (assigned account manager)
- Branch
- Country
- Phone number
- Language
- Role (e.g. Client, IB, Partner)
- Lead status (e.g,. New, Contacted, Qualified, FTD)
- Lead source (e.g,. Campaign, Organic, Referral)
- Trading account number
You can also filter clients by account creation date using the available date range fields (From – To).
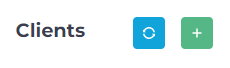
Buttons in this view have the following functions:
| Refresh – you can refresh the list of clients to fetch updated data | Add – you can use it to create new accounts | Import – you can use it to import accounts. Please make sure you used the correct format (you can check it by downloading a sample file in the importing view) | Export – you can export all accounts or accounts matching the filters you provided |
Bulk operations #
In the Clients tab, you can perform selected actions on multiple clients at once using Bulk operations. This is useful for updating lead/client attributes or communicating with a group of clients in a single step.

Available Bulk Operations:
- Assign Account Manager
Assign or change the account manager for all selected clients/leads. - Assign Lead Status
Update the lead status (e.g., New, Contacted, Qualified, FTD) for multiple leads at once. - Assign Verification Status
Set or change the verification/KYC status for the selected clients (depending on your verification workflow). - Assign Branch
Assign a branch (office/region) to multiple clients in one operation. - Broker Notifications
Send broker notifications to all selected clients (e.g., platform messages or notifications, depending on configuration). - Mass Mailing
Send an email campaign/mass mail to the selected group of clients using predefined templates or custom content. - Add Note
This option allows you to add the same internal note to multiple clients at once.
Account details #
To open a client’s details, double‑click on a particular account in the Clients list. This will open a detailed view where you can:
- Review all associated trading accounts
- Access the Timeline (events, notes, tasks, deposits, withdrawals)
- View and manage KYC information (including adding KYC manually, if permitted)
- Send an email directly to the selected client
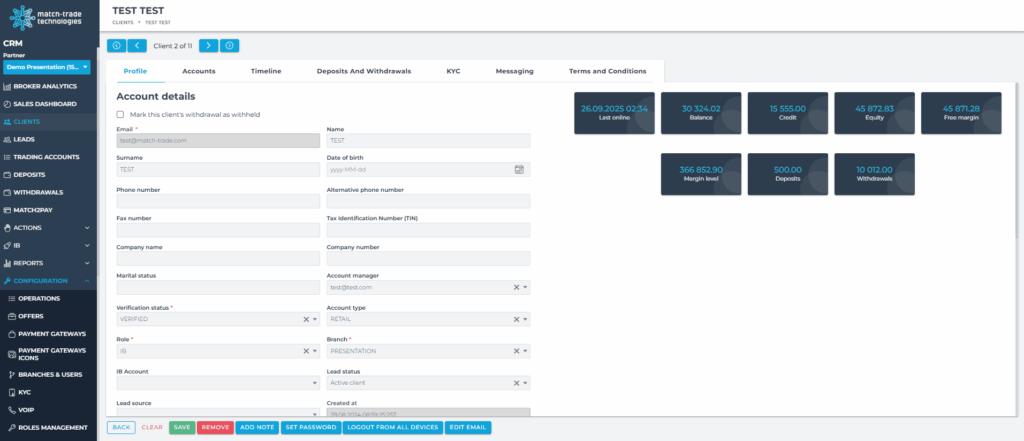
One of the key fields in the account details view is Role. A role defines a predefined set of permissions that determines what a user can view and perform within the Back Office, CRM, and associated portals.
Roles in the Account Details:
- Roles without CRM access
- User – user without the possibility to access the Back Office. This is the user’s account accessed via the Match-Trader platform or Client Office
- IB – IB role gives access to the IB portal (accessed by logging in to the Client Office). IB can see a summary of received commissions, clients introduced by them, and the fee structure assigned to that IB and their sub-IBs
- Sub IB – Sub IBs have access to the same IB portal as IB. They can’t see fees received by IB and subIBs who are in the hierarchy above them
- Roles with CRM access
- Admin – this role is reserved for brokers and gives access to edit accounts, make deposits, withdrawals, and change configuration
- Branch Admin – gives access to the accounts in a selected branch, including creating deposits and withdrawals
- Roles with CRM access that can be edited according to business needs
- KYC – role designed to manage KYC requests and verify users
- Finance – a role designed to check payments (e.g., verify withdrawals) made by the users
- Support & Customer Service – a role designed for employees responsible for managing clients’ inquiries
- Account Manager – role designed for account managers and/or sales departments
- Retention Team Leader – role designed for retention department leaders
- Retention Agent – a role designed for agents responsible for the retention
- Conversion Team Leader – role designed for conversion department leaders
- Conversion Agent – a role designed for agents responsible for the conversion
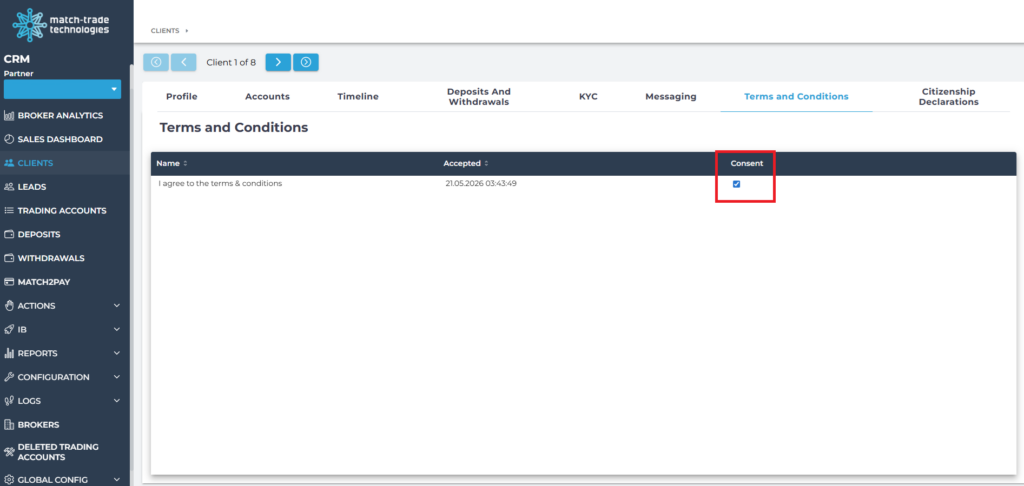
Accepted Terms & Conditions column #
The Clients details now exposes an Accepted column that shows whether the client has accepted the Terms & Conditions during registration or account activation. The column makes it easy to identify clients who have not yet accepted the latest T&C version.
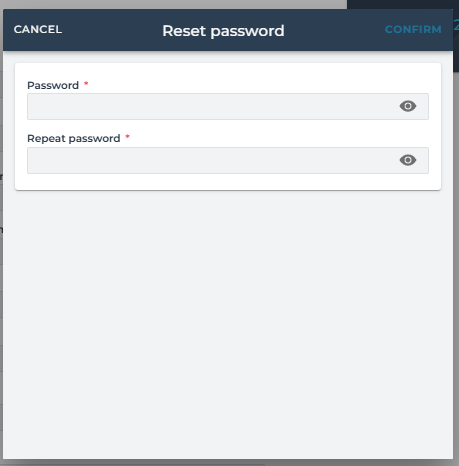
Changing the user’s password #
If you need to change the password for an account, select the desired account from the list and double-click it to open the account details. In the account view, click Set Password.

A new window will appear, allowing you to enter and confirm the new password.
Creating a new account #
To create a new account, click the + button.
When you select this option, a new window will open where you can enter all the necessary information for the new client. Required fields are marked with an asterisk (*).
To add the user directly to the Clients tab, you can choose the Create as Deposited Client option.
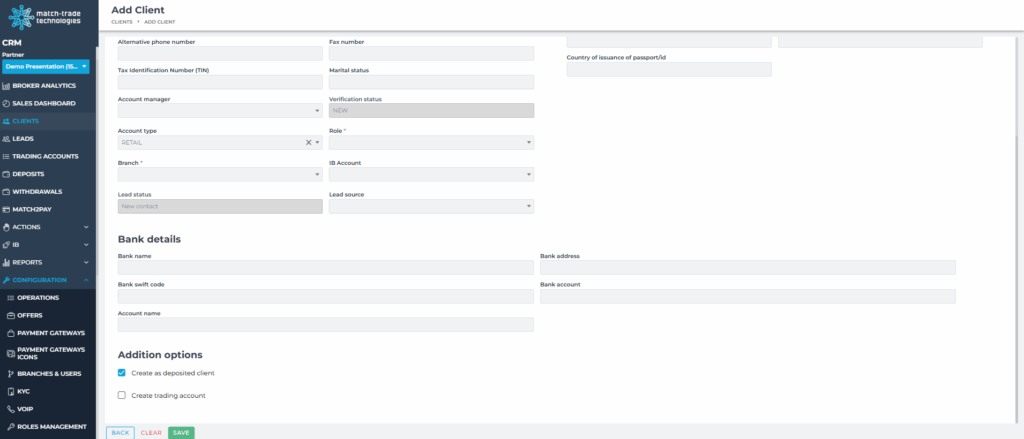
Before initiating any trades, you must first create a trading account. Once the client form is completed, click Create Trading Account and select the appropriate offer to proceed.

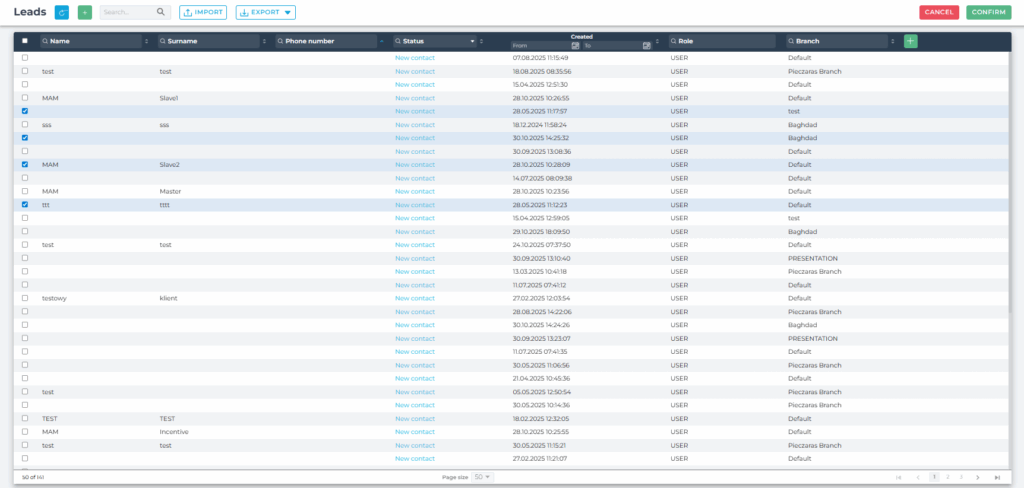
Leads tab #
The Leads tab is used to view and manage all incoming leads before they become clients.

You can also search using the same filters as for the Clients tab.
The buttons in this view have the same functions as in the Clients tab.
| Refresh – you can refresh the list of clients to fetch updated data | Add – you can use it to create new accounts | Import – you can use it to import accounts. Please make sure you used the correct format (you can check it by downloading a sample file in the importing view) | Export – you can export all accounts or accounts matching the filters you provided |
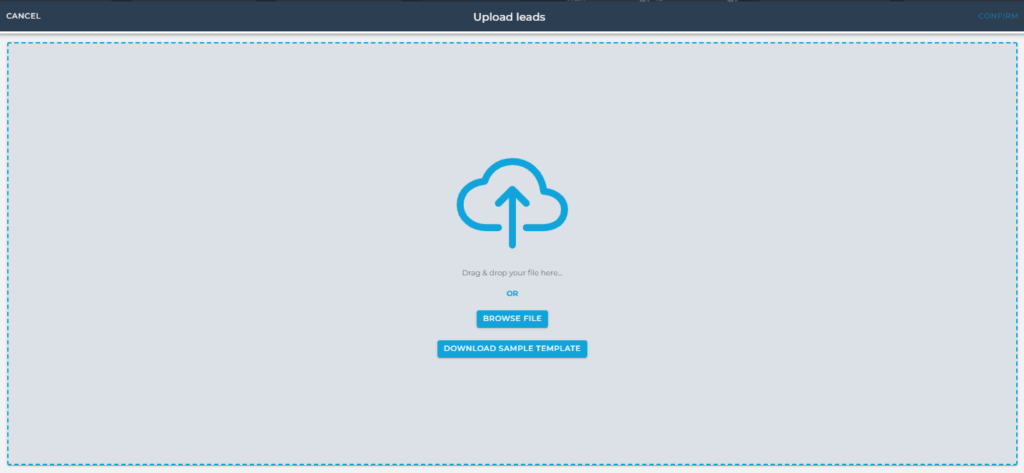
Importing leads #
You can add multiple leads to the CRM at once using the Import function.

How to Import Leads:
- Go to the Leads tab in the CRM.
- Click the Import button.
- In the import window:
- Click Download sample file to get a template with example data and the correct column structure.
- Prepare your import file by:
- Using the same column names and order as in the sample file
- Filling in the data for your leads
- Upload your completed file using the Upload section.
- Confirm the import and wait for the process to finish.
- After a successful import, the new leads will appear in the Leads tab.
File Format Requirements:
- Your file must match the structure of the sample file:
- Same columns/headers
- Correct data types (e.g., email in email field, phone in phone field)
- Unsupported or missing mandatory fields may cause:
- Rows to be skipped
- Validation errors during import
Country Field Format:
- In the Country field, you must use the two‑letter country code according to ISO 3166‑1 alpha‑2.
- Example:
- PL for Poland
- DE for Germany
- GB for the United Kingdom
- Example:
- If needed, you can look up the correct codes on the official ISO website or in your internal country code list.
Integrated Lead Providers #
Bulk operations #
Similar to the Clients tab, you can perform bulk operations in the Leads tab as well, streamlining your workflow.
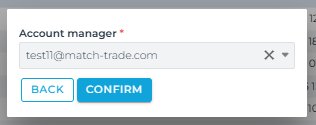
Example for the bulk assigning an account manager #
In bulk assignment mode, you can select multiple leads by ticking the checkboxes next to each entry.
Next, click the Confirm button. This will open a new window where you can proceed with the next steps.

In this window, you can either choose an account manager from the dropdown list or begin typing to search by name.
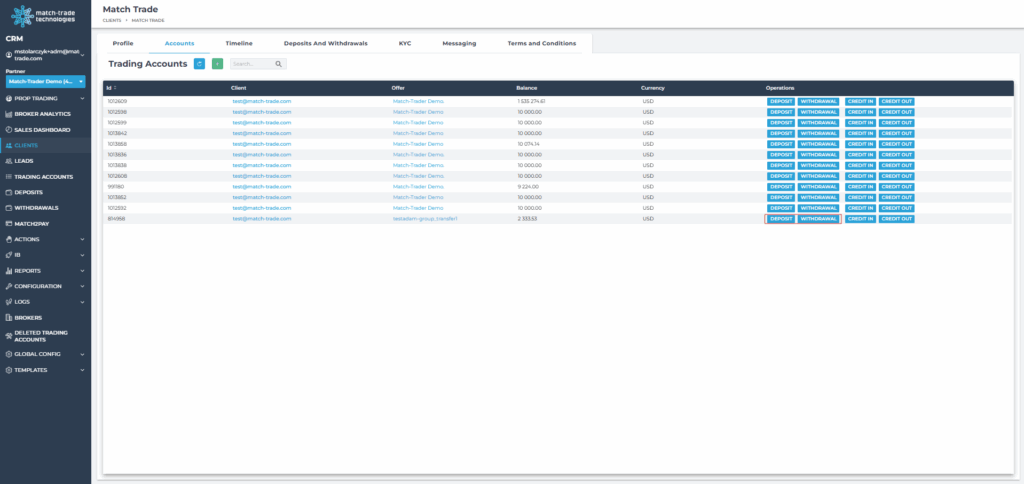
Trading accounts #
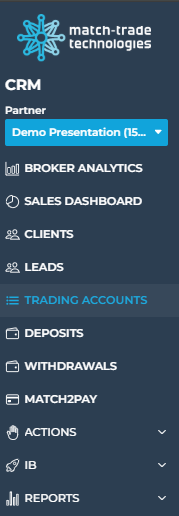
In the Trading Accounts tab, you can view and manage all trading accounts registered in your CRM.
This view is useful for:
- Quickly checking trading account details
- Navigating to related client information
For each trading account, you can see key details such as:
- Trading Account ID – unique identifier of the trading account
- Creation Time – date and time when the account was created
- Email – email address of the client who owns the account
- Offer – trading offer assigned to this account
- Balance – the amount available on the trading account
You can usually click or double‑click a row to open more details about the trading account and the related client (when clicking on the mail).
Deposits & Withdrawals tabs #
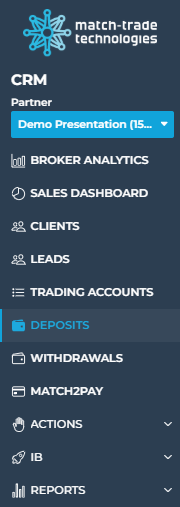
The Deposits and Withdrawals tabs allow you to view and manage all deposit and withdrawal requests submitted by clients.
In these tabs, you can:
- Review all incoming deposit/withdrawal requests
- Approve or reject requests (depending on your role and permissions)
- Monitor the status and details of each transaction
Information Available per Request #
For each deposit or withdrawal request, you can see key data, including:
- Creation time – when the request was created
- Client email – email address of the client who submitted the request
- Trading account ID – the trading account related to the transaction
- Offer – trading offer/account group associated with the account
- Amount – requested transaction amount
- Net amount – amount after fees or adjustments (if applicable)
- Currency – transaction currency (e.g., EUR, USD, BTC)
- Status – current status of the request (e.g,. Pending, Approved, Rejected, Completed)
- Payment gateway – payment method/provider used (e.g,. Match2Pay, bank transfer, card processor)
- Crypto address – destination or source crypto address (for crypto payments only)
- Reference code – reference/transaction code (typically for bank transfers)
- Match2Pay Payment ID – unique ID if the transaction is processed via Match2Pay
- Account Manager – account manager assigned to the client (if available)
Deposits and withdrawals statuses #
Creating a deposit or withdrawal #
You can carry out deposit, withdrawal, credit in, and credit out operations directly within the CRM. To initiate a transaction, select the relevant client, go to the Accounts tab, and all available transaction options will be displayed for you there.
Match2Pay tab #

You can conveniently view your Match2Pay balance directly within the CRM. Additionally, you have the option to request a withdrawal to your hedge account from the same interface.

Actions tab #

In this tab, you can manage four types of information:
- Accounts Removal – easily delete accounts that were previously removed from the Manager
- Trading Accounts – access all trading account details. You can also confirm or reject trading accounts create requests
- KYC – all KYC requests in one place. You can also manage existing KYC from this view
- Money Managers – view all your Money Managers and confirm or reject new requests
- Mailing – check all emails sent via the CRM
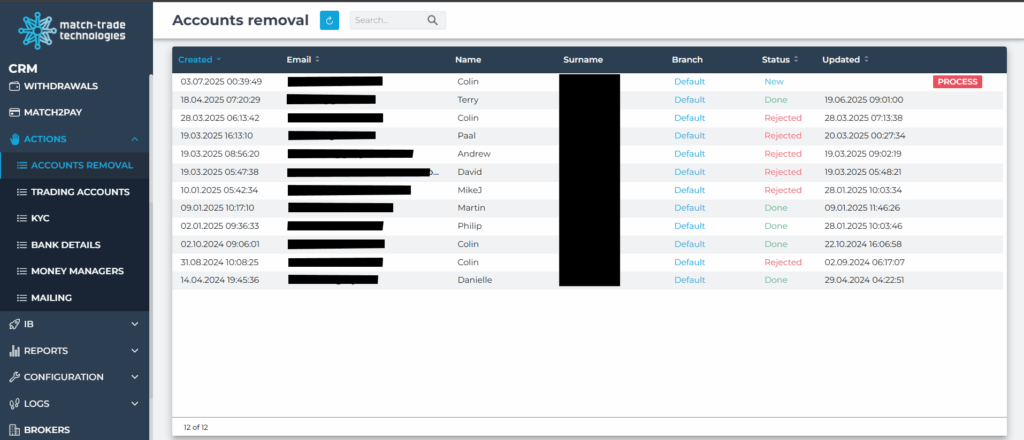
Accounts removal #
In the Accounts Removal tab, you can easily delete accounts that were previously removed from the Manager. To proceed, simply click the Process button next to each account entry to remove them individually.
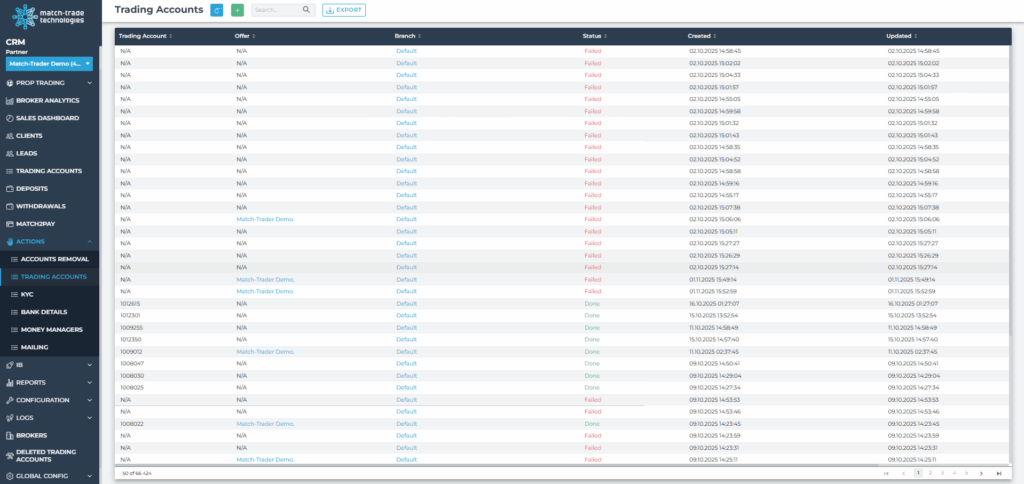
Trading accounts #
In this tab, you can view all trading accounts associated with your clients. To locate a specific account, use the search field or sort the table by available categories such as Trading Account Number, Account (Email), Offer, Branch, Status, or Creation/Update Date.
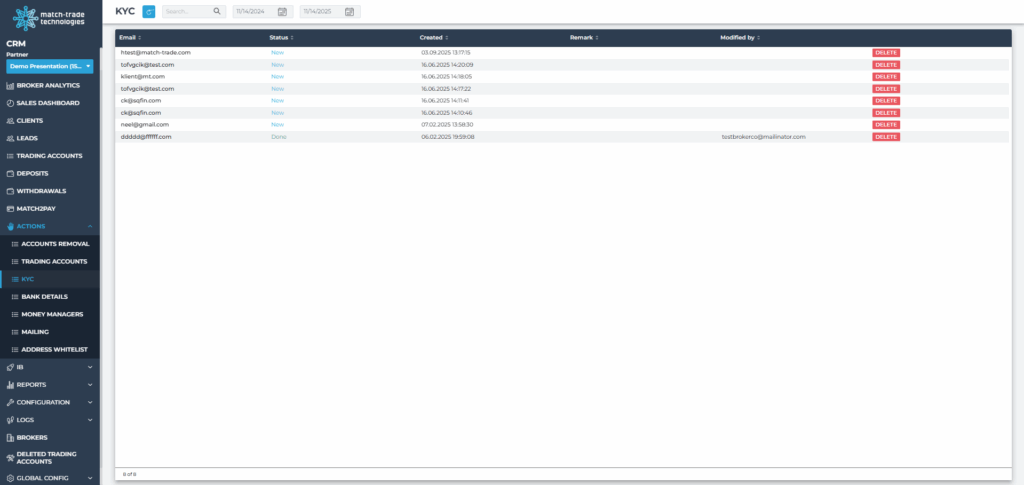
KYC #
In this tab, you can view and verify your clients’ KYC requests. To access the details of a specific request, simply double-click the corresponding entry. The search field and category sorting functions operate just like in other tabs, allowing you to quickly locate and manage KYC submissions.
Bank details #
In this tab, you can efficiently manage and review your clients’ bank information. It offers a clear, organized overview of all submitted bank details, streamlining the process of verification and updates.

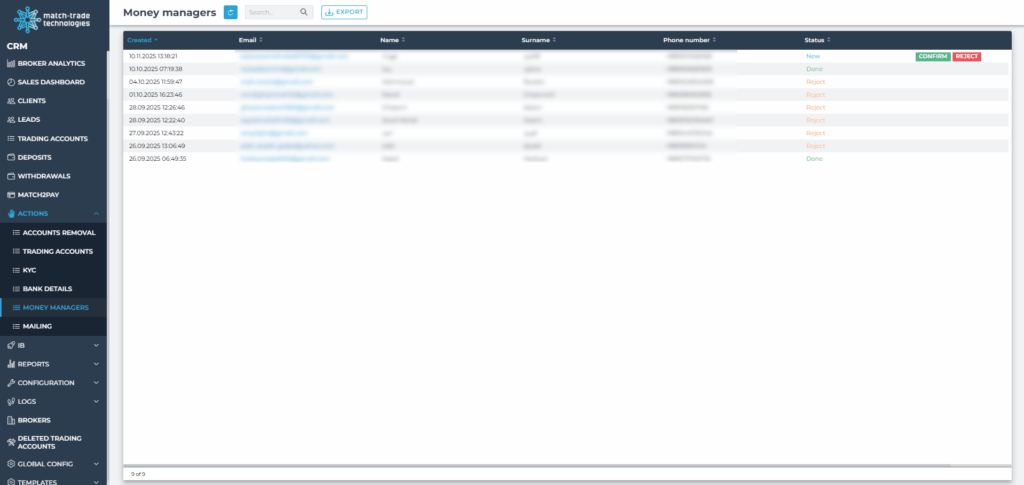
Money managers #
In this tab, you can view incoming requests from your Money Managers. To manage these accounts, simply use the Confirm or Reject buttons provided for each request.
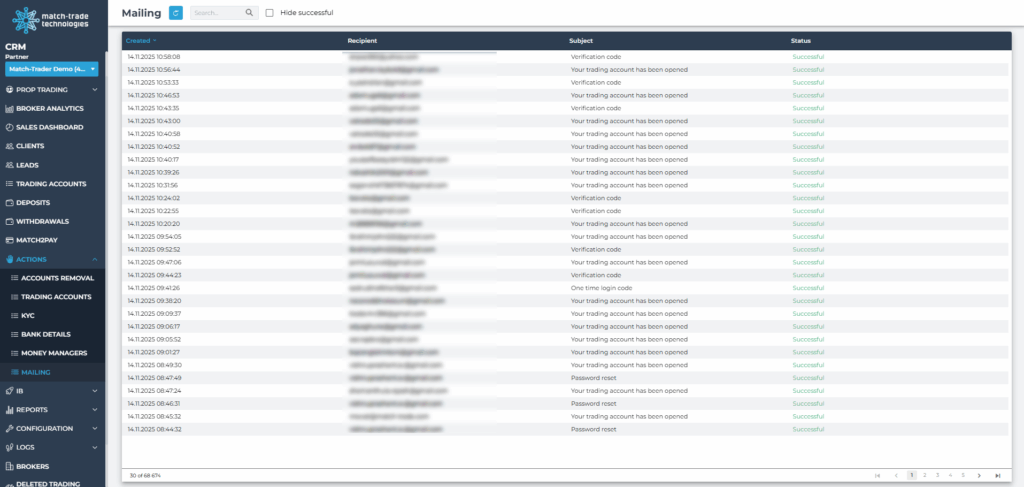
Mailing #
This tab provides an overview of all emails sent through the CRM, offering a clear record of communication history.
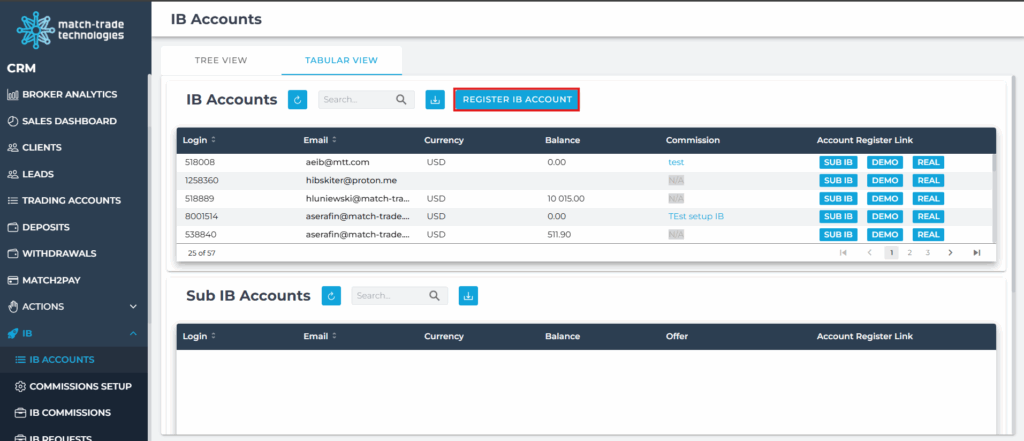
IB tab #
In this tab, you can manage your IB accounts, their sub-IBs, and associated clients. You also have access to account registration links, which can be viewed and copied. When a user registers using one of these links, they are automatically assigned to the corresponding IB.
IB accounts #
In this tab, you can view all your IBs, sub-IBs, and their associated clients.
Two display modes are available:
- Tabular View: Offers a detailed, row-by-row breakdown of account connections for precise review.
- Tree View: Provides a visual representation of the hierarchical structure, making it easy to analyze relationships at a glance.
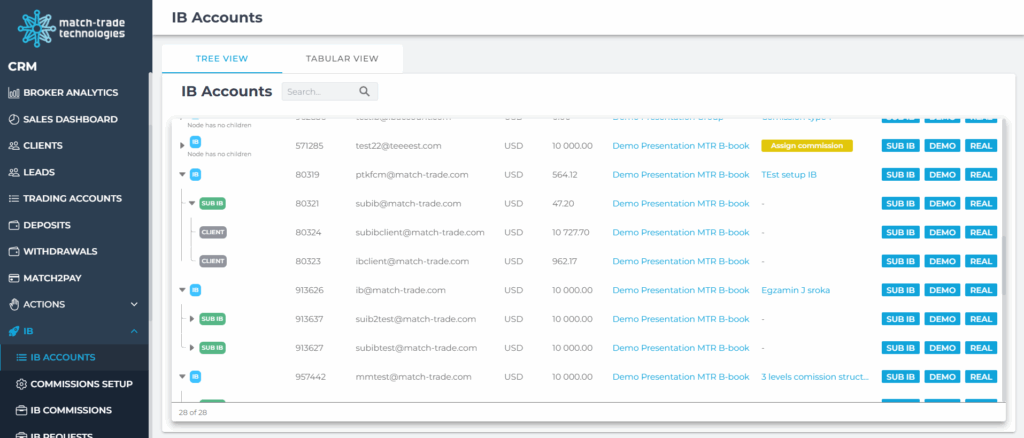
To view a sub-IB or a client associated with a specific IB or sub-IB, you must first select the corresponding IB or sub-IB from the list.
Creating accounts in the IB structure #
Clients can apply to become an IB directly from the Match-Trader platform:
- The client clicks the “Become IB” button in the platform.
- This creates an IB request, which must be reviewed and approved by the broker in the IB Requests tab in the CRM.
Assigning the IB Role:
- Automatic role assignment via referral link
- When a new account is created using a referral link (available in the IB Accounts tab).
The IB role is assigned automatically to the user associated with that referral.
- When a new account is created using a referral link (available in the IB Accounts tab).
- Manual role change in the account edit view
- You can also manually change the role of an existing user:
- Open the user’s account in the Clients tab.
- Go to the edit view of the account.
- Change the Role field to IB (or another appropriate role).
- Save the changes.
- You can also manually change the role of an existing user:
IB Commission setup #
In the IB Commissions tab, you can configure and manage the commission structures assigned to Introducing Brokers. Each IB can have an individual commission setup.
In this tab, you can:
- Edit existing parameters (e.g., commission per lot, per symbol, per account group)
- View the list of all IB commission setups
- Search/filter existing setups (e.g., by IB, name, status – depending on configuration)
- Select a particular commission setup to:
- View details (instruments, groups, levels, payout rules, etc.)
IB Commissions #
The IB Commissions tab enables you to manage commission setups for IB accounts and monitor calculated commissions for both IBs and their sub‑IBs.
Key Functions:
- Review calculated commissions for any IB or sub‑IB within a chosen time period
- View all IB trading accounts along with their assigned commission setups
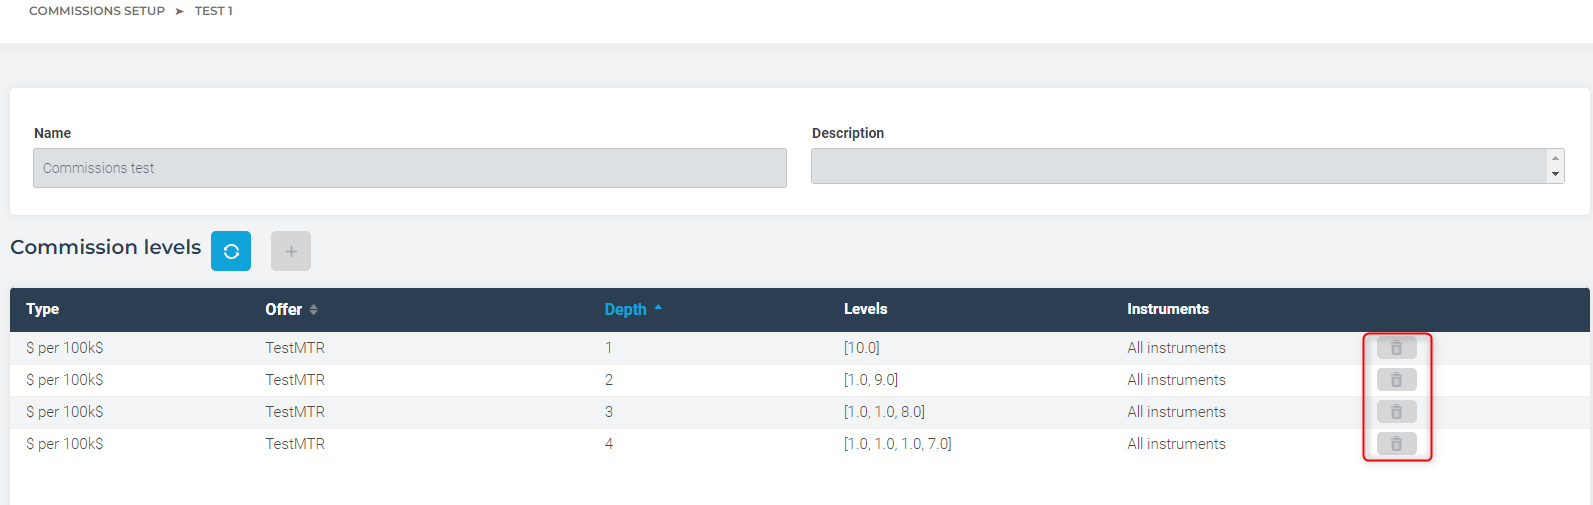
How to create an IB commission structure #
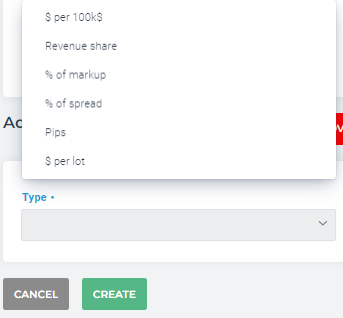
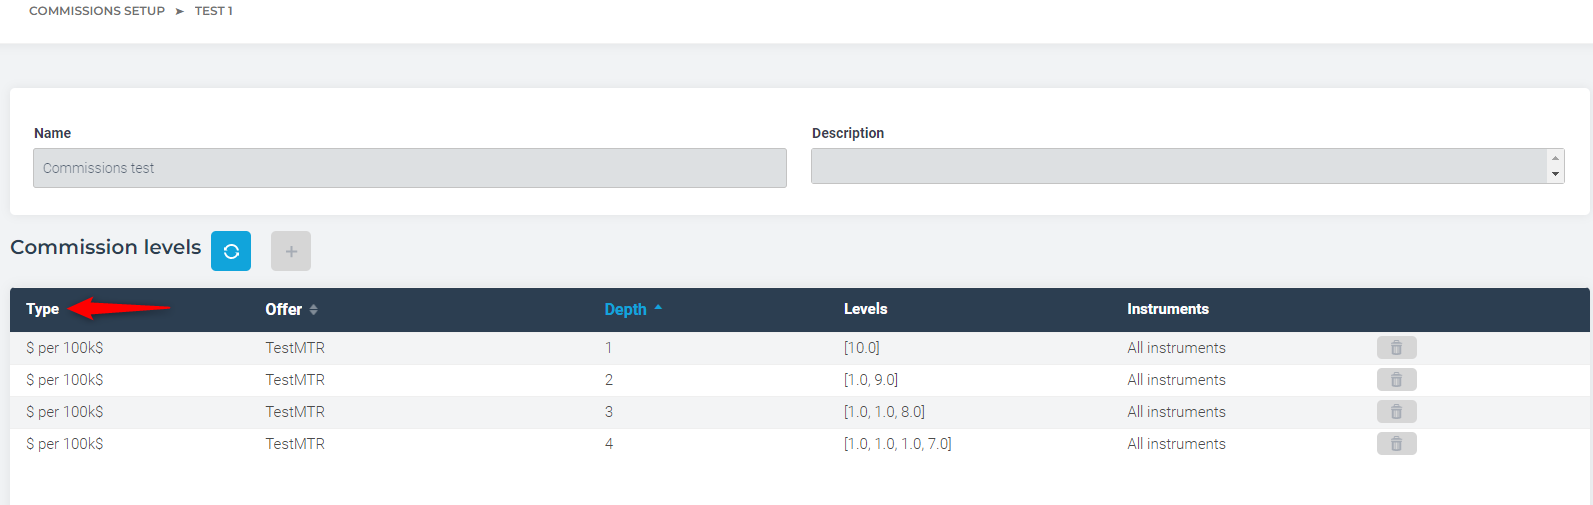
You can configure how commissions are calculated for an IB by creating a Commission Setup with one or more commission levels. To configure commission setup, use the + button.

You can define commission in one of the following ways:
- per100k traded – fixed amount per each 100,000 of traded notional value
- Revenue share – percentage share of the broker’s revenue
- Percentage of markup – percentage calculated from the markup applied to the client
- Percentage of spread – percentage calculated from the spread
- Pips – fixed number of pips as commission
- $ per lot traded – fixed amount per each traded lot
You can add multiple levels (e.g. per symbol group, volume tier, etc., depending on configuration).
To remove a specific commission level, use the bin / delete icon on that row.
For each commission template, you must define which offers it applies to:
- Select the Offer(s) from the list of client trading offers for which you want to calculate IB commission.
- If a given offer is not added to the commission template:
- No commission will be calculated for trades done on that offer.
- Any trading volume on that offer will be ignored for this IB’s commission.
Make sure all relevant offers are included so the IB is paid correctly.
Creating a commission template is not enough on its own – it must be assigned to an IB account:
- Go to the IB Commissions / IB Accounts view.
- Select the desired IB trading account.
- Open the commission assignment screen (e.g. by double-clicking the Login ID).
- Choose the commission template you created and assign it to the selected IB account
- Save the changes.
Once assigned, the template will be used to calculate and accrue commissions for that IB based on the defined levels and offers.
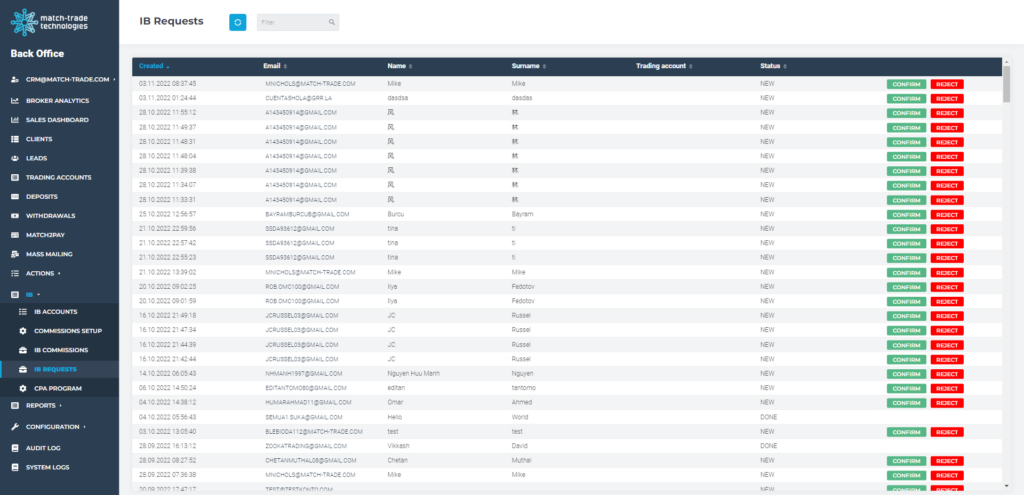
IB Requests #
In this tab, you can view all IB registration requests submitted by clients. If a client is already linked to an existing IB, confirming their request will automatically assign them as a sub-IB under that IB.
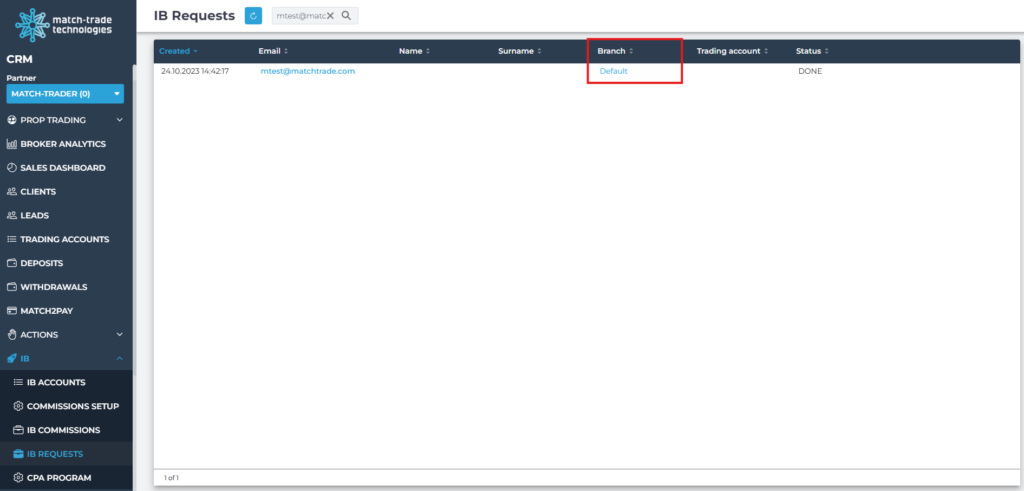
Branch column on IB Requests #
The IB Requests list now includes a Branch column that shows the CRM branch of the client who submitted the IB registration request. This allows Branch Admins and multi-branch brokers to quickly identify which branch a request belongs to and to filter or sort requests by branch before approval.
CPA Program #

In this tab, you can assign bonuses to IBs based on their clients’ First Time Deposits (FTDs).
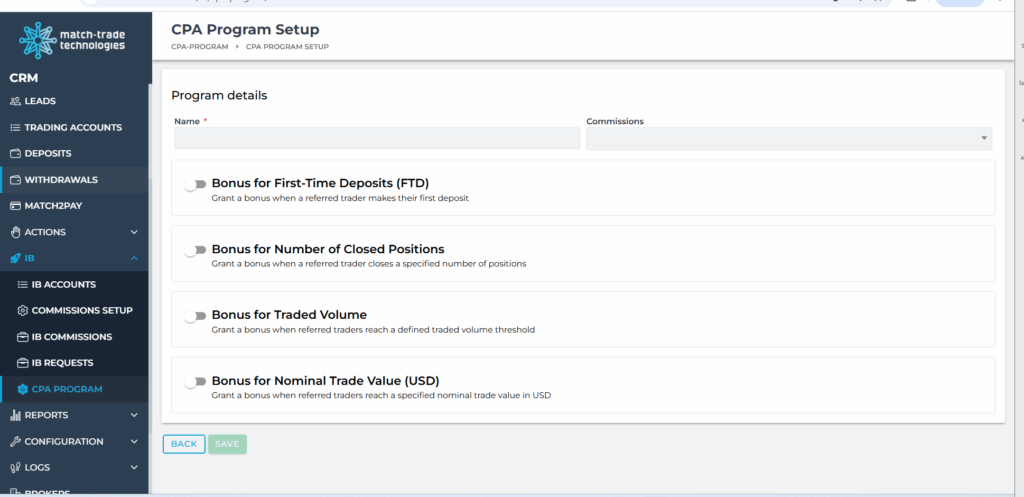
You can set up the following:
- Name – name of the CPA Program
- Commissions – one or more commission setups that must be linked to the IB for this program to apply. Every IB linked to at least one of those commissions can receive the bonus.
- Toggle switches:
- Bonus for First-Time Deposits (FTD) – Grant a bonus when a referred trader makes their very first deposit.
Required configuration when enabled:
‑ From amount & To amount – Define the deposit range for which the bonus will be applied. The bonus will be granted for deposits starting from the specified minimum amount, up to (but not including) the optional upper limit.
‑ Bonus type – FIXED or PERCENTAGE.
‑ Bonus – amount or % paid in the trader’s account currency.
Optional flags:
‑ Apply bonus to all trading accounts – if checked, every trading account’s first deposit qualifies; otherwise, only the first deposit in the user’s lifetime is considered.
‑ Specific countries – in that field, you can specify countries where the CPA will be applied; leave empty or tick “All countries” for a global rule. - Bonus for Number of Closed Positions – Pay once a trader closes a defined number of positions, summed across all of the user’s live accounts.
Required configuration when enabled:
– Number of closed trades
– (Bonus) Amount – in $
Optional flags:
‑ Specific instruments.
‑ Specific countries. - Bonus for Traded Volume – Reward the IB when the referred trader’s accumulated traded volume (lots) reaches the configured value.
Required configuration when enabled:
‑ Volume – Minimum allowed volume: 0.01 lot.
– (Bonus) Amount – in $
Same optional filters as above (instruments, countries). - Bonus for Nominal Trade Value (USD) – Similar to Traded Volume, but the counter is the “Nominal Value in USD” (contract size × price) aggregated across all closed trades.
Configuration & filters mirror the Traded Volume section.
- Bonus for First-Time Deposits (FTD) – Grant a bonus when a referred trader makes their very first deposit.
Reports #
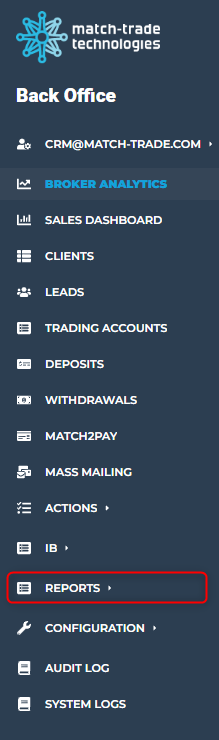
The Reports section in CRM aggregates multiple analytical views that help brokers and managers monitor performance, traffic quality, and partner results.
Typical report tabs include:
- IB Report – view a summary table of partner accounts
- Lead Source – support marketing optimization and traffic quality monitoring
- Lead Providers – analyze performance of external or internal Lead Providers
- Account Managers’ Performance – view a summary of results per Account Manager
- CPA Report – access a CPA-specific report
Each report tab is:
- Exportable to CSV
- Table-based (sortable and filterable columns)
- Filtered by date range with quick filters (Last day/week/month)
Configuration #
Operations #
In the Operations tab, you can manage existing operations and create new ones. Operations are later used to trigger actions such as email notifications.
In this tab, you can:
- View the list of existing operations
- Edit their settings
- Create new operations
- Link operations with email templates
If you only need to assign an email template to an existing operation, you can skip creation and go directly to the Setting up email notifications subsection.
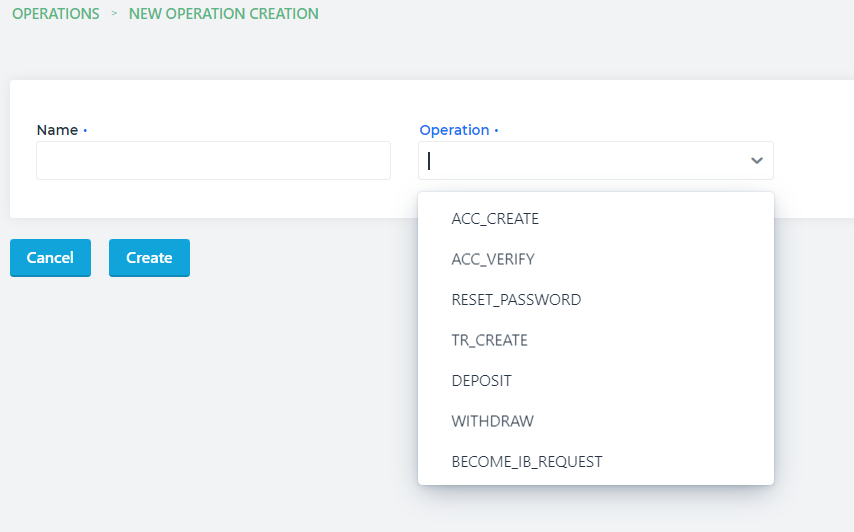
Creating a New Operation
- Open Configuration → Operations.
- Click the “+” button to add a new operation.
- In the creation form:
- Enter the Operation name.
- Select the user operation type you want this configuration to apply to (e.g., specific action performed by CRM user).
- Go to the Allowed users section/tab:
- Define which user roles/groups are allowed to use this operation.
- Assign the client statuses for which this operation will be available (e.g,. Lead, Client, Inactive, etc.).
- Save the operation.

Once created and configured, the operation can be used in other parts of CRM, including email notification setup.
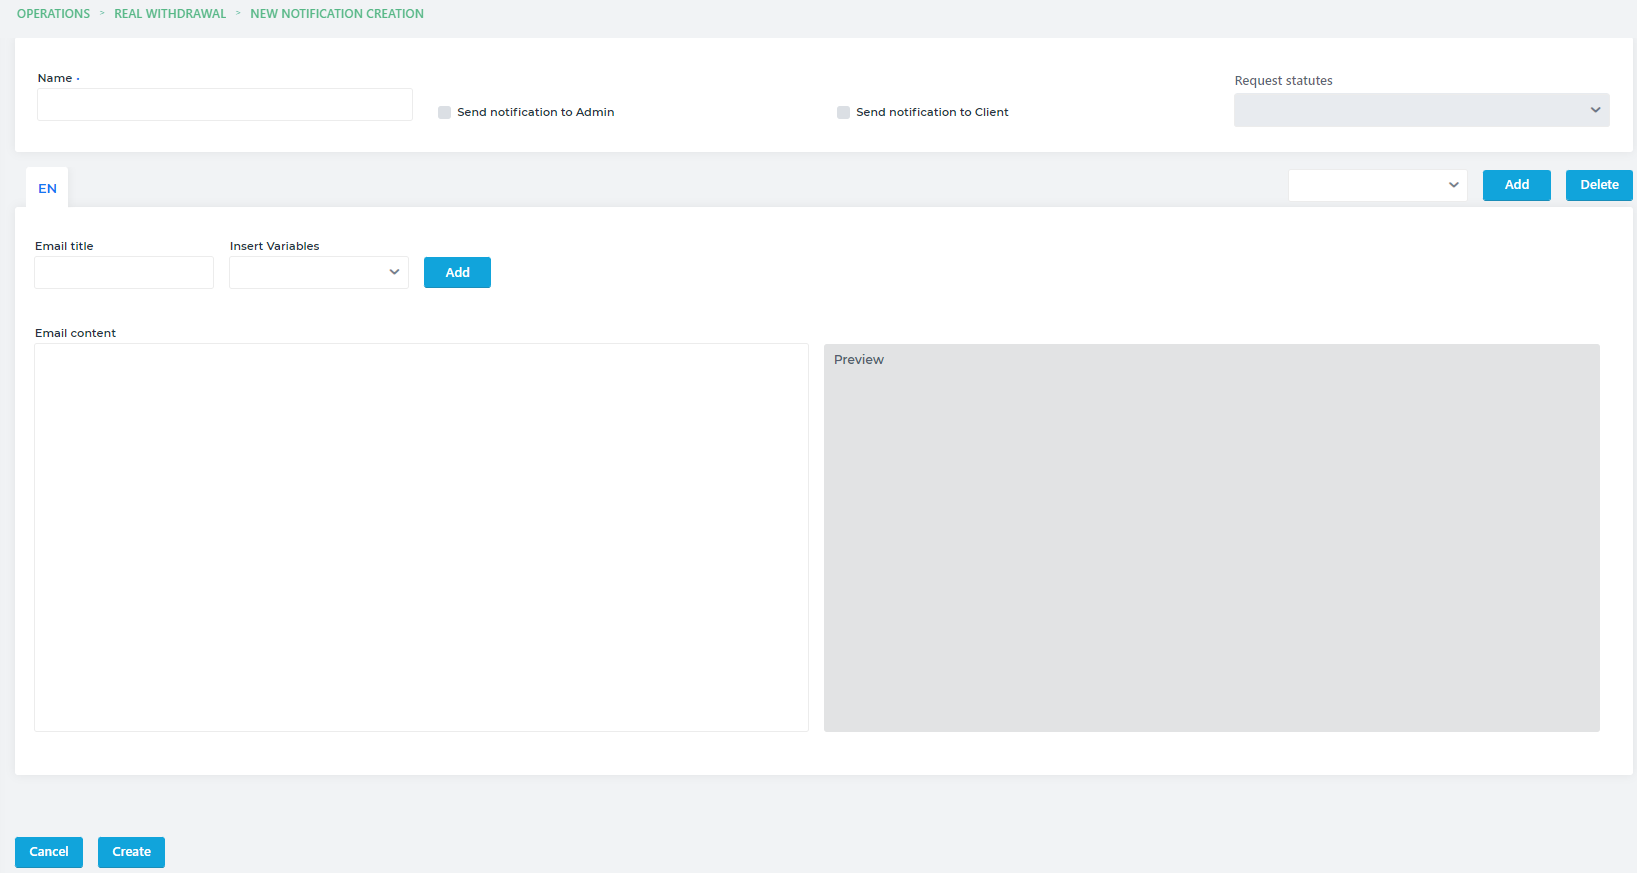
Setting up email notifications #
For any operation, you can set email notifications for the user or admin by clicking the button pointed below.
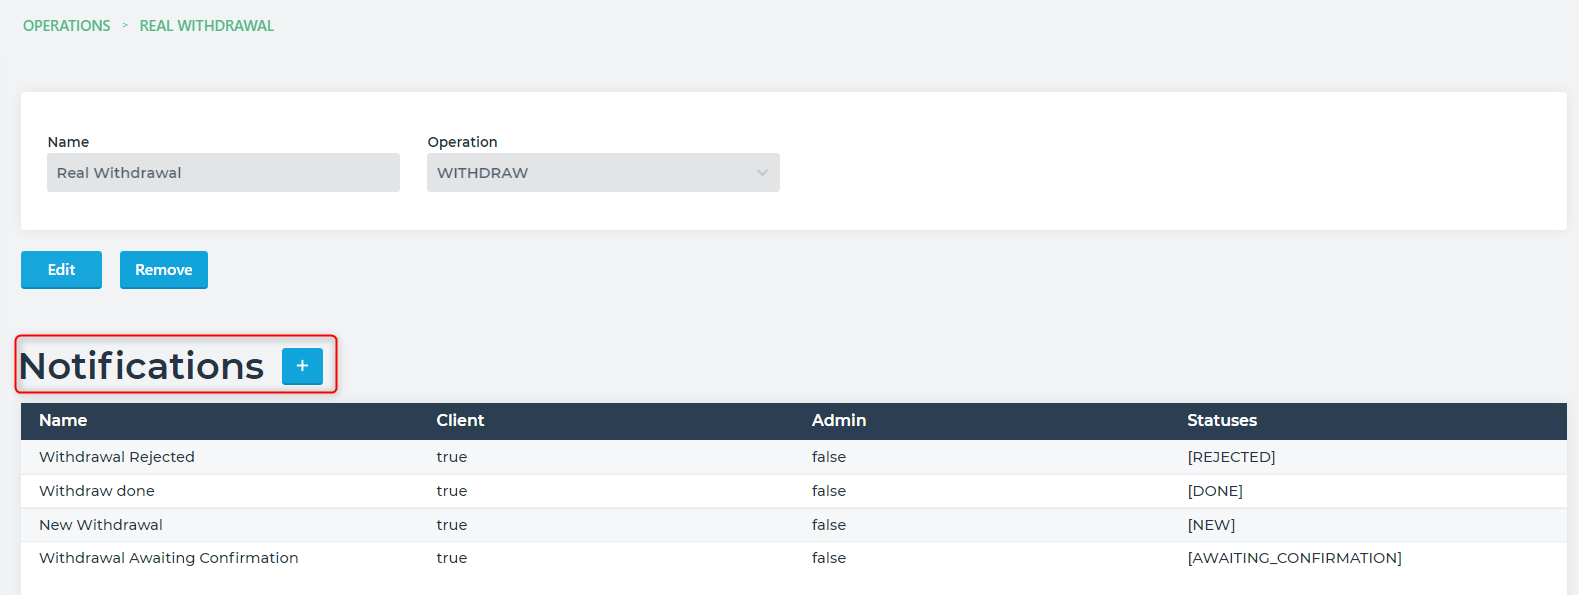
There is a possibility to set several templates for a specific action. This option can be useful
when you want to send different emails depending on the status
First set a name of the template, then set whether the email should be sent to the client or
admin, choose the status of the operation for which the email will be sent. Then you can set
up the email title and its content.
HTML styles are allowed, so on the right side of the screen you can see a preview of the
created message.
Offers #
To set up appropriate trading conditions you need to create an offer connected to the group
in a trading system.
After switching to the View Configurations -> Offers there is an option of adding a new offer
or editing an existing one
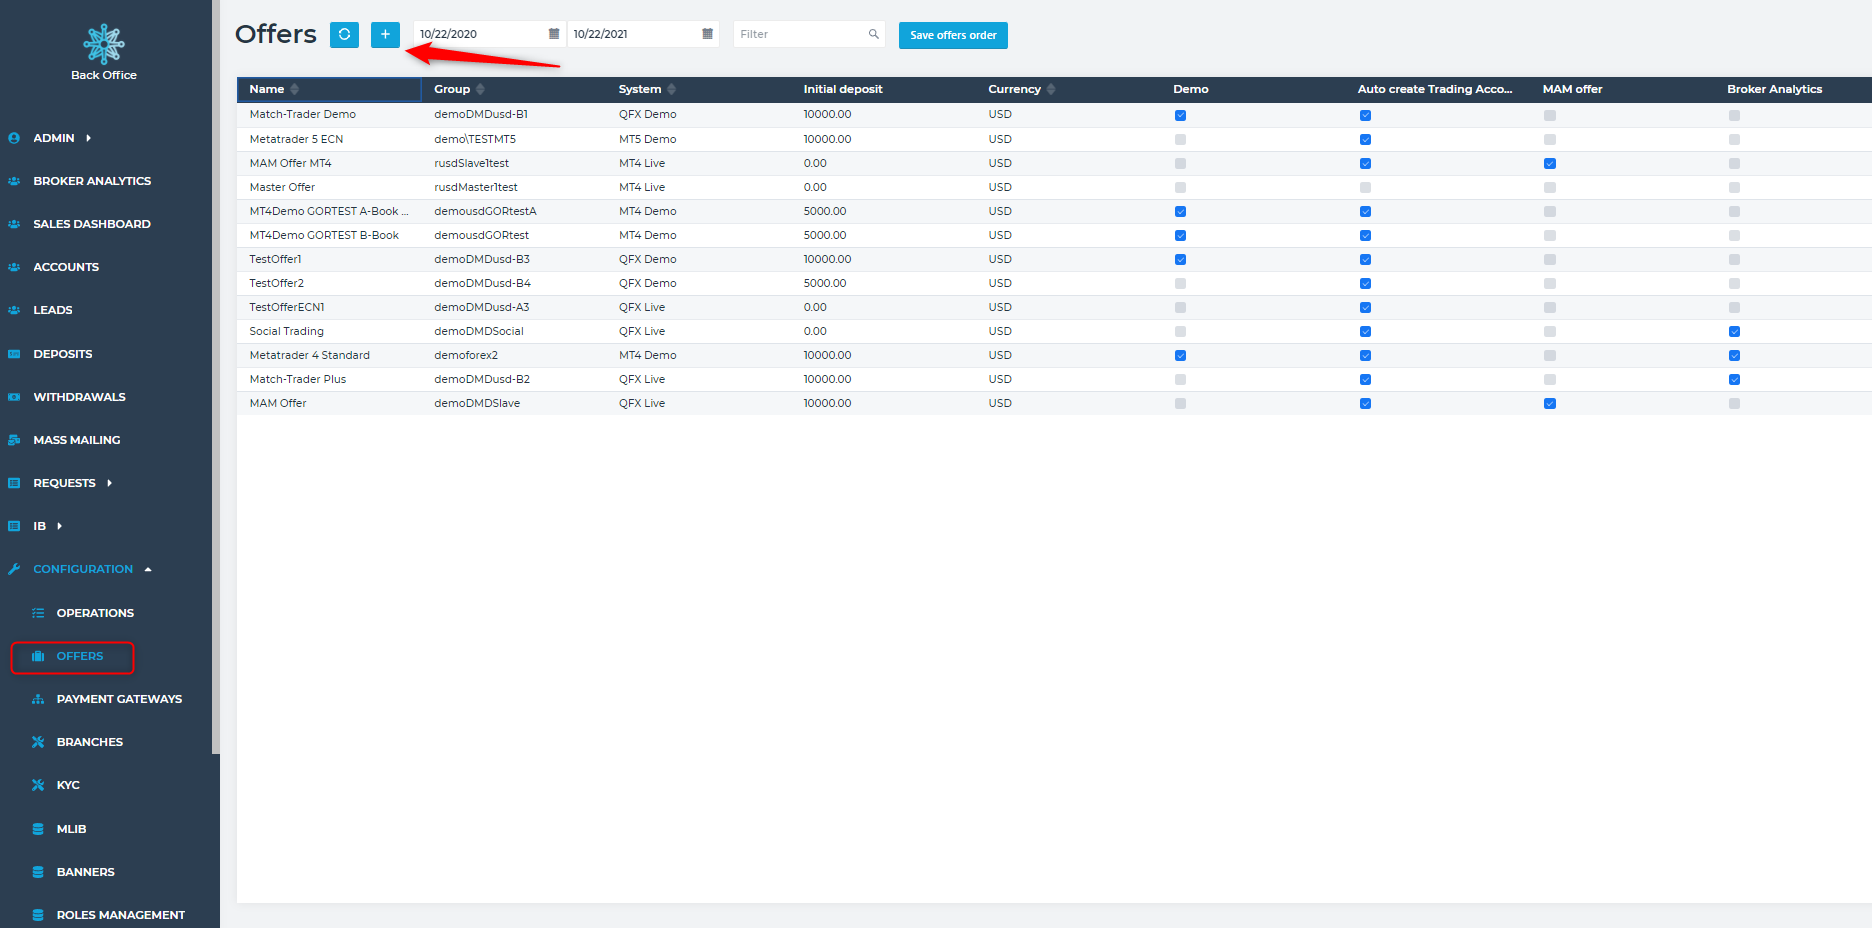
To add a new group, click the button marked above
Below is the correctly set offer. You can set up parameters like leverage, initial deposit,
branch of the client or mark PAMM offer, which will show up in the PAMM leaderboard.
Please note that the Group Name must match the name of the group configured in Admin
application.
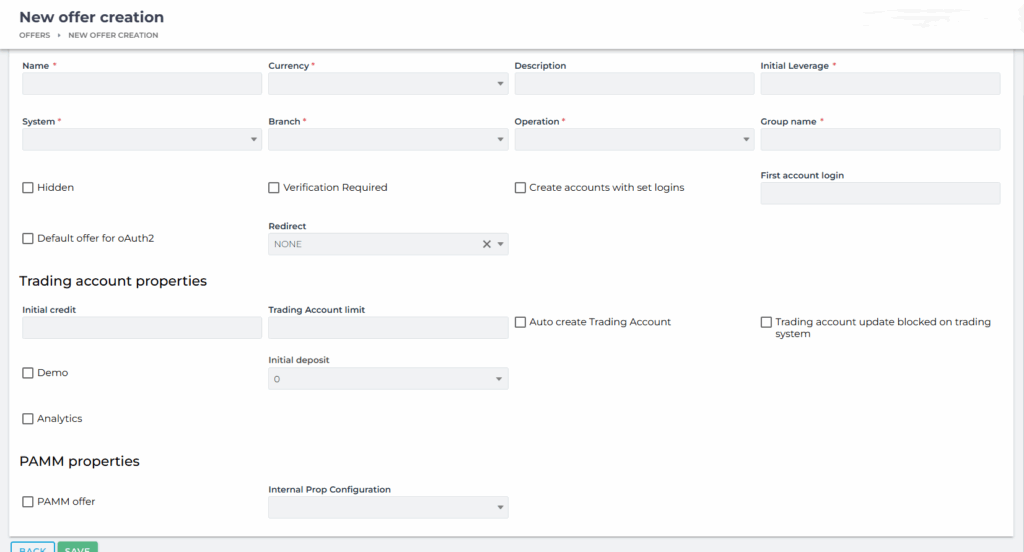
Form Fields (Offer details)
Name – Label of the offer shown in CRM and during registration/account creation flows (e.g. Real, Demo, QFX_USD, Phase 1).
Currency – Trading account currency for accounts created under this offer. Must match the group currency in QFX (e.g. USD, EUR).
Description – Optional free‑text description for internal use.
Initial Leverage – Default leverage assigned to the QFX group via this offer (e.g. 100).
System – Trading system to be used by this offer (e.g. FX 2.0, QFX Real, FX Live).
Branch – CRM branch for which this offer is available (e.g. Default).
Operation – Type of operation performed on the trading system. Use “Create Trading Acc” for account creation.
Group name – QFX group identifier used when creating trading accounts from this offer (e.g. realXXXusd-B1, demoXXXusd-B1).
Hidden – If checked, the offer will not be visible in registration or “open account” pickers. Hidden offers can still be used programmatically.
Verification Required – If checked, KYC verification must be completed before the trading account is finalized.
Create accounts with set logins – If enabled, CRM uses a predefined numeric login range instead of auto‑assigning logins. Define the starting login in “First account login.”
Default offer for oAuth2 – If checked, this offer will be used when accounts are created via OAuth2 (e.g. “Sign in with Google”).
Redirect – Select the redirect target after account creation/registration. “NONE” means no special redirect.
First account login – Define the starting login value when “Create accounts with set logins” is enabled.
Trading Account Properties
Initial credit – Amount of trading credit assigned at account creation (separate from balance/deposit). Leave empty in standard setups.
Trading Account limit – Limit field for trading accounts. Leave empty in standard setups.
Auto create Trading Account – If checked, trading accounts are created automatically during registration/open‑account flow. If not checked, requests must be processed manually in CRM.
Initial deposit – Predefined initial balance for accounts in this offer:
– Real offers: usually 0
– Demo offers: set to demo balance (e.g. 5000, 10 000 USD)
Trading account update blocked on trading system – If checked, updates from CRM are not propagated to the trading system.
Demo – Marks the offer as a demo offer.
Analytics – Enables integration with Broker Analytics for accounts in this offer.
PAMM Properties
PAMM offer – Marks the offer as a PAMM/MAM offer (for Money Manager/Slave setups).
Internal Prop Configuration – Marks the offer for internal prop configuration.
Buttons
BACK – Return to the offers list without saving changes.
SAVE – Save or update the offer
Payment gateways #

Back Office allows configuring different deposit and withdrawal methods available for
clients or Broker only. They are set up in the Payment Gateways tab.
● Bank Transfer – allows showing client bank details in the platform to make a
deposit
● Manual Deposit – an internal method for brokers to make transactions available only
in Client Office
● Crypto agent – allows the broker to accept cryptocurrencies (BTC, LTC, ETH, TRX, BNB, USDT – ERC20/TRC20/BEP20) payments from their clients and convert them to FIAT currencies
● Crypto wire transfer – allows users to make a deposit with wire transfer using
cryptocurrency
● Crypto credit card – allows users to make a deposit with a credit card using
cryptocurrency
● Online Payment – allows configuring e-wallets like Skrill, Revolut, Neteller, Paypal
etc.
● Internal transfer – withdrawal method allowing to transfer funds between trading
accounts.
Setting up payments method
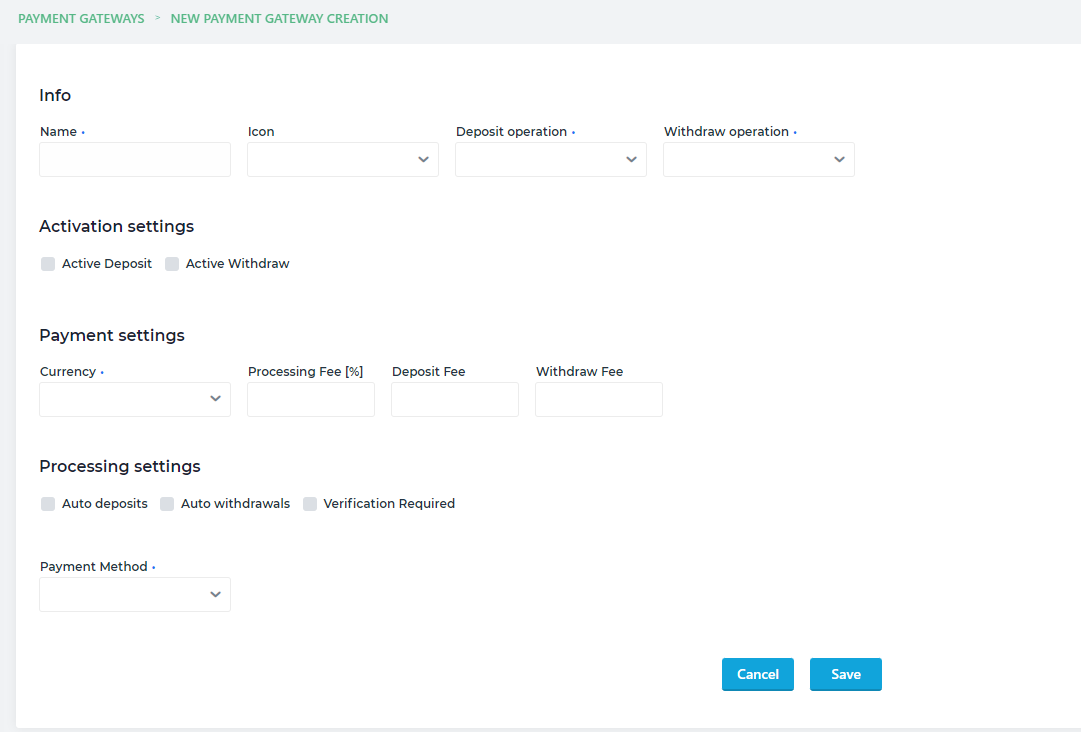
After setting up the name of the gateway which will be visible for the client on the platform,
choose one of the available payment methods described in the previous subsection.
Processing fee – it is a percentage fee that is charged for processing the
transactions. For deposits, the amount will be deducted before booking it to the
trading account. For withdrawals, the net amount will be sent for further processing.
Deposit fee – A fixed amount that will be deducted from a deposit before booking it to
the trading account.
Withdraw fee – A fixed amount that will be deducted from a withdrawal before
sending it for further processing.
You can apply both fees at the same time or choose only one.
After setting up the currency and selecting the icon confirm with the create button.
If you want to have a crypto agent method setup, contact our support.
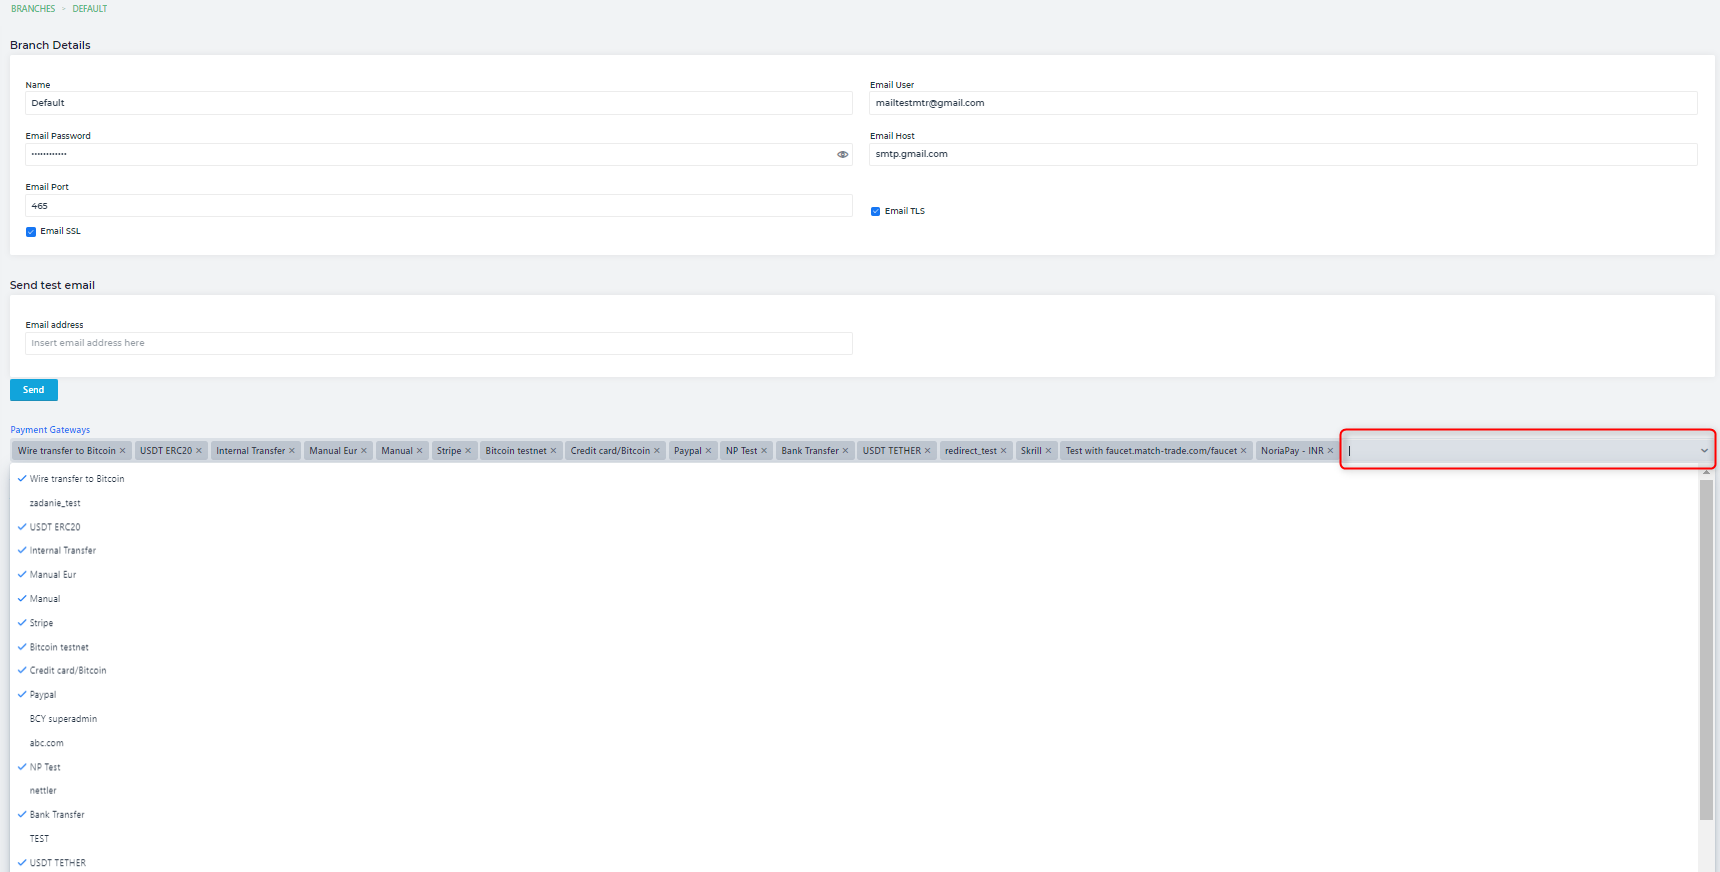
Branches #
To create a new Branch go to the Branches tab and click Add button.
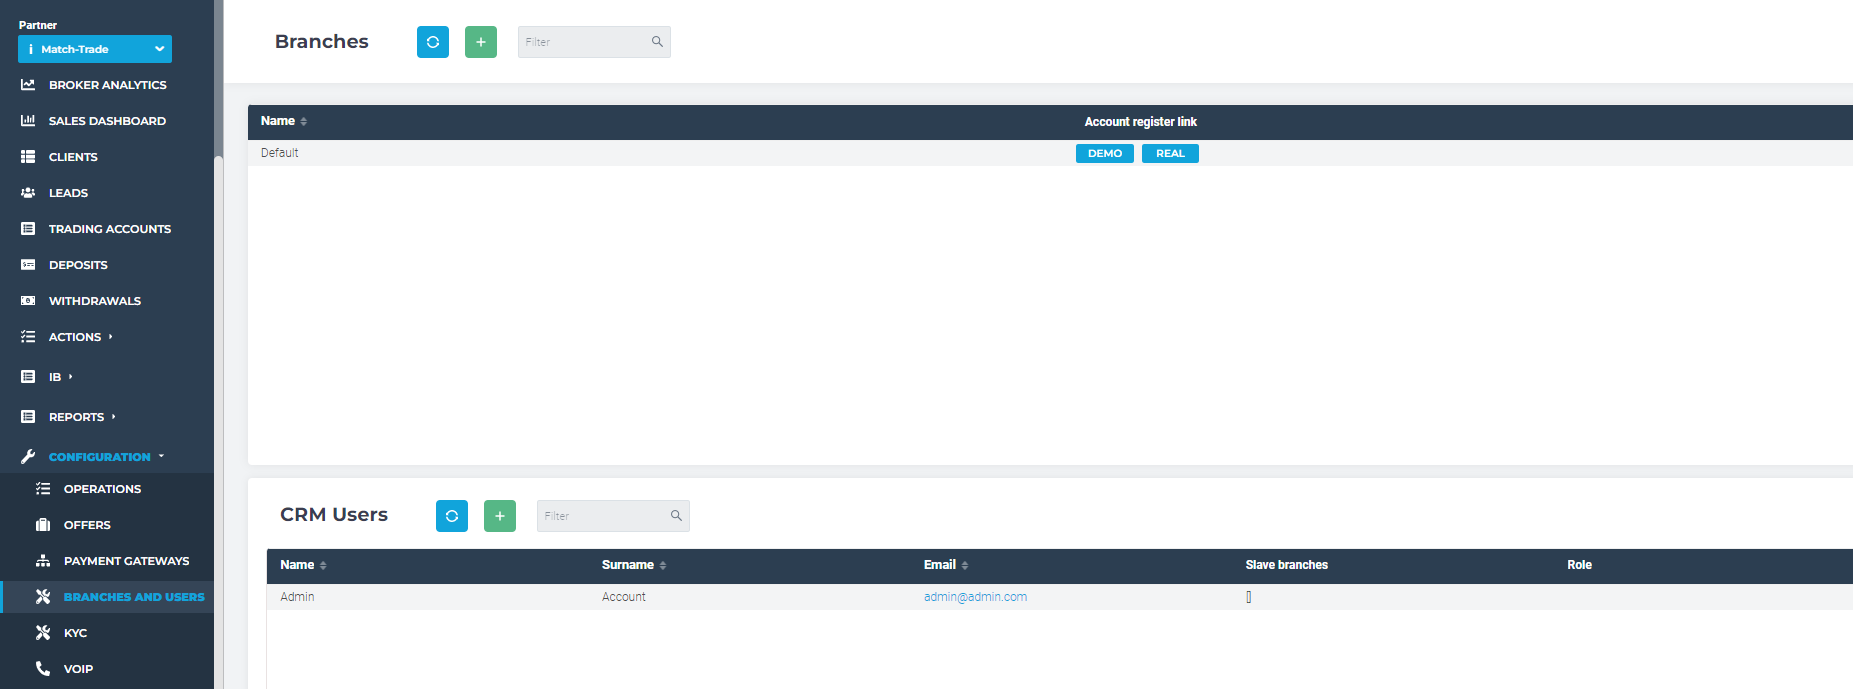
In the branch tab, you can also find registration links to the appropriate branch. In these
register forms, only the offers that are assigned to a particular branch will be shown.
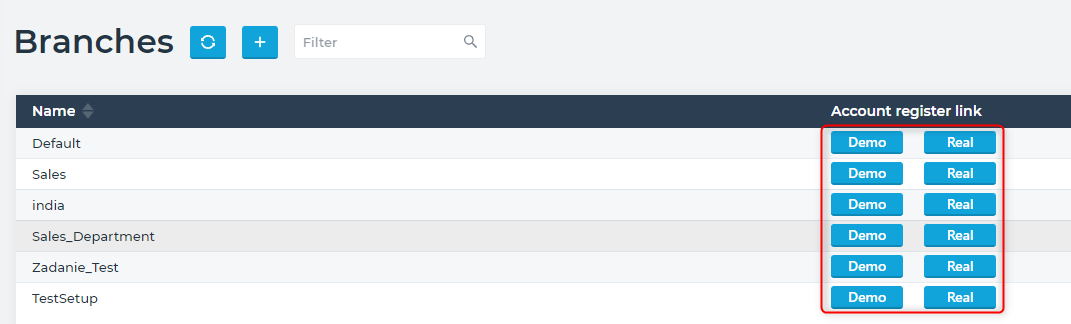
In the Branches tab, it is possible to create different branches. Clients will be assigned to a
particular branch based on the offer in which they create an account.
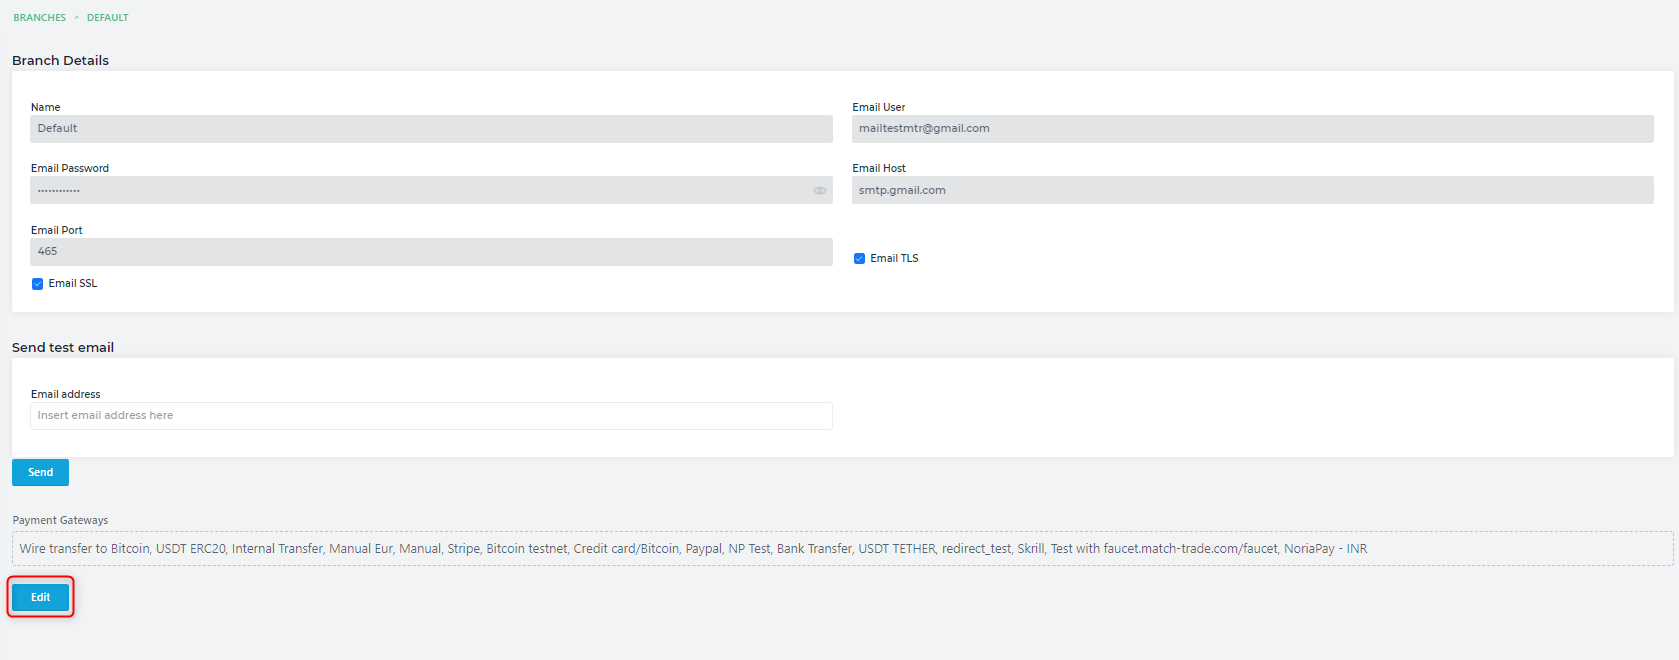
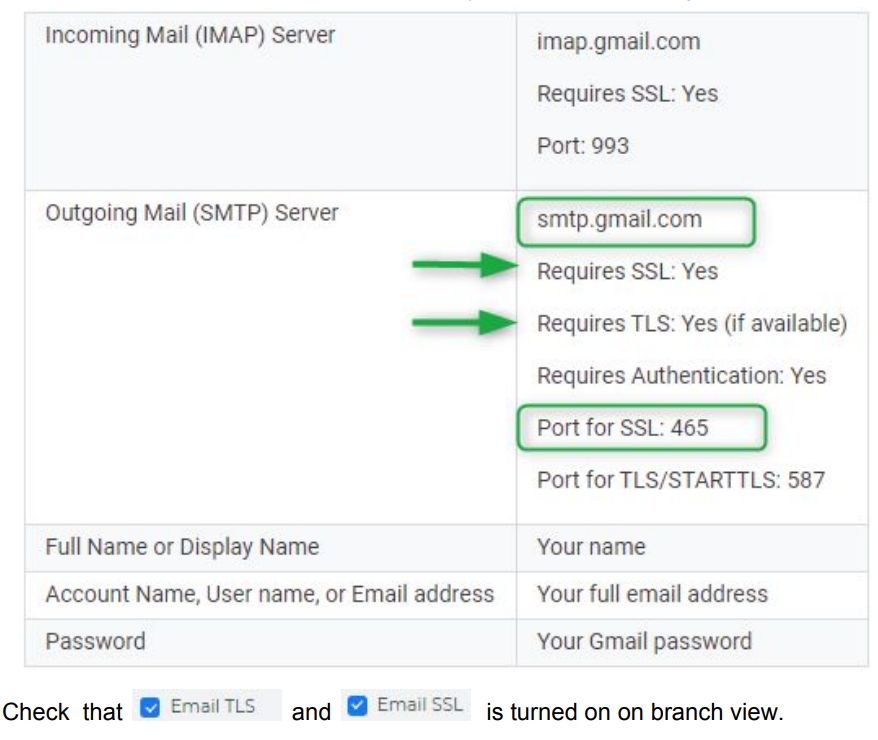
Mailer Configuration is crucial for the proper functioning of email notifications.
Information on how to set up SMTP can be found in your mailbox in the options.
For example, in Gmail, you will find them by clicking the settings icon in the upper right corner
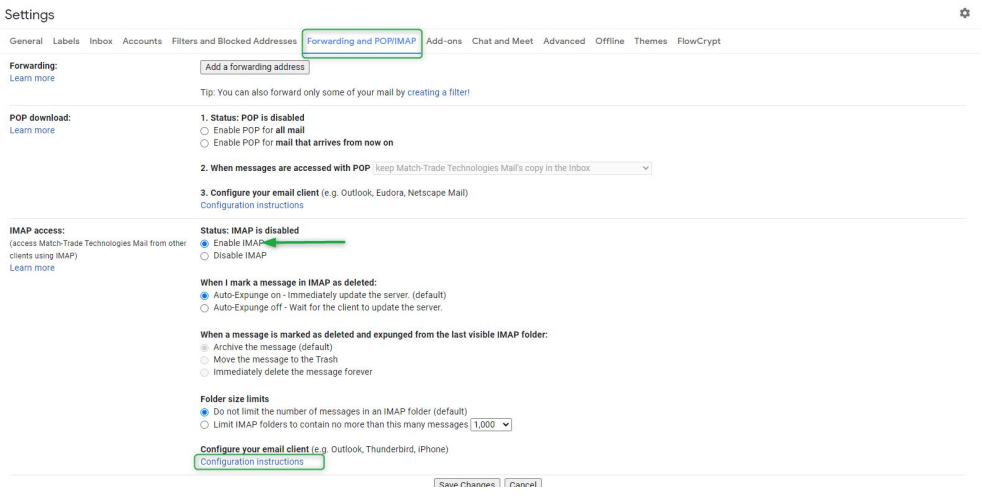
be enabled.
Information about email host and email port you can find in Configuration Instruction.
In the selected branch you can easily choose which payment methods will be used by users.
Just expand the list and choose the methods interesting to you.
CRM Users #
In the CRM Users tab, you can set up accounts that are allowed to access the CRM.

To create new CRM user account, click ‘Add’ green button with plus icon and fill the new user form assigning it to role of Admin or other CRM role. Only when assigned to one of the roles, the account is visible in the CRM users view, and not in the Clients tab. Its the role definition that determines in which table, Clients or CRM Users, the account will be visible.
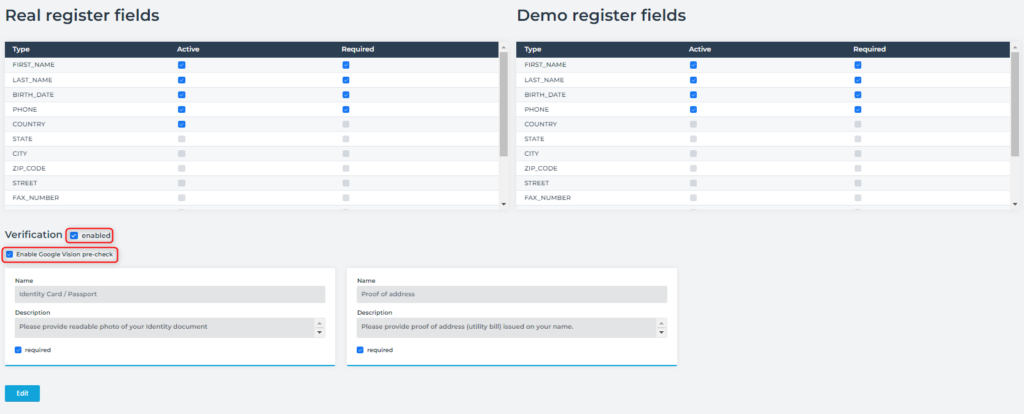
KYC #
Options in this tab give the ability to customize registration forms in the Client Office platform.
There are two types of columns.
The first one is displaying a specific field (ACTIVE), the second one allows you to set this field as
necessary to complete the registration process (REQUIRED)
The functionality works for real and demo forms.
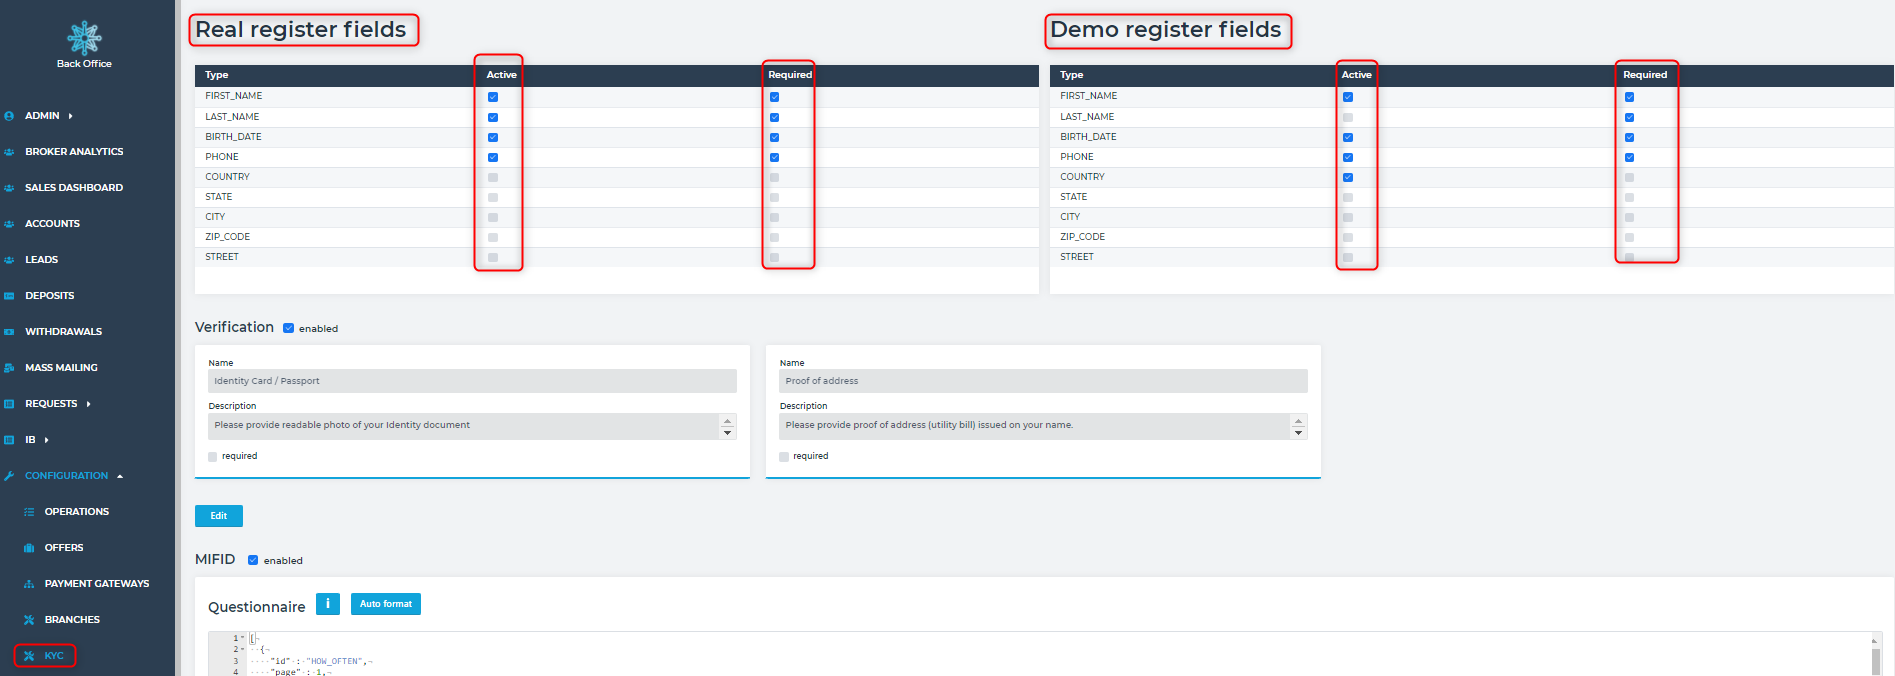
There is also a tab called “Verification”, where you can decide if it is necessary for your clients to upload the KYC documents.
There is also “Enable Google Vision pre-check” a feature from GOOGLE that is in charge of processing and analyzing the images received to identify images with characteristics similar to the values put in during the registration.
Verify email – this option is responsible for sending emails with a code to confirm (by the client) during the opening of a new account
MIFID – it is a questionnaire where a new client needs to answer some questions regarding a financial market etc.
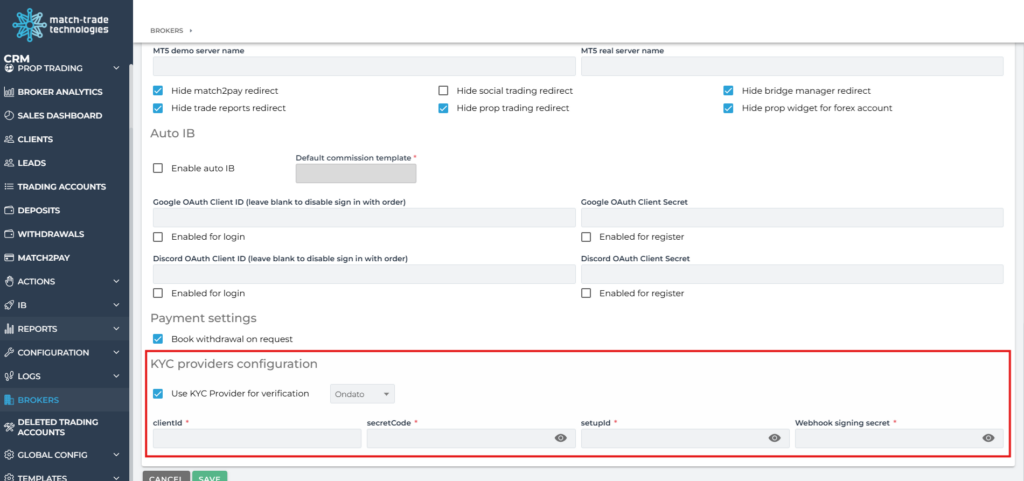
Ondato Integration #
The KYC module supports integration with external verification providers. In addition to SumSub, brokers can now enable Ondato as the KYC provider. The provider is selected via the KYC Provider Type setting, which accepts one of the following values: NONE, SUM_SUB, or ONDATO.
When ONDATO is selected, the following configuration fields must be filled in:
- Client ID – identifier provided by Ondato for the broker’s account
- Secret Code – the shared secret used to authenticate requests to Ondato
- Setup ID – identifier of the KYC setup/flow defined on the Ondato side
- Webhook Signing Secret – secret used to validate inbound webhook notifications about KYC status changes
Unlike SumSub, Ondato verification is completed on Ondato’s side. Clients are presented with a redirect button and an instruction such as “Use the button below to finish verification”. After completing the Ondato flow, the KYC status is synchronised back to the Back Office via webhook.
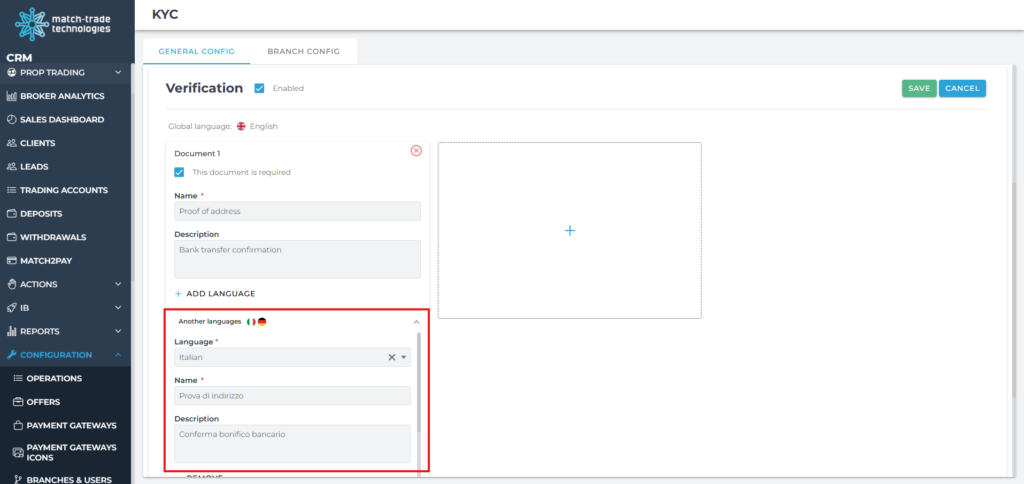
Multi-language Verification Documents #
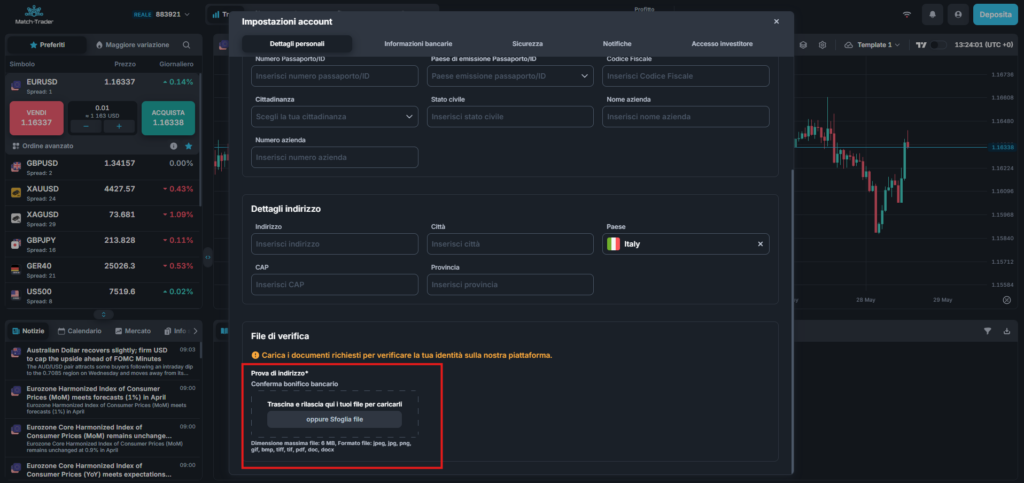
Verification document Name and Description can be configured in multiple languages from the Back Office. When a trader opens the verification flow in the CRM Client Office or on the Match-Trader platform, the document name and description are displayed in the trader’s selected application language. If a translation is not available for the selected language, the platform falls back to English.
When creating or editing a verification document, the form provides:
- Name – default document name (English).
- Description – default document description (English).
- Language – the primary language of the entries above.
- Another languages – optional section where additional translations can be added. For each language selected from the dropdown, enter the localized Name and Description. Up to 18 additional languages can be configured per document (19 in total including the primary one).
When two or more languages are configured, the form displays a flag next to each entry to make the active language easy to identify. When only one additional language is set, the language name is shown without a flag.
Documents without a translation for the trader’s selected language continue to be displayed in English, ensuring that every trader always sees a usable name and description regardless of their locale.
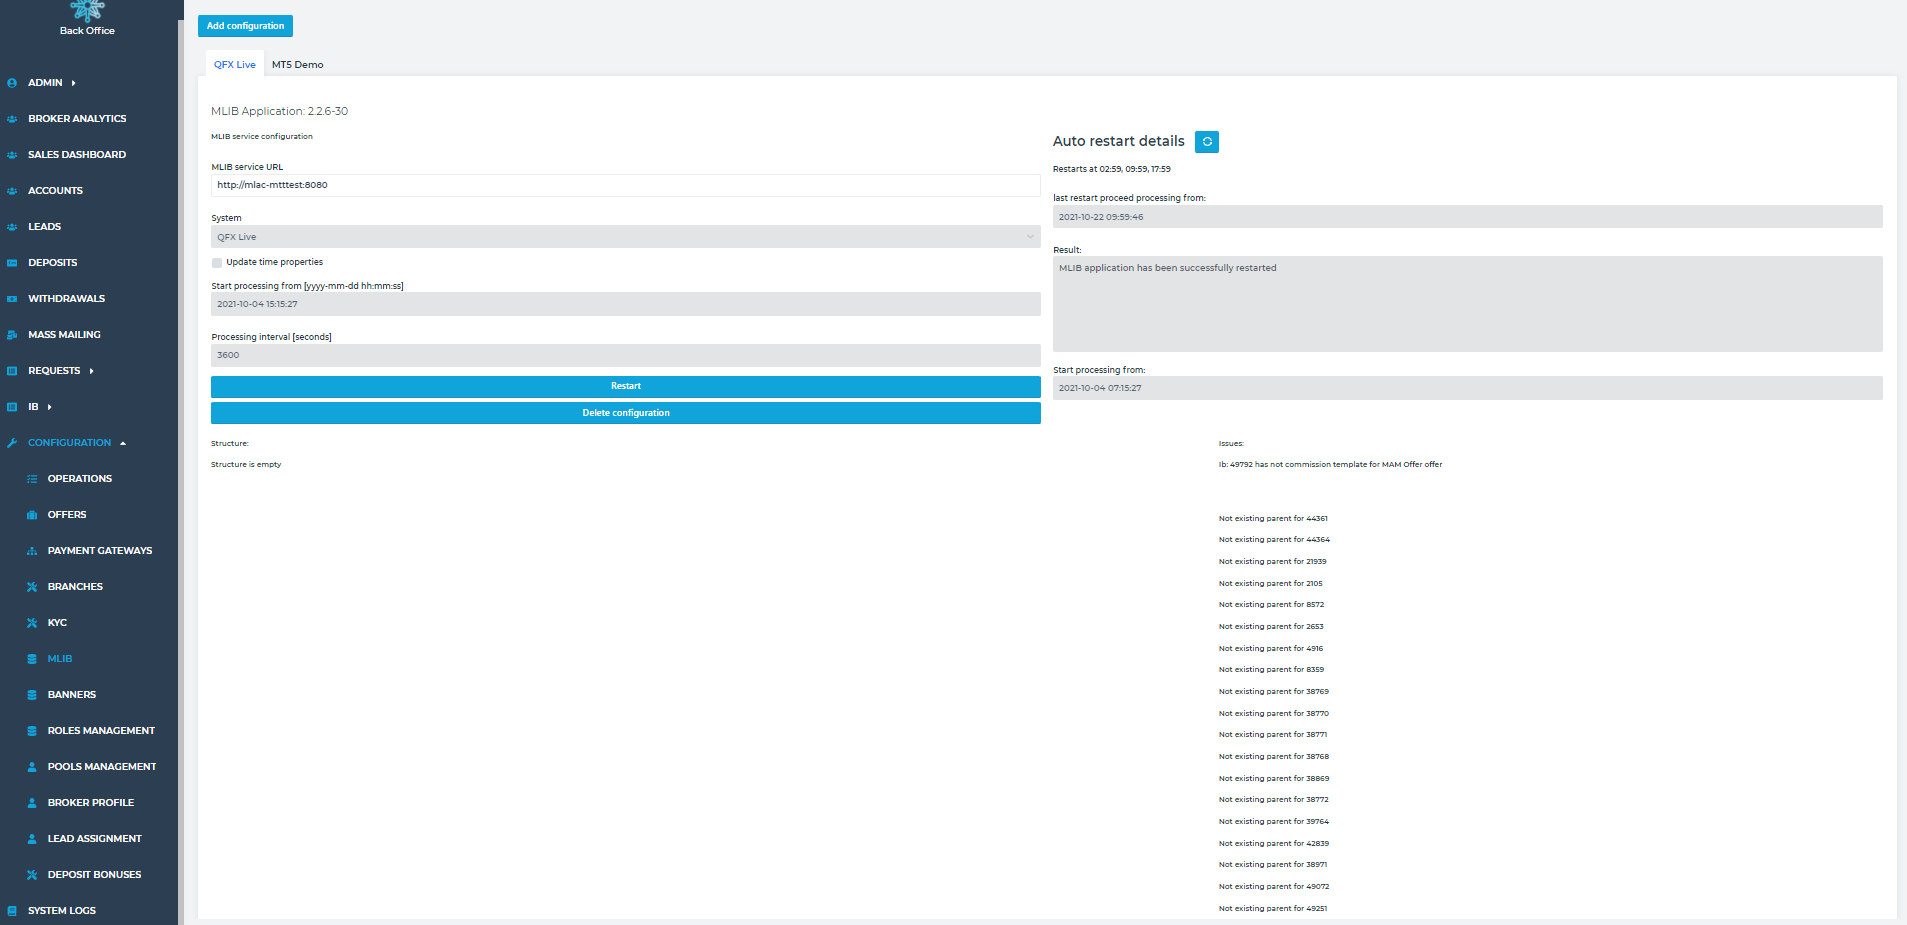
MLIB #
This is the configuration tab of the multi-level IB system. Here admin can see the structure of calculation
commission per each IB or subIB account or issues related to the IB accounts without
commission template. It’s also possible to restart the MLIB system to accelerate calculating
commissions.
Banners #
This is the tab where you can add banners, which will be displayed at bottom of your client office page.

You can simply upload an image that will be your banner. The image format should be 500×90.
Roles Management #
Roles Management tab is a place where you can create, edit specific roles who can access your back office panel.

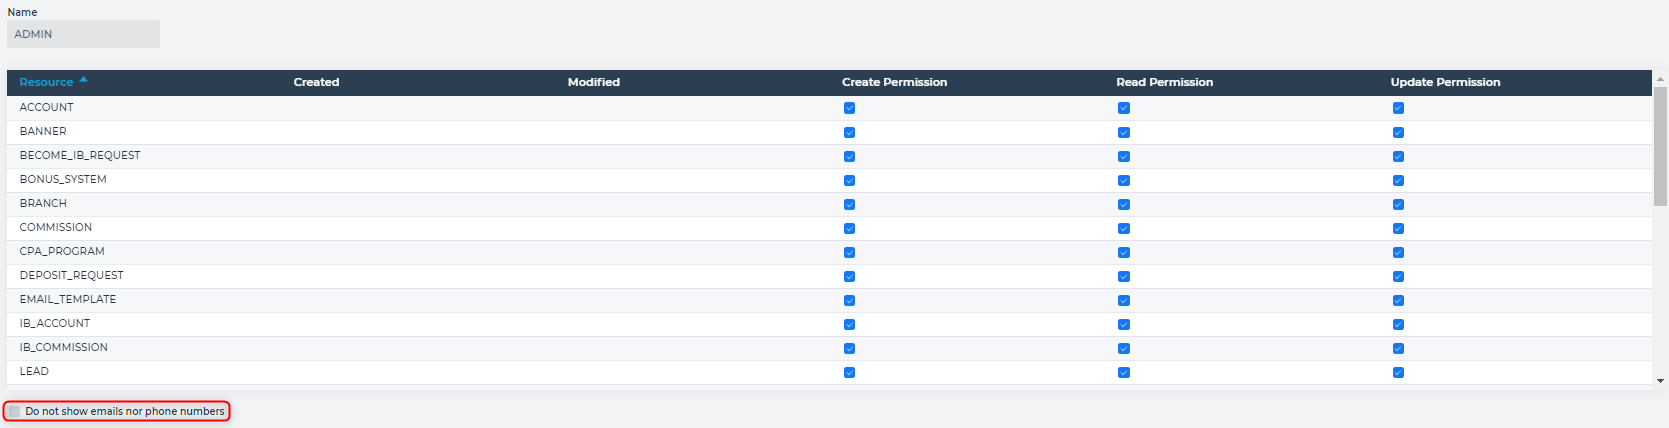
What’s more, you can edit permissions for each role. There is also a special check box at the bottom, where you can hide sensitive information about your clients for a specific role.
Pools Management #
In this tab, you can create Pools, where different Account Managers can be assigned.
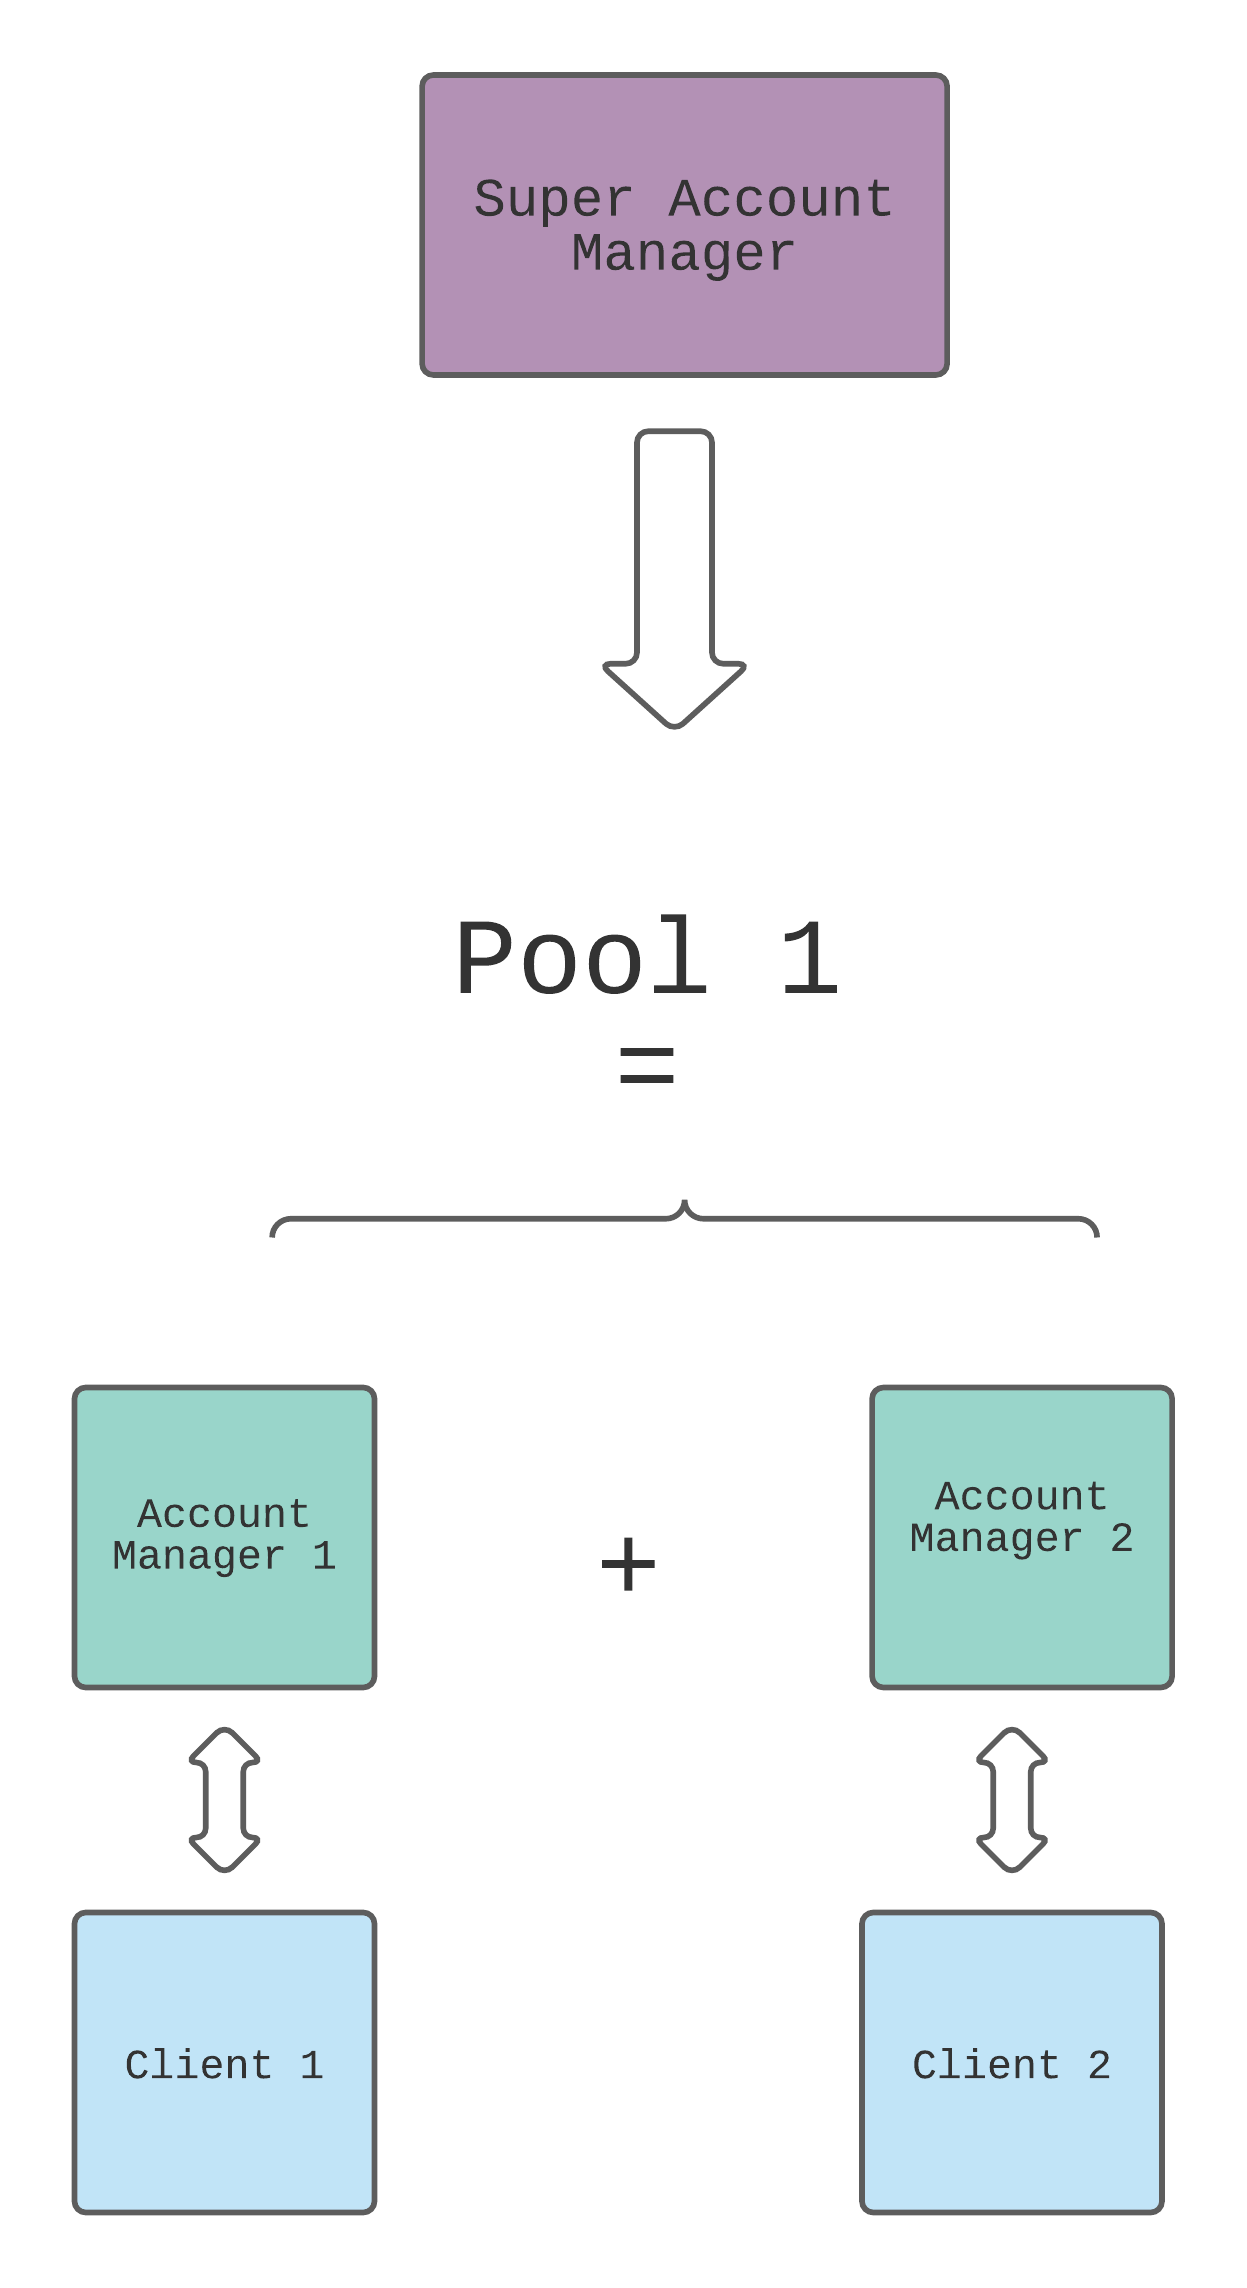
This picture presents the idea behind the Pool Management system.
Enter the Pools Management tab. Name and add only the managers you want to sign for a given Team Leader (Without adding Team Leader to this group!)

Enter the Accounts tab and click on the Team Leader account. In Account Details add this pool to Manager pools (take a look at the screenshot below).

Remember to click the save button at the bottom of Account Details.
Broker Profile #
In this tab, you can enter the contact information that will be displayed to your clients. The communicators (like Messenger, Telegram, WhatsApp, etc.) links can be added here and will be shown on your Match-Trader platform.
You can also write down your email contact, phone etc. On the bottom, you can also provide a link to your mobile app trading app.
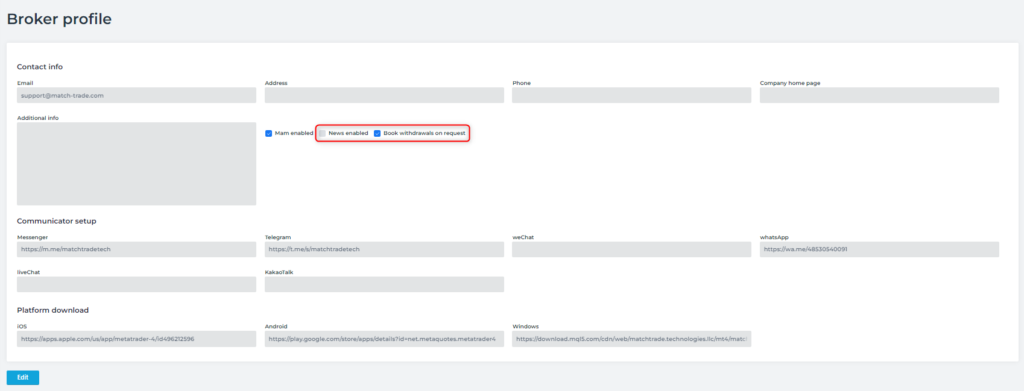
- News enabled – this setting allows you to enable or disable Match-Trader’s News Widget
- Book withdrawals on request – when this option is on, funds are taken from trading account as soon as client requests withdrawal. Turning off this option leads to funds being subtracted at the time of accepting withdrawal request.
Guest mode
In the bottom of broker profile tab, you can selec and assinge account thaht will be used as guest account.
Client after visiting your platform page will see instruments in guest mode.
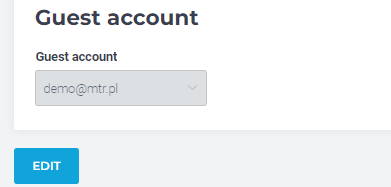
Account to be guest one, must have one of these three roles:
-User
-IB
-sub IB
Lead Assignment #
In this tab, you can add the assignment rules which will be followed, when new leads will be added into your back office.
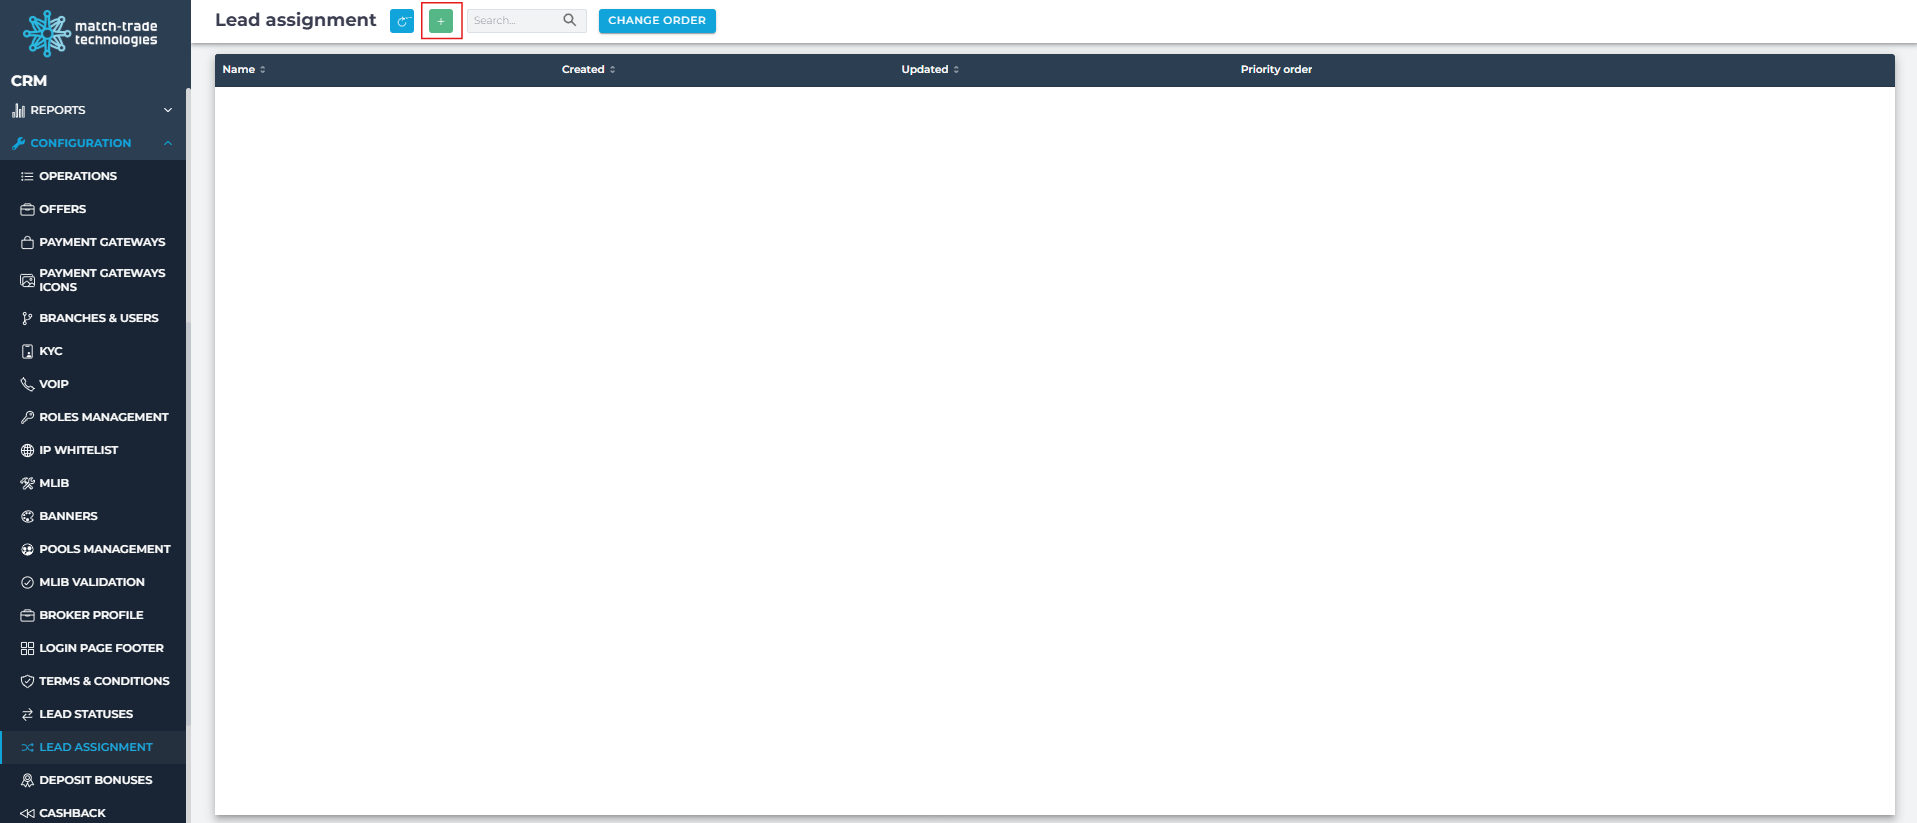
You can add an account manager, name the rule and choose what will be a split of percentages between each account manager.
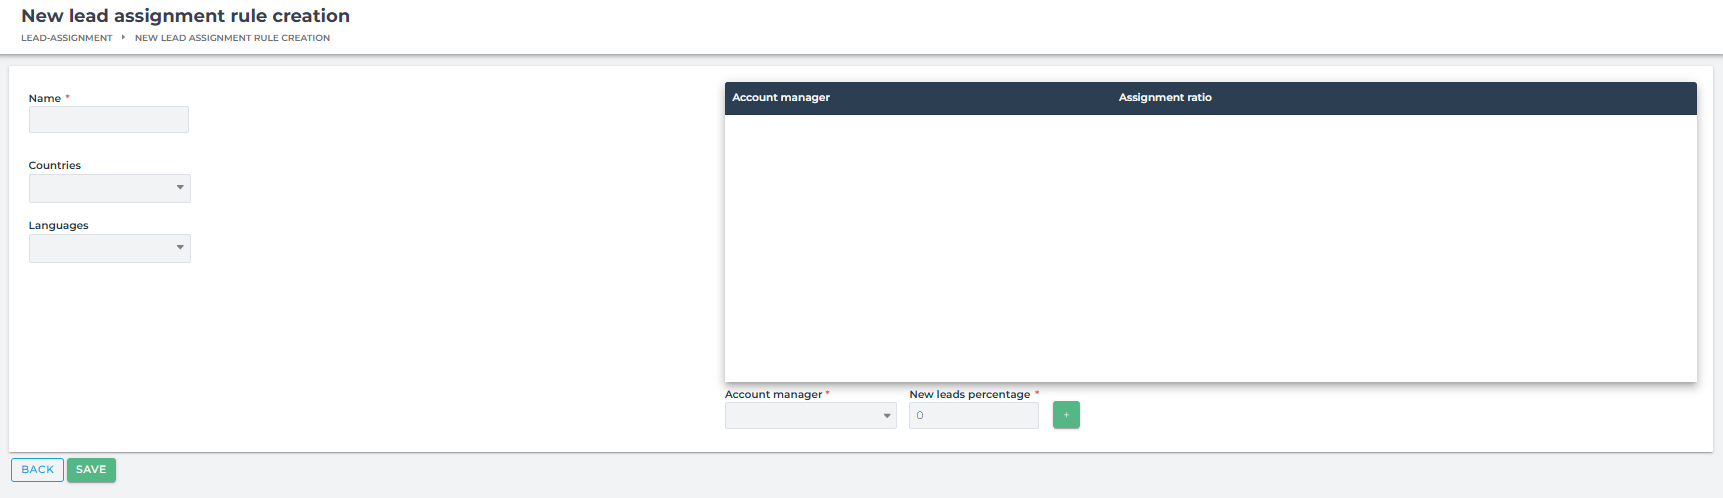
- Rule name – you can choose what will be a name of a rule
- Countries – choose from which countries should be leads assigned to account manager
- Languages – choose what is language of a lead who should be assigned
Deposit Bonuses #
In this tab, you can set up a welcome bonus which will be given once only for your client first deposit. Keep in mind that it is only credit that cannot be withdrawn.
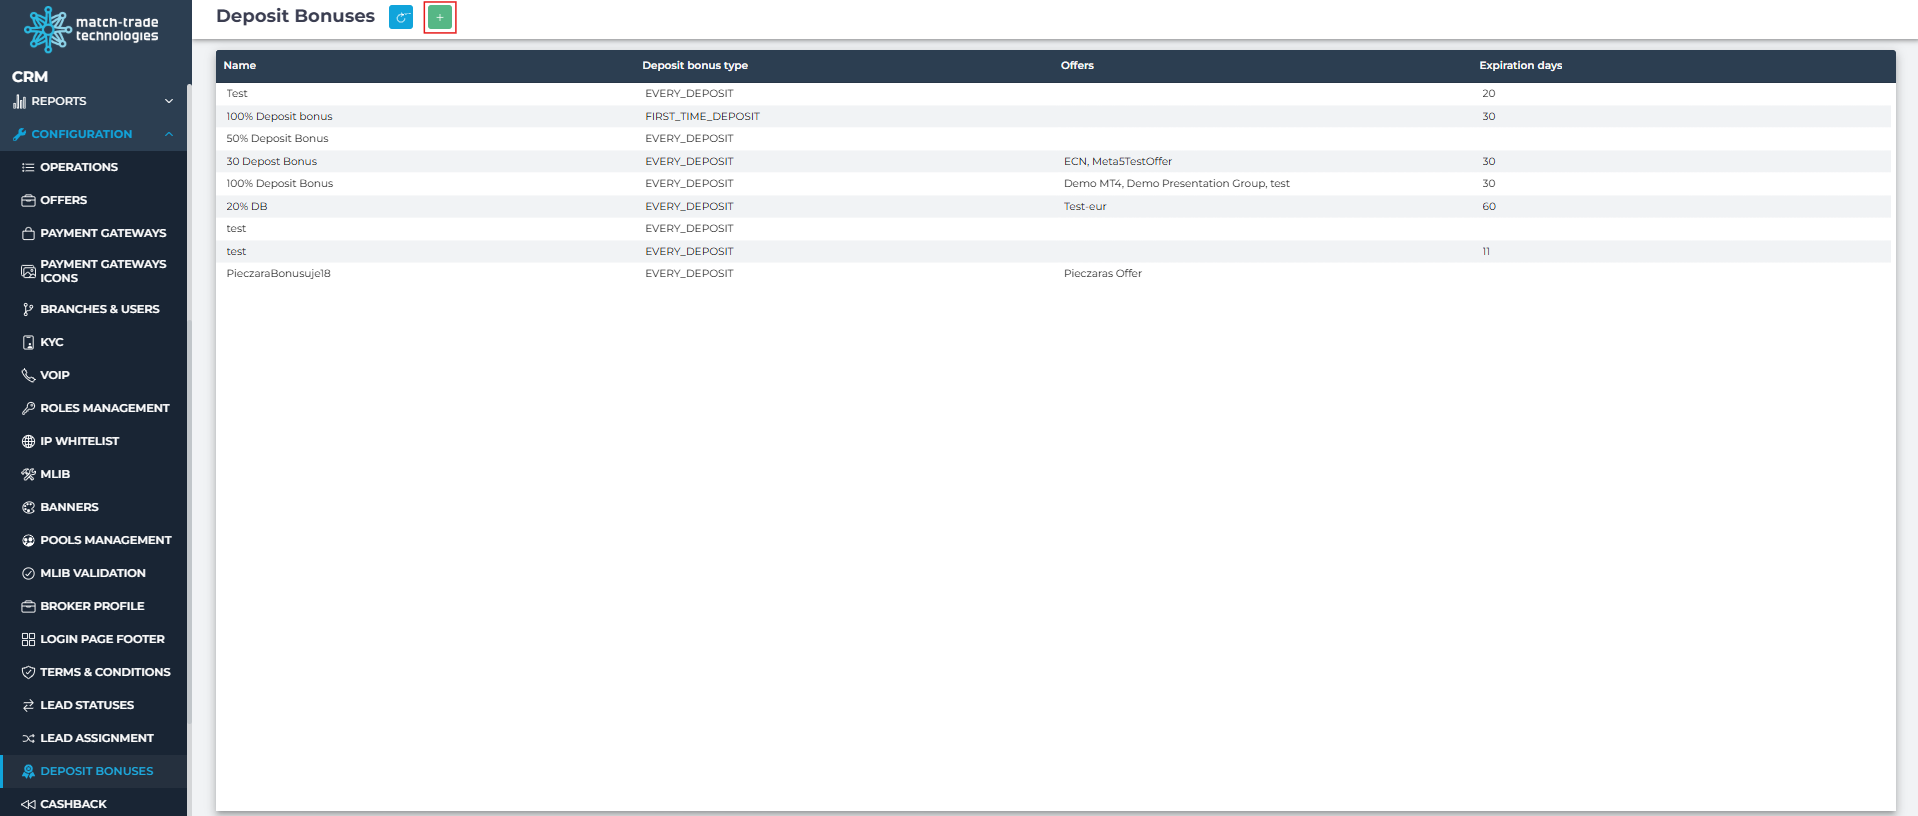
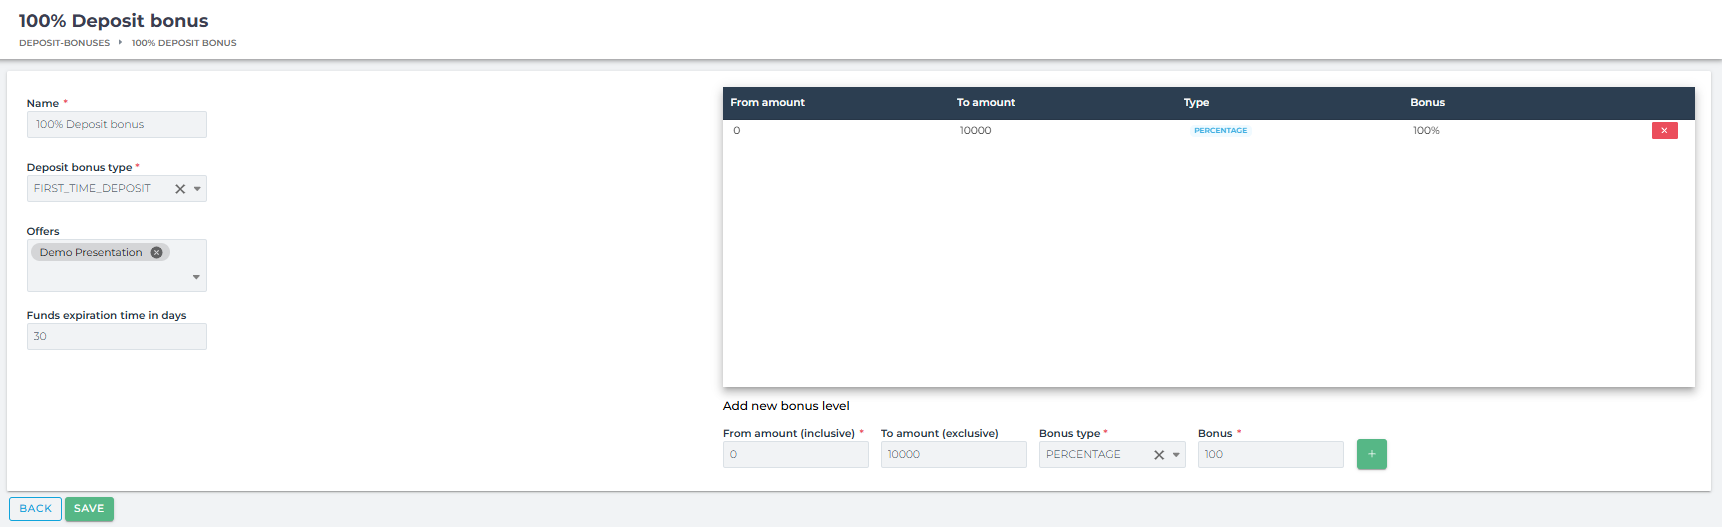
- Name – name of bonus system
- Bonus System type – Fixed or Percentage. Fixed is a specific amount which will be given to a client for his first deposit. Percentage system will give your client a specific percantage of the amount that was deposited
- Minimum Deposit – There you decide what will be minimum deposit which will trigger bonus allocation
- Bonus – There you can choose what will be percentage or fixed amount of bonus
- Offers – There you can choose offers to which the bonus system will be assigned
Cashback #
In this tab, you can configure the cashback program for your clients. The clients receive the cashback for their trades.
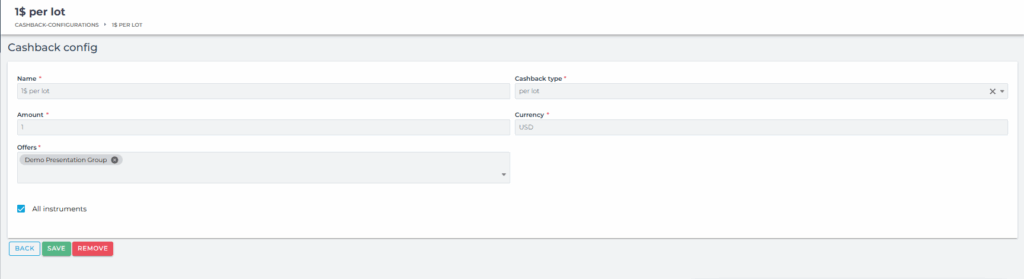
You can set up:
- Name – name of the cashback program
- Type – per lot or per 100k USD
- Amount – there you can enter amount to be paid
- Currency – there you can choose the currency in which the cashback bonus will be paid
- Offers – there you can choose offers to which the cashback program will be assigned
Logs tab #
The Logs tab offers comprehensive access to system and client activity records. All entries are retained for 3 months and can be easily filtered by time range, sorted, and exported or downloaded in CSV format. This feature is designed to enhance operational transparency, streamline client support, and enable detailed behavioral analysis across both the CRM and trading platform.
The tab includes three distinct sections:
CRM Audit Logs #
A complete history of all manual actions performed within the CRM interface. This section is useful for tracking administrative activity and ensuring accountability across the system.
Client Logs #
A record of automated operations executed by the CRM on client accounts – such as account creation, KYC status updates, and triggered communications. These logs help trace background processes, rule-based actions, and scheduled tasks. Each entry includes the client’s email, operation name, status, and a brief system-generated remark.
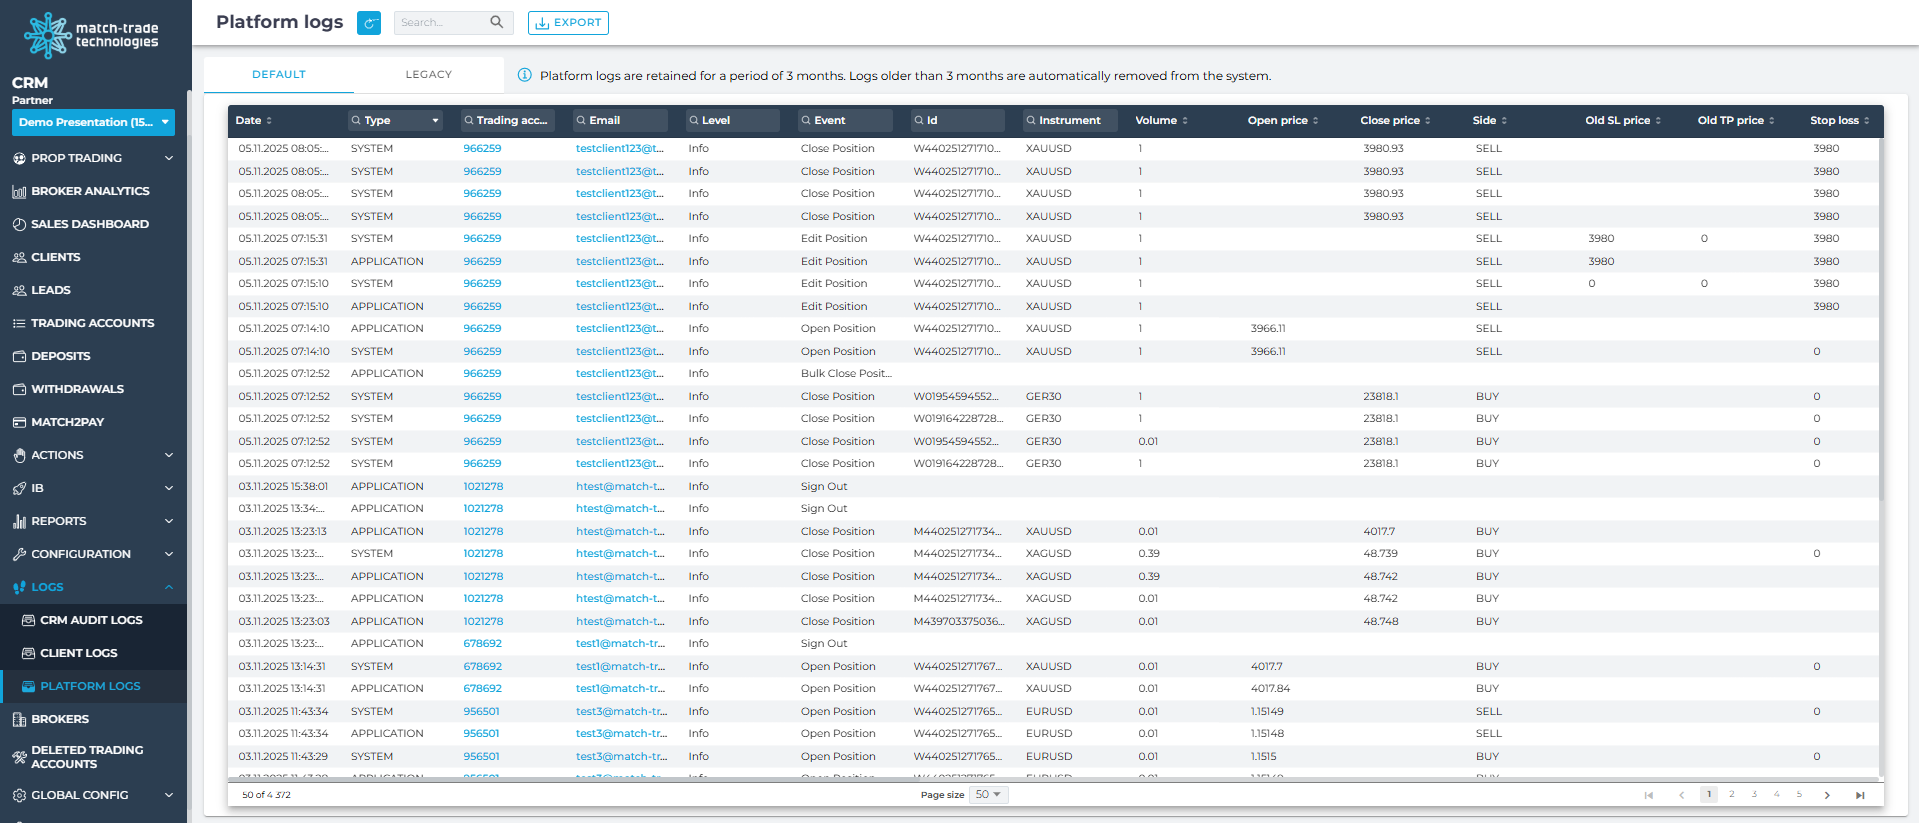
Platform Logs #
A real-time stream of trader activity captured from the Match-Trader platform. It includes events such as page views, order placements, position closures, and connection events. Key data points include timestamp, event type, platform view, trading login, instrument and volume (if applicable), as well as device and browser metadata.
This section supports both Default and Legacy formats for compatibility with different data structures.
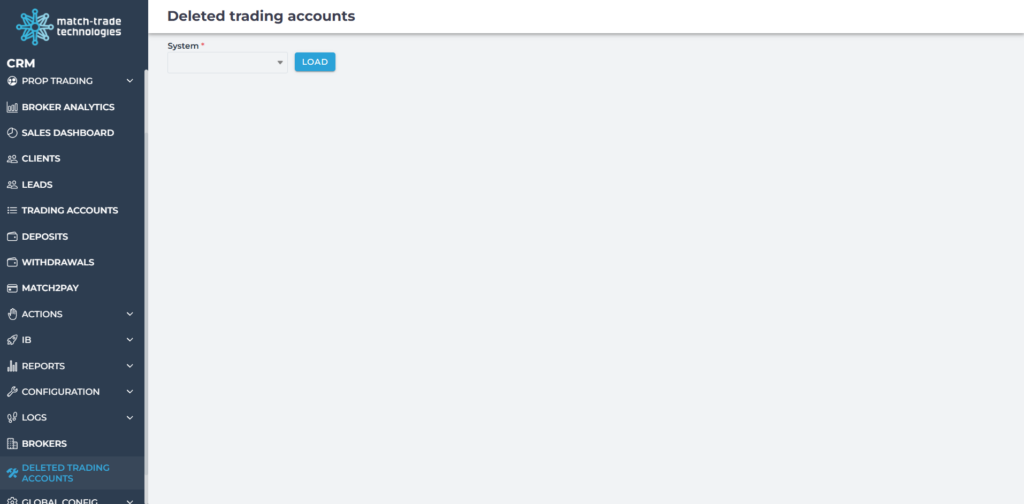
Deleted Trading Accounts #
The Deleted Trading Accounts tab allows CRM users to view and permanently remove trading accounts that still exist in CRM but no longer exist in the selected trading system. This helps keep the CRM clean and prevents clients from seeing accounts that are no longer active.
Templates #
The Templates section is used to configure reusable templates used across CRM workflows.
Operations #
This area contains email templates used by the Operations module.
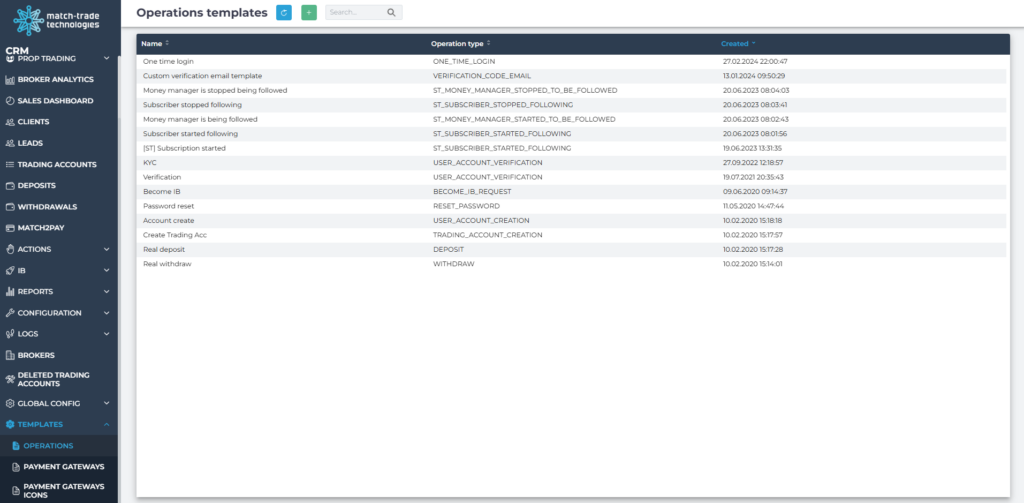
Available actions:
- Insert variables into the subject or content
- Add, edit, and delete templates
Payment Gateways #
This section is used to manage payment gateway templates used in payment configuration flows.
Available actions:
- Create and edit templates
Payment Gateway Icons #
This section allows users to manage icons used for payment gateways.
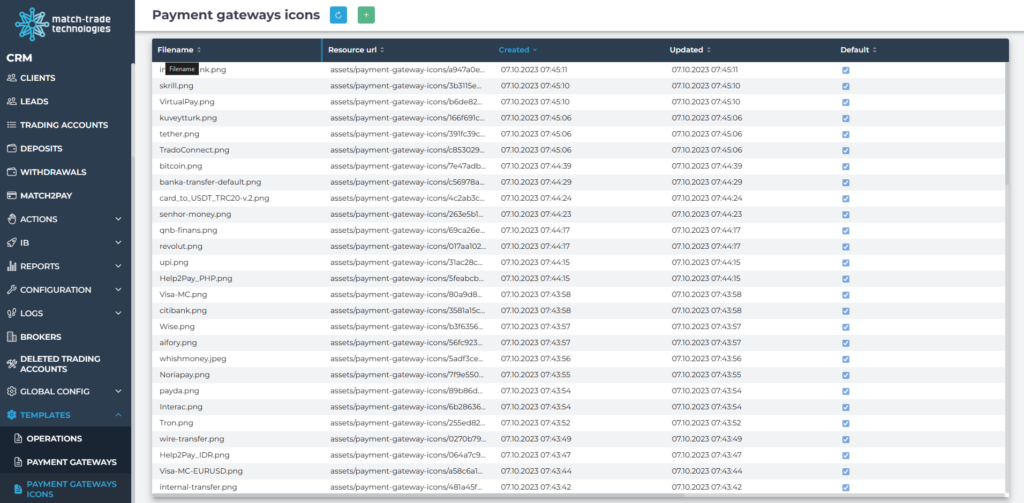
Available actions:
- Edit icon details
- Upload icon files (drag‑and‑drop or file selection)