Installation #
The installation process consists of the following steps:
1. Install the adequate version of Java (32bit or 64bit) from the Java support paga
You can find different version of Java under the link below:
https://javadl.oracle.com/webapps/download/AutoDL?BundleId=245479_4d5417147a92418ea8b615e228bb6935
2. Install application from the following link:
https://mtupdates.match-trade.com/updates/mtr/mt-admin/admin_mtr.jnlp
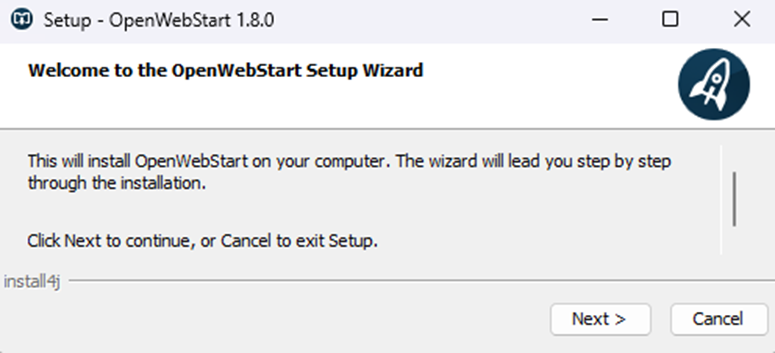
3. Install OpenWebStart from the following links, depending on operating system:
- https://mtupdates.match-trade.com/updates/ows/OpenWebStart_MatchTrade_windows-x64.exe – Windows 64-bit
- https://mtupdates.match-trade.com/updates/ows/OpenWebStart_MatchTrade_macos-x64.dmg – macOS x64
- https://mtupdates.match-trade.com/updates/ows/OpenWebStart_MatchTrade_macos-aarch64.dmg – macOS aarch64
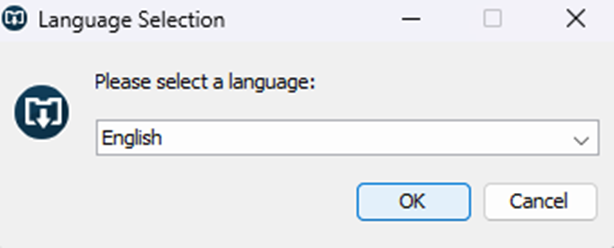
- After starting the installation choose a language version
- Click the Next button in the windows below:
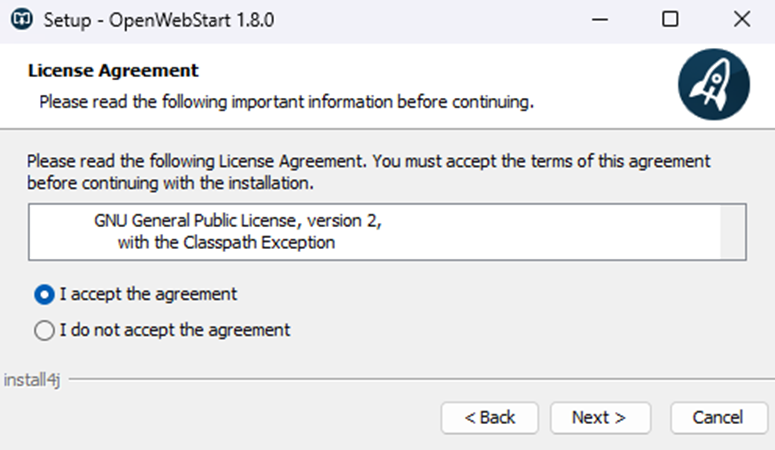
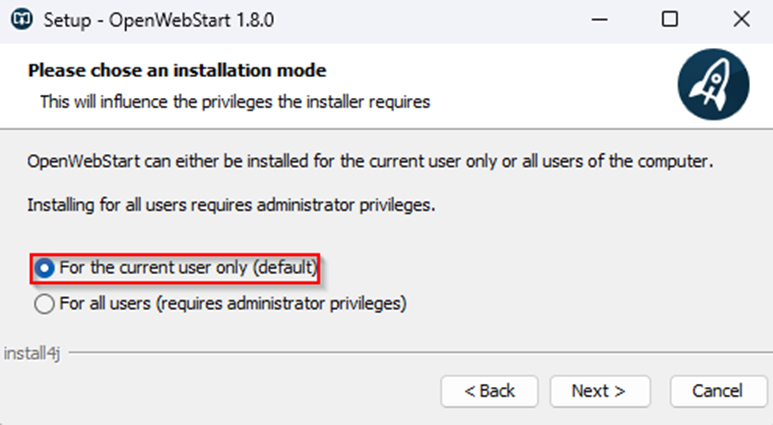
- Select the correct option
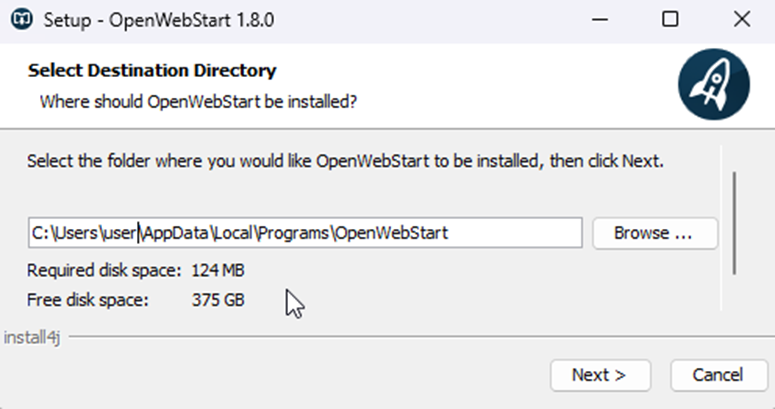
- Select a place on the disk where the application should be installed
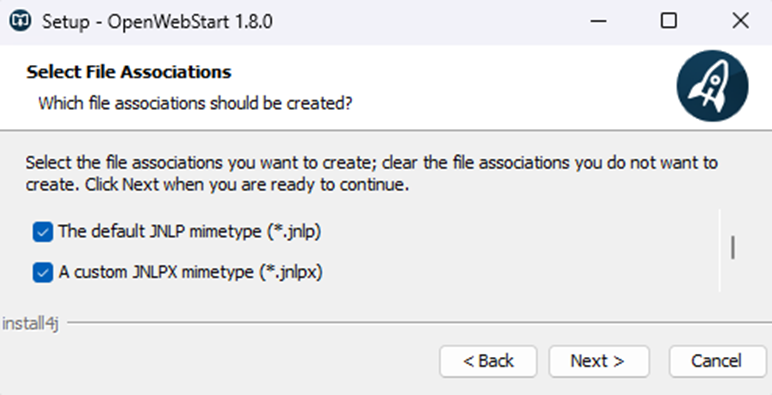
- Select file types indicated below
Log in to Admin application #
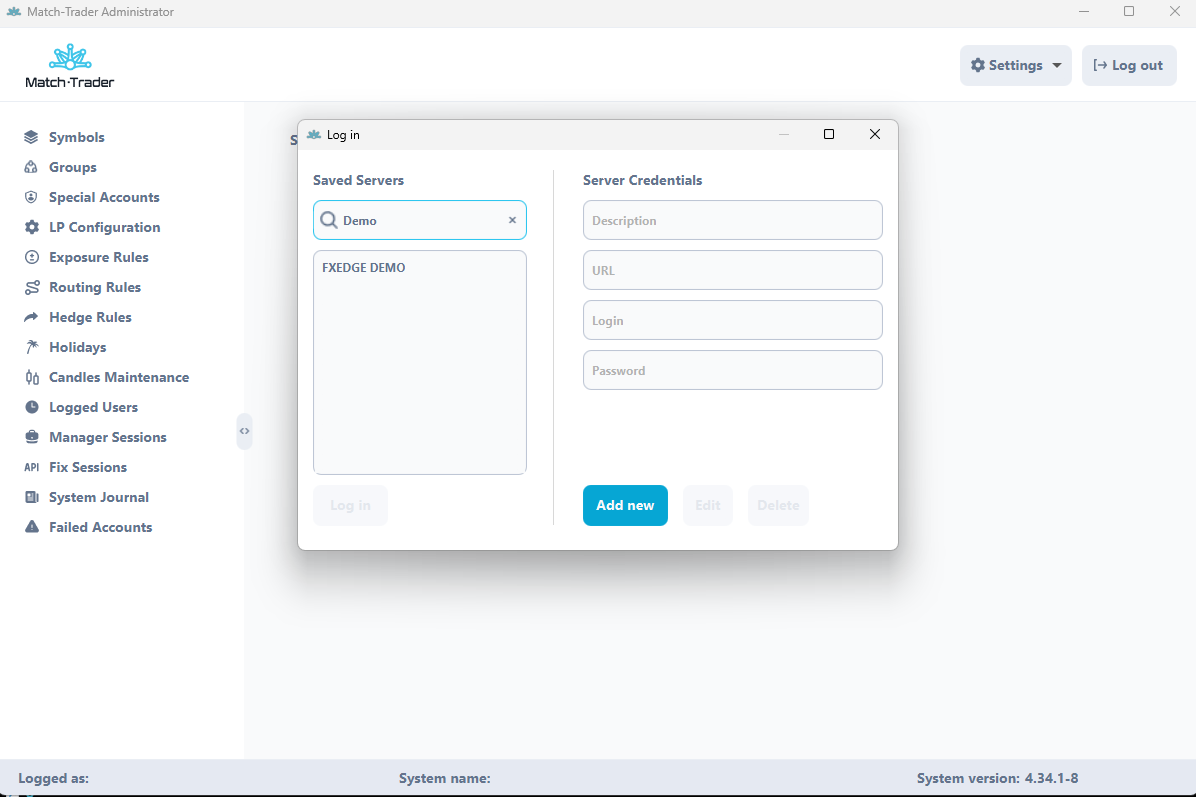
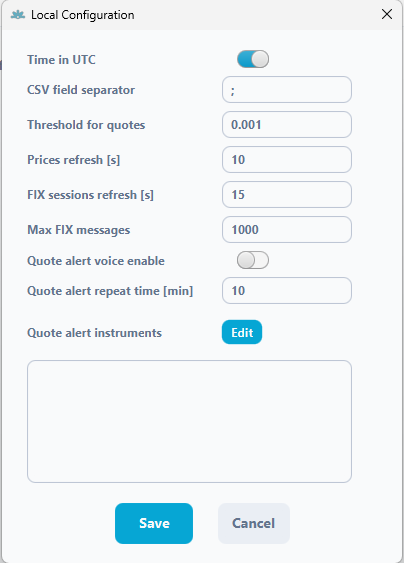
- To log in you need to type the correct server address in the Server field. The server address is always provided by Match-Trade Technologies.
- In the Login and Password field you need to type credentials to your administrator account.
- If you click “save login data”, then the system will store your login and password on your local computer, which will be used for future logins to the applications
Admin Main window #
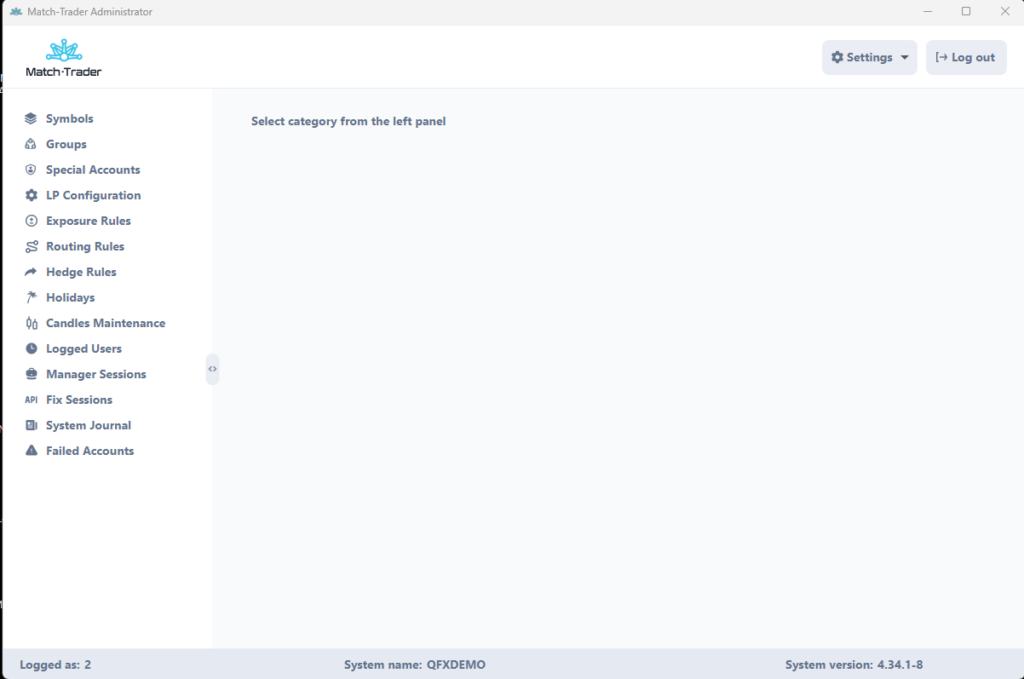
In Admin main window there are three buttons:
- Settings Configuration.
- Global Trusted Market.
If the “Global Trusted Market” flag is turned off, at least one LP quote has to be present in the order book (for a given instrument) to allow executions of market orders as well as activation of pending orders and stop-outs (preferable option for Forex). If the “Global Trusted Market” flag is turned on, then the market is always trusted, which means that market and pending orders can be executed despite of presence of LP orders. - Auto generate Client Id.
Allow to switch on/off. If the “Auto generate Client Id” flag is turned on, then you can choose the “Next Client ID”, which is the number from which new accounts will be created. You can also set a range of IDs which will be skipped by the system when creating new accounts. If the “Auto generate Client Id” flag is turned off then the system creates accounts then the system creates accounts one by one starting with the lowest numbers and there is no possibility to skip some of them.
- Global Trusted Market.
Symbols/MEs #
In this bookmark user can set various parameters which concern instrument configuration.
- Symbol – It is the name of the instrument in the system
- ID – It is the unique ID of the instrument in the system
- Sym. Alias. – It is the name of the instrument which will be visible on trading platform (if you leave this field empty then Symbol name will be visible on trading platform)
- Lot size – It is the value which allows to set size of 1 lot on trading platform, moreover it is treated as contract size, e.g.:
- lot size for XAUUSD is 100, multiplier is 1 and divider is also 1 – then opening 1.00 lot will open 100 ounces of XAUUSD
- B curr. – This is the first currency in a trading pair. It represents the currency being bought or sold in the transaction. For example, in the EURUSD pair, the base currency is EUR, meaning you are buying or selling euros
- Q curr. – This is the second currency in a trading pair. It indicates how much of the base currency is worth in terms of this currency. For EURUSD, the quote currency is USD, showing the price of 1 EUR in USD. baseCurrency and quoteCurrency apply only to the calculation type FOREX (they are ignored by the system for CFD and FXCFD).
- Price Dec places – It is a number of digits after comma of a price of particular instrument. In other words it is an instrument precision
- VolDecPlaces – It is a precision of the order volume which can be sent to ME. If the value is 2 – the client on the platform will be able to change the volume of the position by 0.01 contract units.
- Calc Type – type of calculation
- 0 – forex
- 1 – cfd
- 2- fxcfd (cryptocurrencies)
- Vol. Step – from admin with an offset by volume decimal places. eg: if Vol. Dev. Places is 0 and Vol. Step is 1 then contract size will be 1 and the trader won’t be able to open half or less position. For the FOREX type of calculation, the default value of contract size is 100 000 units, vol. step is 1000 because 0.01 lot = 1000 units
- Leverage – default leverage for particular symbol:
- if value is set to 100, leverage on instrument will be 1:100 (1% of position nominal value will be taken as required margin)
- if value is set to 30, leverage on instrument will be 1:30 (3.33% of position nominal value will be taken as required margin)
- etc.
- Swap Calc Type – It is a type of swaps calculation. It can be Pips (daily) or Percents (yearly)
- Swap L – value of the swap for Long Position
- Swap S – value of the swap for Short Position
- Multiplier – increase nominal value of position by multiplying by the set value (applies only for cfd and fxcfd)
- Divider – decrease nominal value of position by dividing by the set value (applies only for cfd and fxcfd)
Multiplier / Divider = Contract Size
e.g. Multiplier is 25 and Divider is 10, then Contract Size will be 25/10=2.5 - Mult. Currency – This is the currency in which the instrument is denominated, e.g., for GER30 it will be EUR.)
- Description – It is symbol description visible on the trading platform.
- Delay Yellow – this is the time (in seconds) after which a symbol in the LP Symbols tab changes from yellow to red when it stops quoting.
- Delay Green – this is the time (in seconds) after which a symbol in the LP Symbols tab changes from green to yellow when it stops quoting.
There are a few buttons at the top of the window:
- New – by clicking this button user can add new instrument
- Refresh – it refreshes configuration of the instruments
- Submit Changes – by clicking this button you submit changes which were made
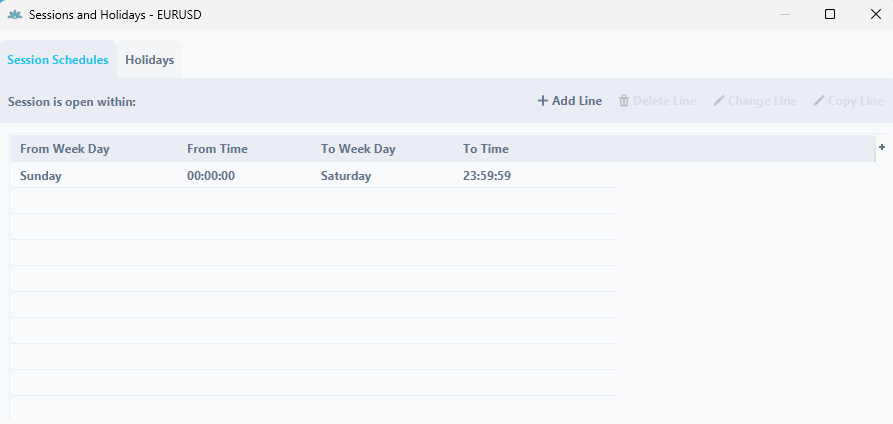
- Sessions Calendar – here you can define trade session for particular instrument
- Sessions Copy – here you can copy session of one instrument to other instruments
- Download – it is an option to download whole configuration to csv file
- Upload – it is an option to upload configuration from csv file to the server
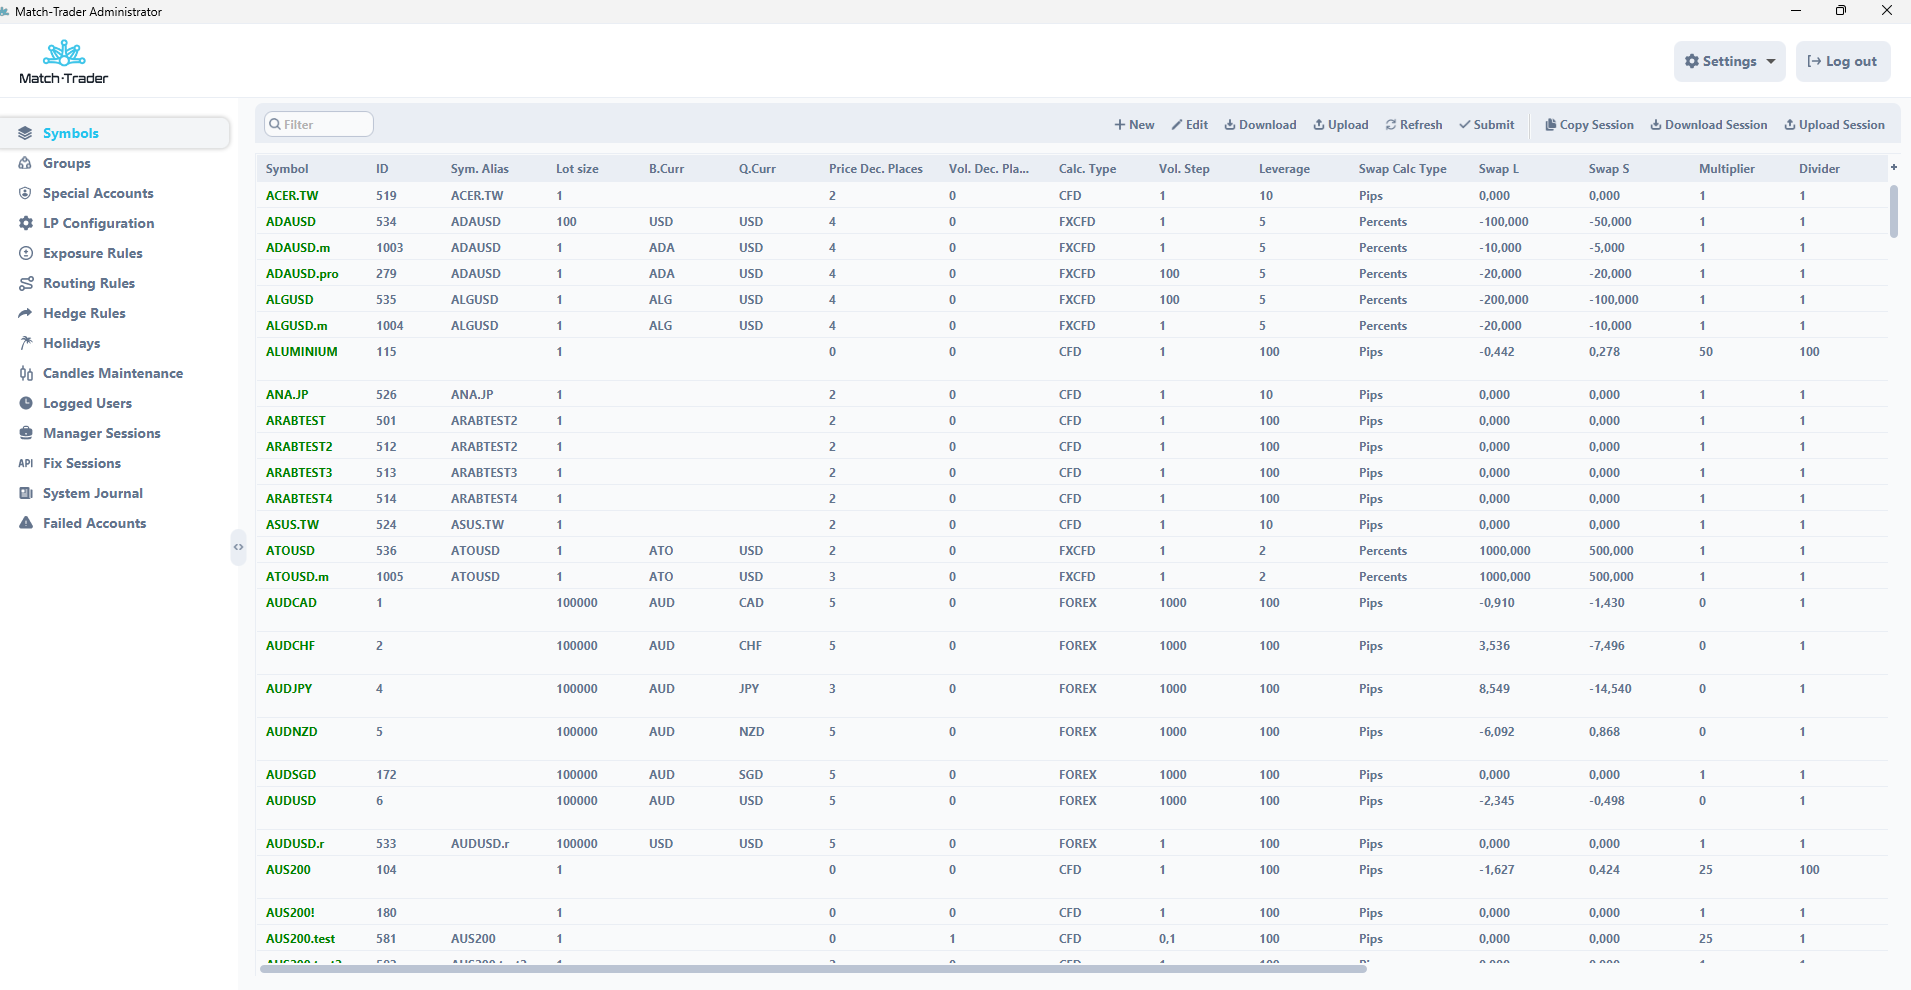
When you double-click on a specific symbol, you will be able to modify the session opening hours.
If you right click on particular instrument you are able to close or open session manually for particular instrument.
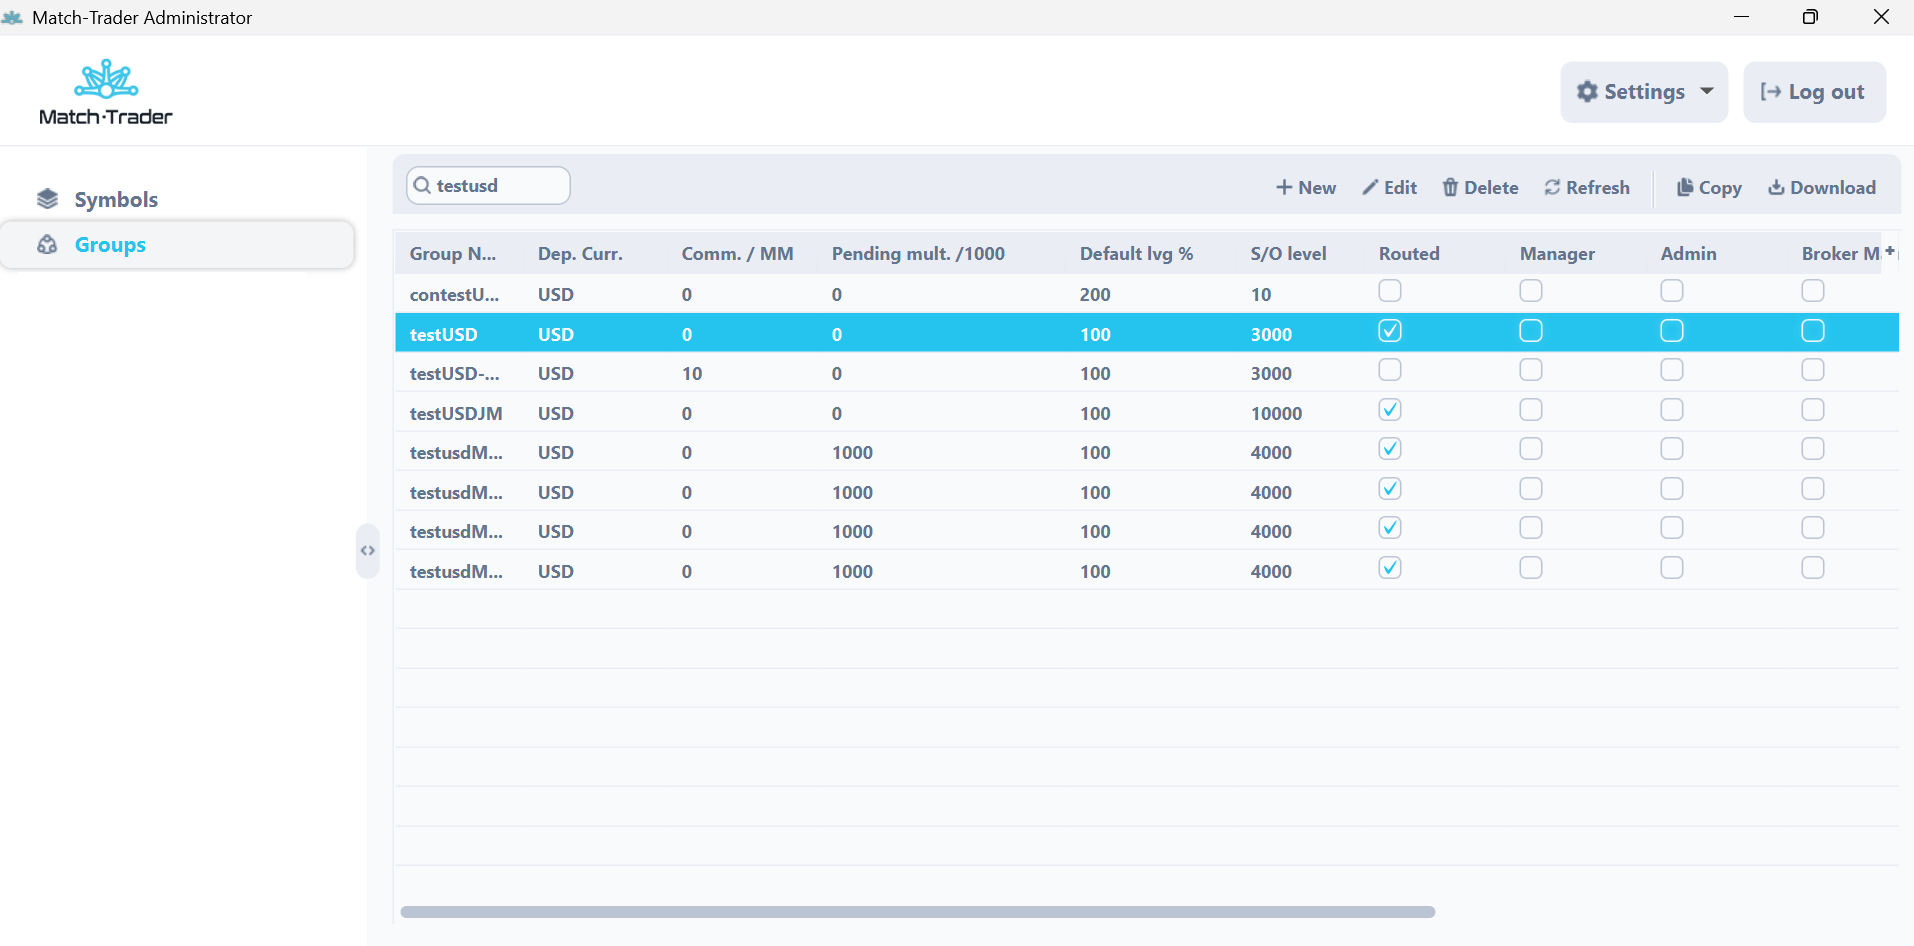
Groups #
In main window you can see a list of all groups with their parameters.
- Group Name – It is a name of the group
- Dep Curr – It is a deposit currency of the client group
- Comm / MM – It is a default commission per million USD traded
- Pending multipler / 1000 – it is a % value that is applied as a margin for pending orders (only for fifo mode accounts)
- Default Leverage % – It indicates that each account created in the group will have given Leverage %, e.g.:
- if Leverage value in Symbols tab on EURUSD is 30 and Leverage % on trading account is 100, final leverage for EURUSD will be 1:30 (3.33%)
- if Leverage value in Symbols tab on EURUSD is 30 and Leverage % on trading account is 200, final leverage for EURUSD will be 1:60 (1.66%)
- etc.
- S/O Level – It indicates at what level accounts will reach the stop out activation
- Routed – It indicates if this group should be hedged with LP
- Manager – It indicates if group consists of manager users
- Admin – it is a setting which indicates if users in this group should have Manager Roles
- BrokerManager – it is a setting which indicates if users in this group should have Broker Manager Roles
- Demo Execution Mode – ensures that orders are executed at market prices without affecting the order book, meaning they do not consume available liquidity. Orders are processed using the Fill or Kill (FOK) rule, meaning they must be fully executed or rejected. If an order exceeds the available liquidity, the system cannot determine the execution price, resulting in a Not enough liquidity error. Execution prices are calculated using VWAP (Volume Weighted Average Price), ensuring that orders are filled at an averaged market price. Example:
- If the order book contains 5, 10, and 15 available lines of lots, an order for 40 lots will be rejected.
- If the order book contains 5, 10, and 15 available lines of lots, An order for 29 lots will be executed, but the order book remains unchanged.
- Equity Range Emitter – this function has to be enabled for prop trading groups in order to monitor trading rules
- Company – it is the name of the broker company
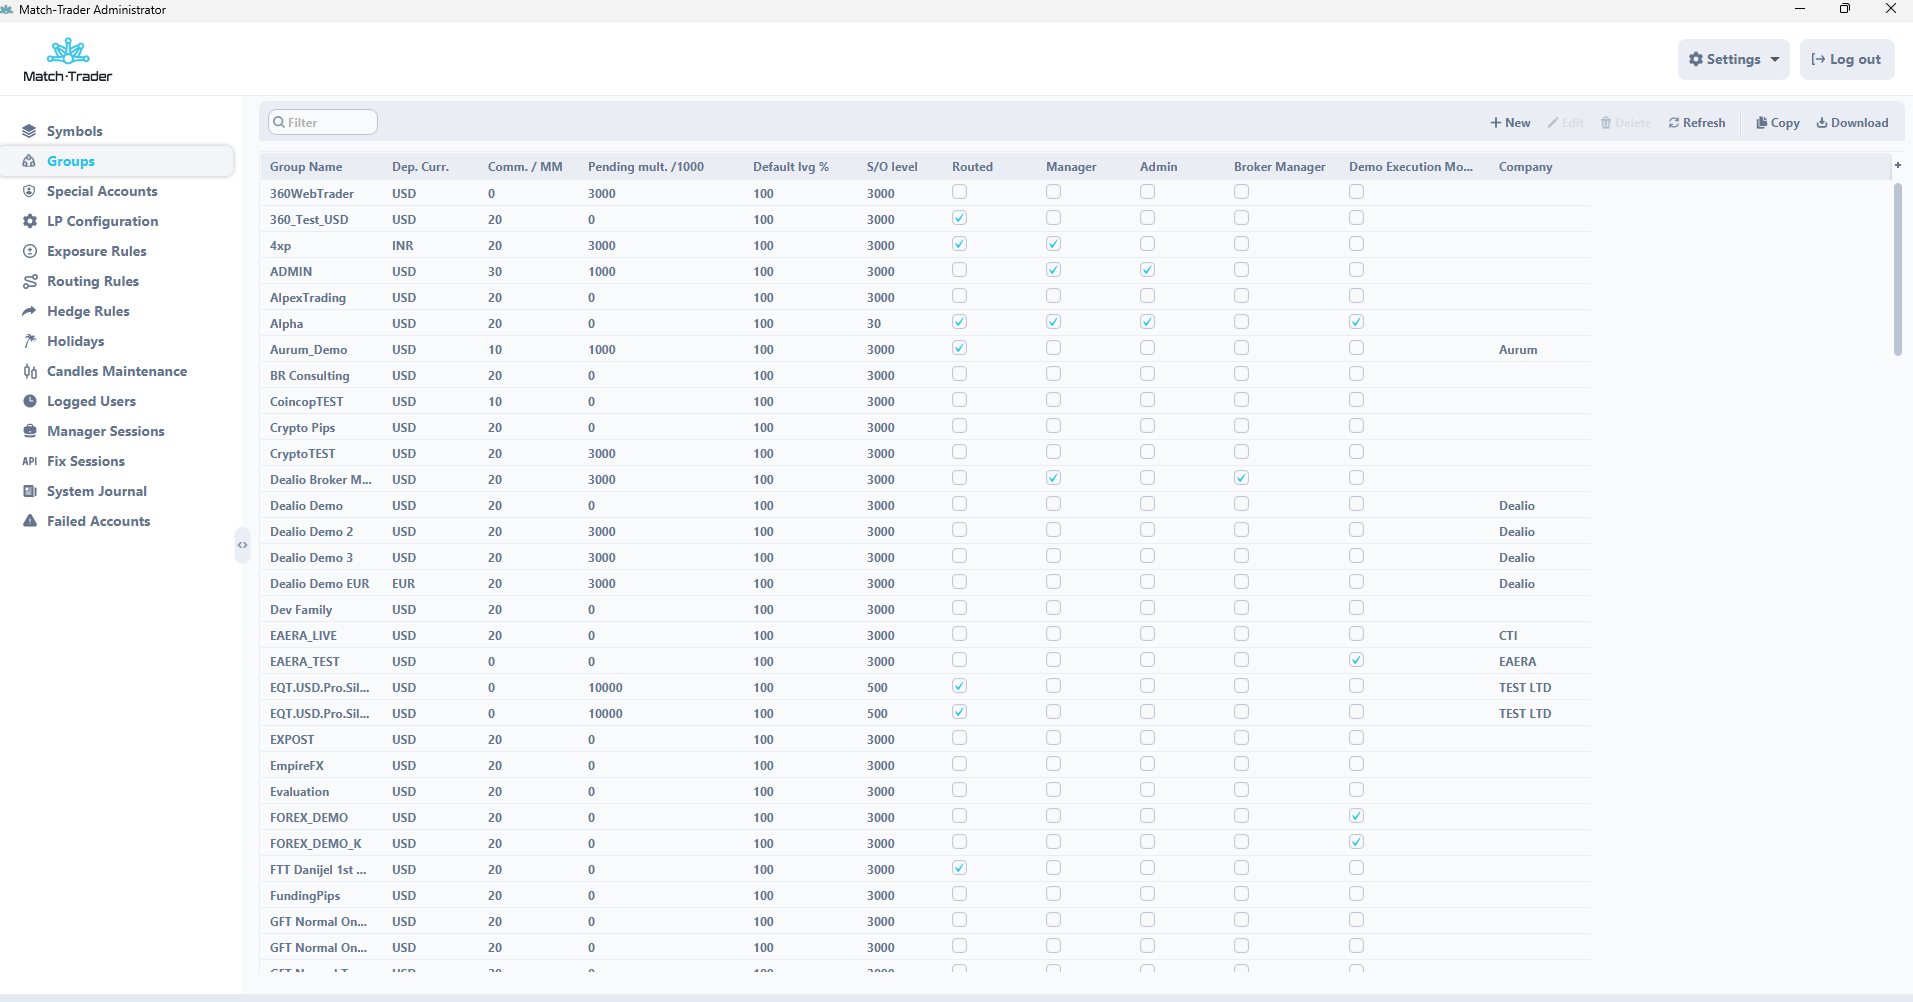
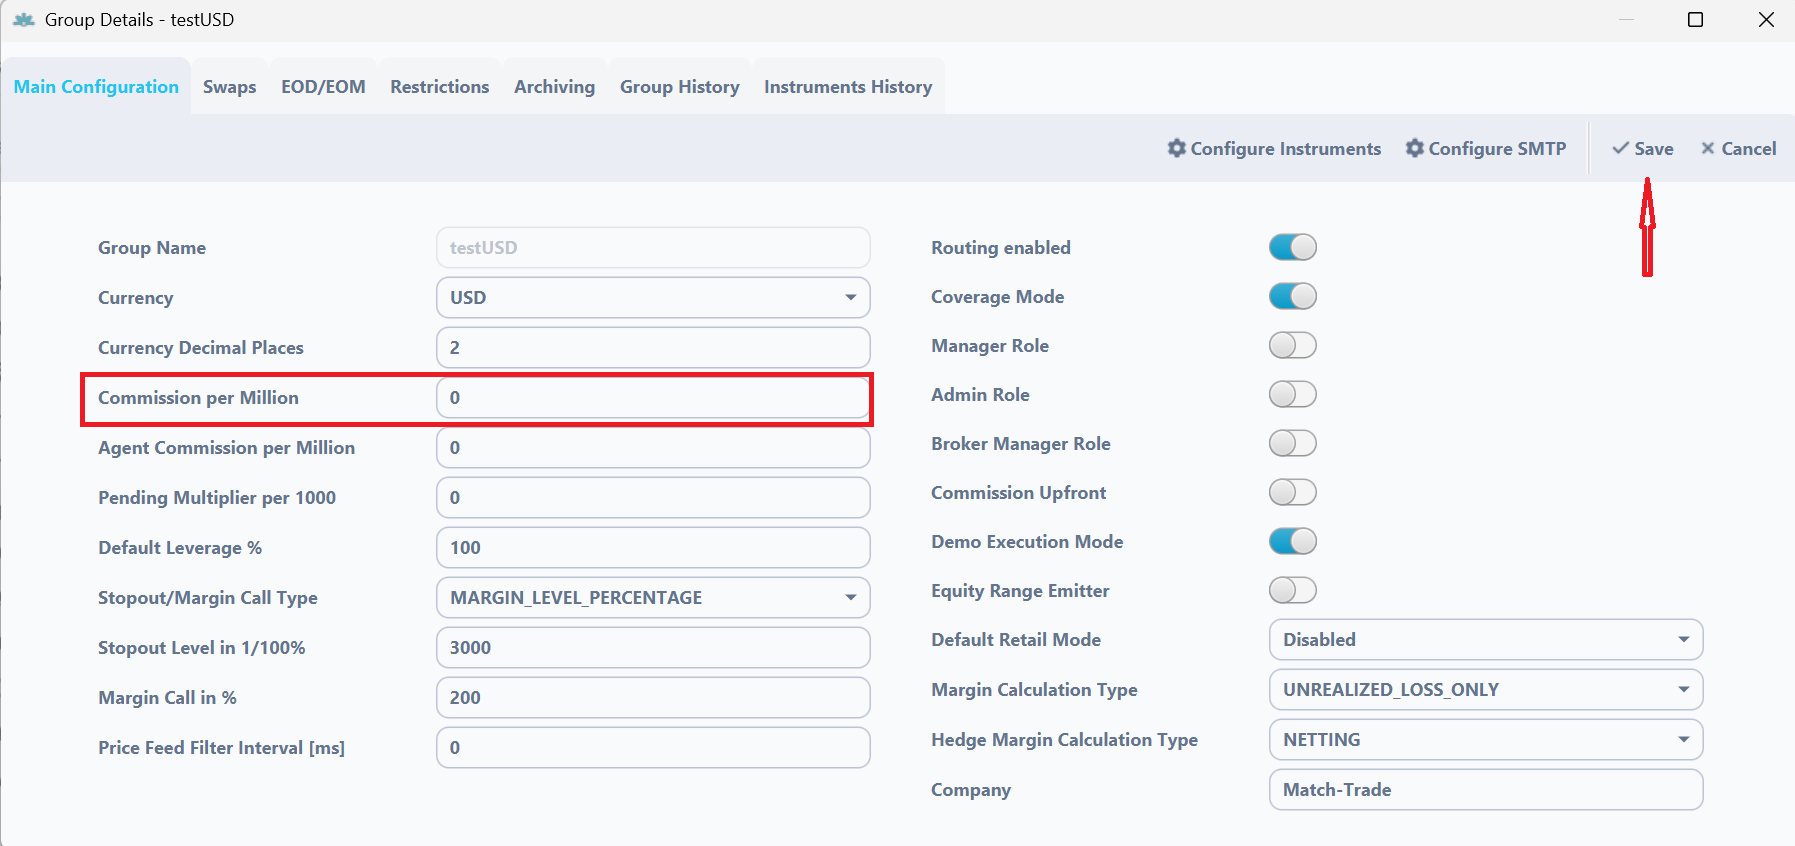
If you double click on the group, then it is possible to change some additional group parameters
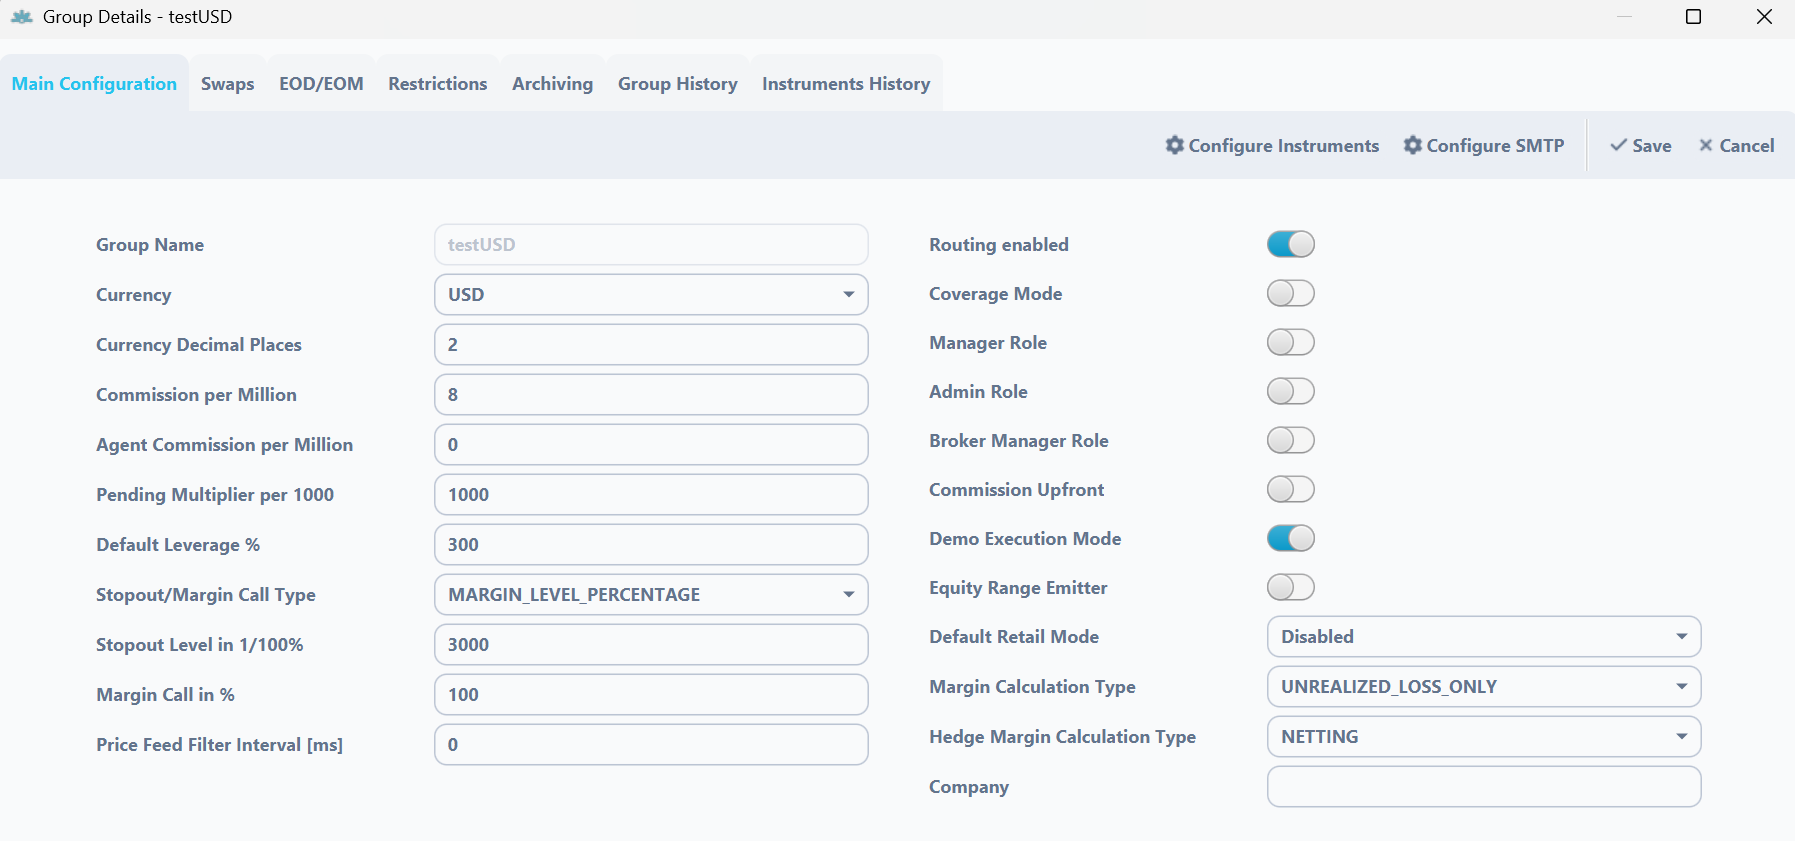
Main Configuration
- Currency – currency of the group
- Currency Decimal Places – It is a precision for deposit currency
- Commission per Milion – It is the value of commission that will be charged to broker for 1 million turnover in this specific group
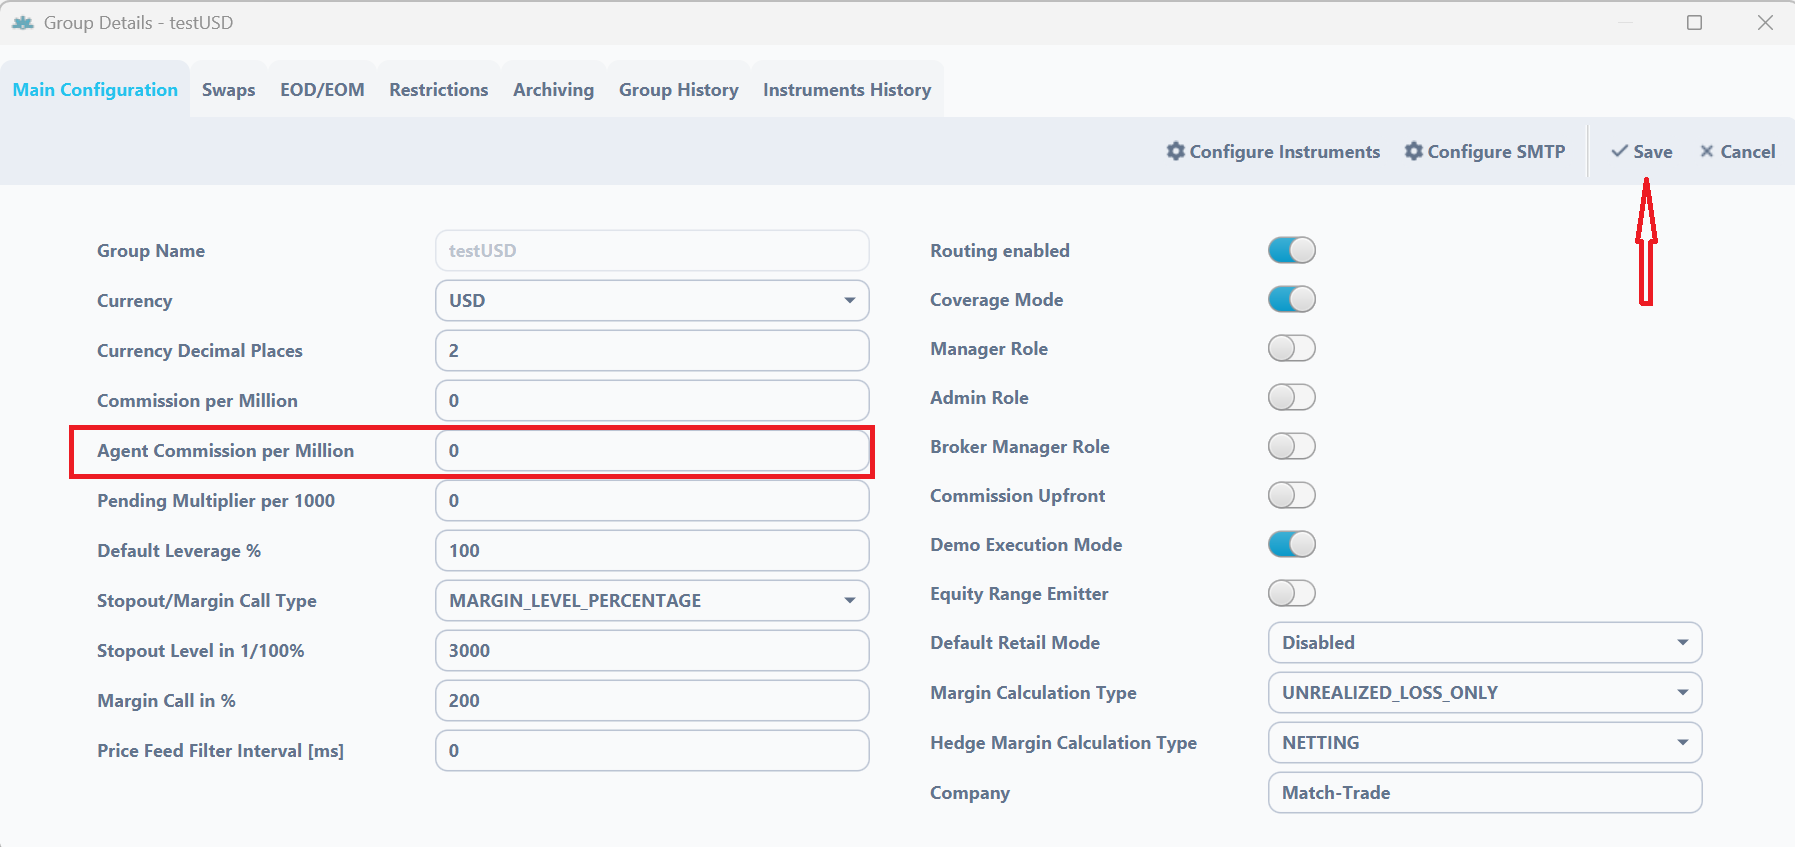
- Agent Commission per Million – It is a value of commission which can be added to agent accounts
- Default Leverage % – It indicates that each account created in the group will have given Leverage %, e.g.:
- if Leverage value in Symbols tab on EURUSD is 30 and Leverage % on trading account is 100, final leverage for EURUSD will be 1:30 (3.33%)
- if Leverage value in Symbols tab on EURUSD is 30 and Leverage % on trading account is 200, final leverage for EURUSD will be 1:60 (1.66%)
- etc.
- Stopout/Margin Call Type: Stopout Level at 1/100% refers to the percentage of the margin used to calculate when the stopout level is triggered. When you set a value like 3000, it represents 30%
- ABSOLUTE_EQUITY_USD Option:
- Example: A trader has an account balance of $5000. If the equity (balance including open positions) drops to f.e. $3000 or below, a stopout will automatically occur after approximately 2 seconds. This means the trading platform will begin to close the trader’s open positions to prevent further losses.
- MARGIN_LEVEL_PERCENTAGE Option:
- Example: A trader has various open positions in the market, and initially, their margin level is higher than 30%. The margin level is the ratio of equity to the used margin. If this ratio falls to 30% or lower, which can happen if open positions start incurring losses, a stopout will automatically be triggered after approximately 2 seconds. This will cause the open positions to be closed until the margin level is back above 30% or until all open positions are closed.
- ABSOLUTE_EQUITY_USD Option:
- Margin Call in % – it is a level when clients receive a margin call notification. If set to 50%, customer accounts will receive a margin notification when their margin falls below 50%.
- Price Feed Filter Interval [ms] – the delay execution for scalpers’ trades in milliseconds
- Hedging/Routing Enabled – [only for Match-Trader server license] enabling this makes it possible for orders from this group to be routed to another LP. This group needs to be configured in Routing Rules Tab
- Coverage Mode – [only for Match-Trader server license] Enabling routing allows You too route the trades from specified symbols in the routing rules to different account in case it’s internall or different LP through LP connector, coverege marking is used in case of hedging exposition with external LP to net expositions in the position summary – so when You are fully hedged, position summary should not present any exposition.
- Manager Role – it indicates if users in this group should have Manager Roles
- Admin Role – it indicates if users in this group should have Admin Roles
- Broker Manager Role – it indicates if users in this group should have Broker Manager Roles
- Commission Upfront – it is a setting which charges the commission upfront, only during opening trade (exact value, specified on the symbol’s setting).
- EOD Reports Mode – you can define if you wish to send daily reports to your clients
- EOM Reports Mode – you can define if you wish to send monthly reports to your clients
- EOM/EOD Generation time – you can define at what time you want to send daily and monthly reports
- Default retail mode – when this option is enabled, newly created accounts in this group will operate in retail mode. If it is disabled, the accounts will be created in FIFO mode. This setting does not affect existing accounts. In FIFO mode (First In, First Out), it is not possible to open positions in opposite directions on the same symbol – for example, if you have a 1.0 lot buy on EURUSD and open a 0.3 lot sell, the system will partially close the existing buy position, leaving you with 0.7 lot buy. Additionally, Take Profit and Stop Loss orders are not available in FIFO mode.
- Margin calculation type – – it is a parameter that set the margin calculation mode
- UNRALIZED_LOSS_ONLY – use loss only: Free Margin = Equity (Unrealized loss) – Margin
- UNRALIZED_PROFIT_LOSS – use loss and profit: Free Margin = Equity (Unrealized loss + Unrealized profit) – Margin
- Hedge Margin Calculation Type – defines how the margin is calculated for hedge positions
- NETTING – margin level is calculated after a position has been netted. If two opposite positions are open on the hedge account – 2 lots of EURUSD Buy Market and 1 lot of EURUSD Sell Market – the margin for the hedge account will be calculated on the basis of the position size of 1 lot EURUSD.
- LARGER_LEG- margin level is calculated from the highest position on the hedge account. If two opposite positions are open on the hedge account – 2 lots of EURUSD Buy Market and 1 lot of EURUSD Sell Market – the margin for the hedge account will be calculated on the basis of the position size of 2 lots EURUSD.
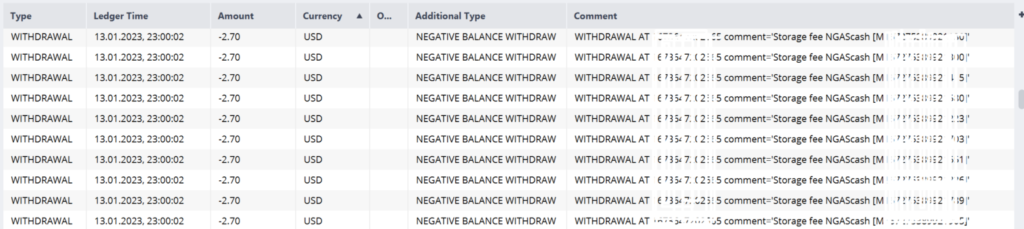
- Islamic SWAP – when you set this option, the swaps will be displayed in the system as a deposit/withdrawal with the comment “storage fee” containing Position and symbol.
- Swap Calculation time – it is time when swap will be calculated on clients accounts
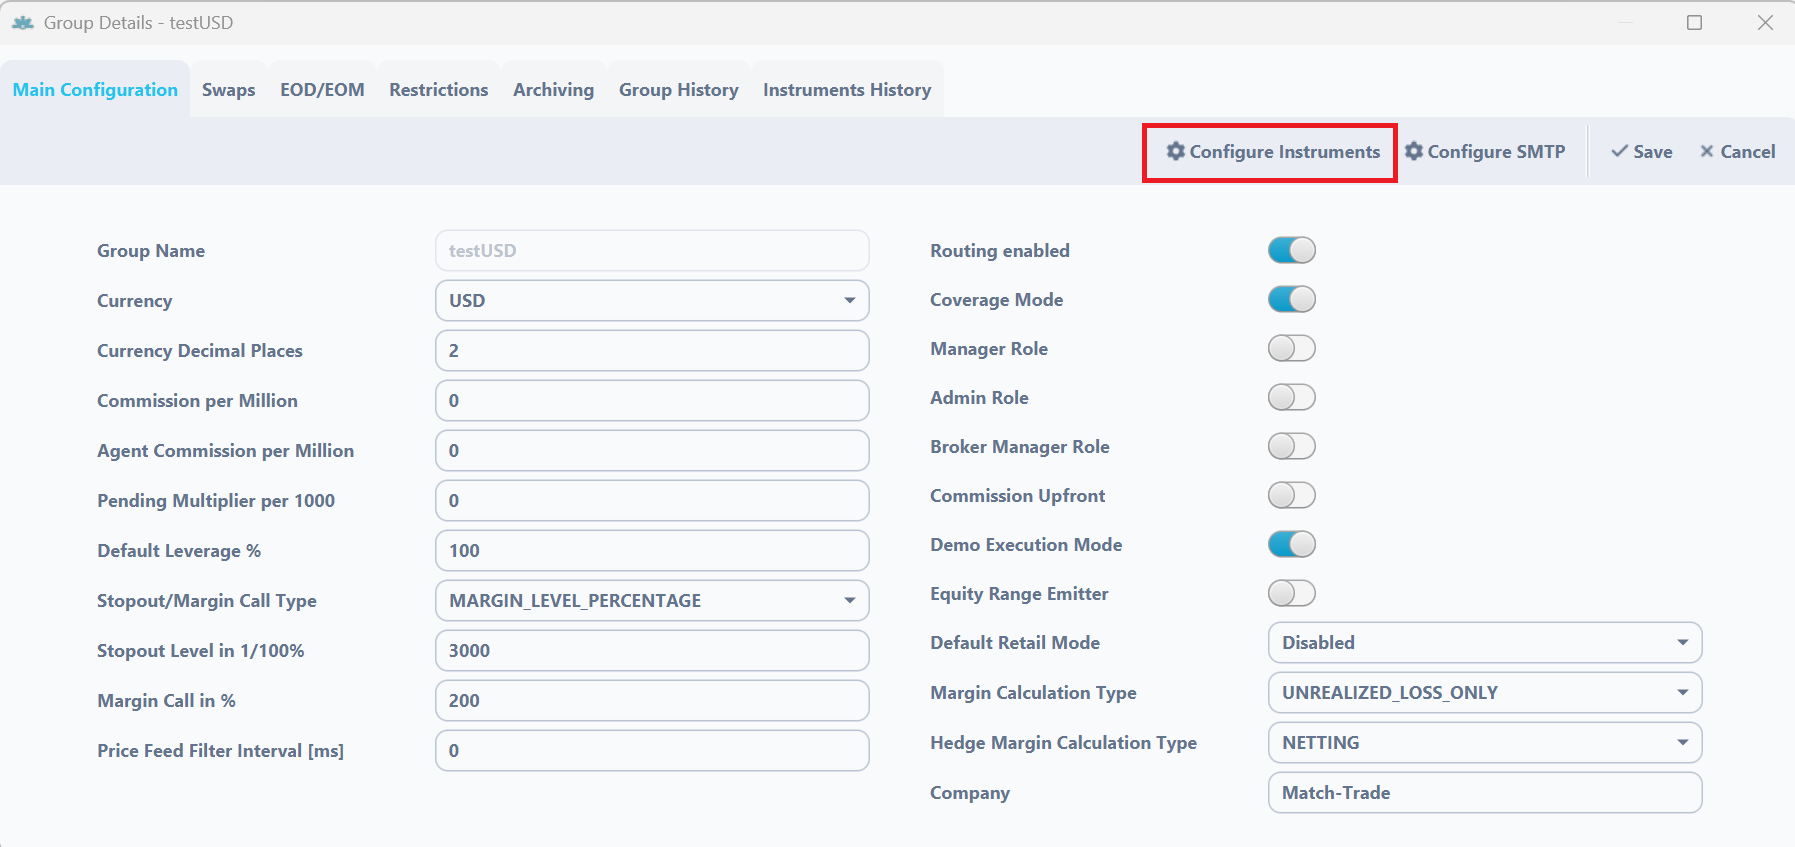
- Button Configure Instruments – it allows to change instrument settings in particular group
- Button Configure SMTP – it allows to set a mailer to send notifications to the clients
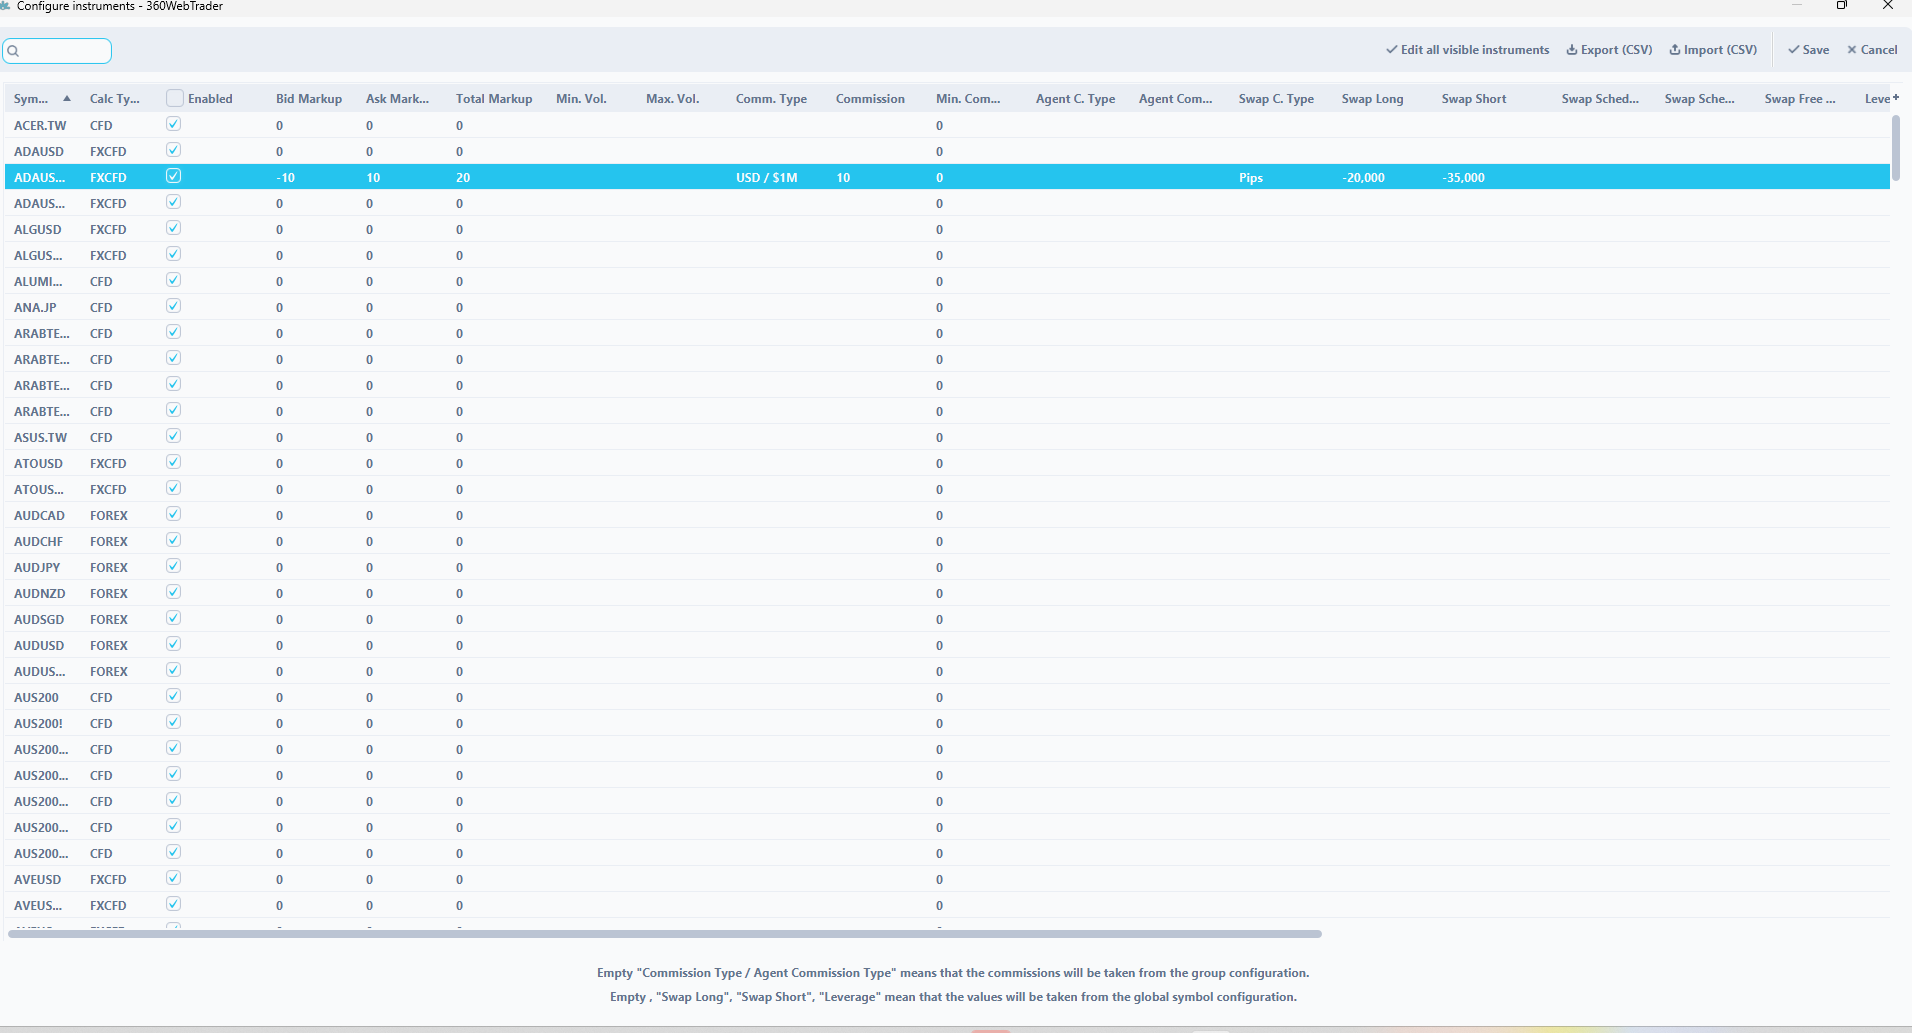
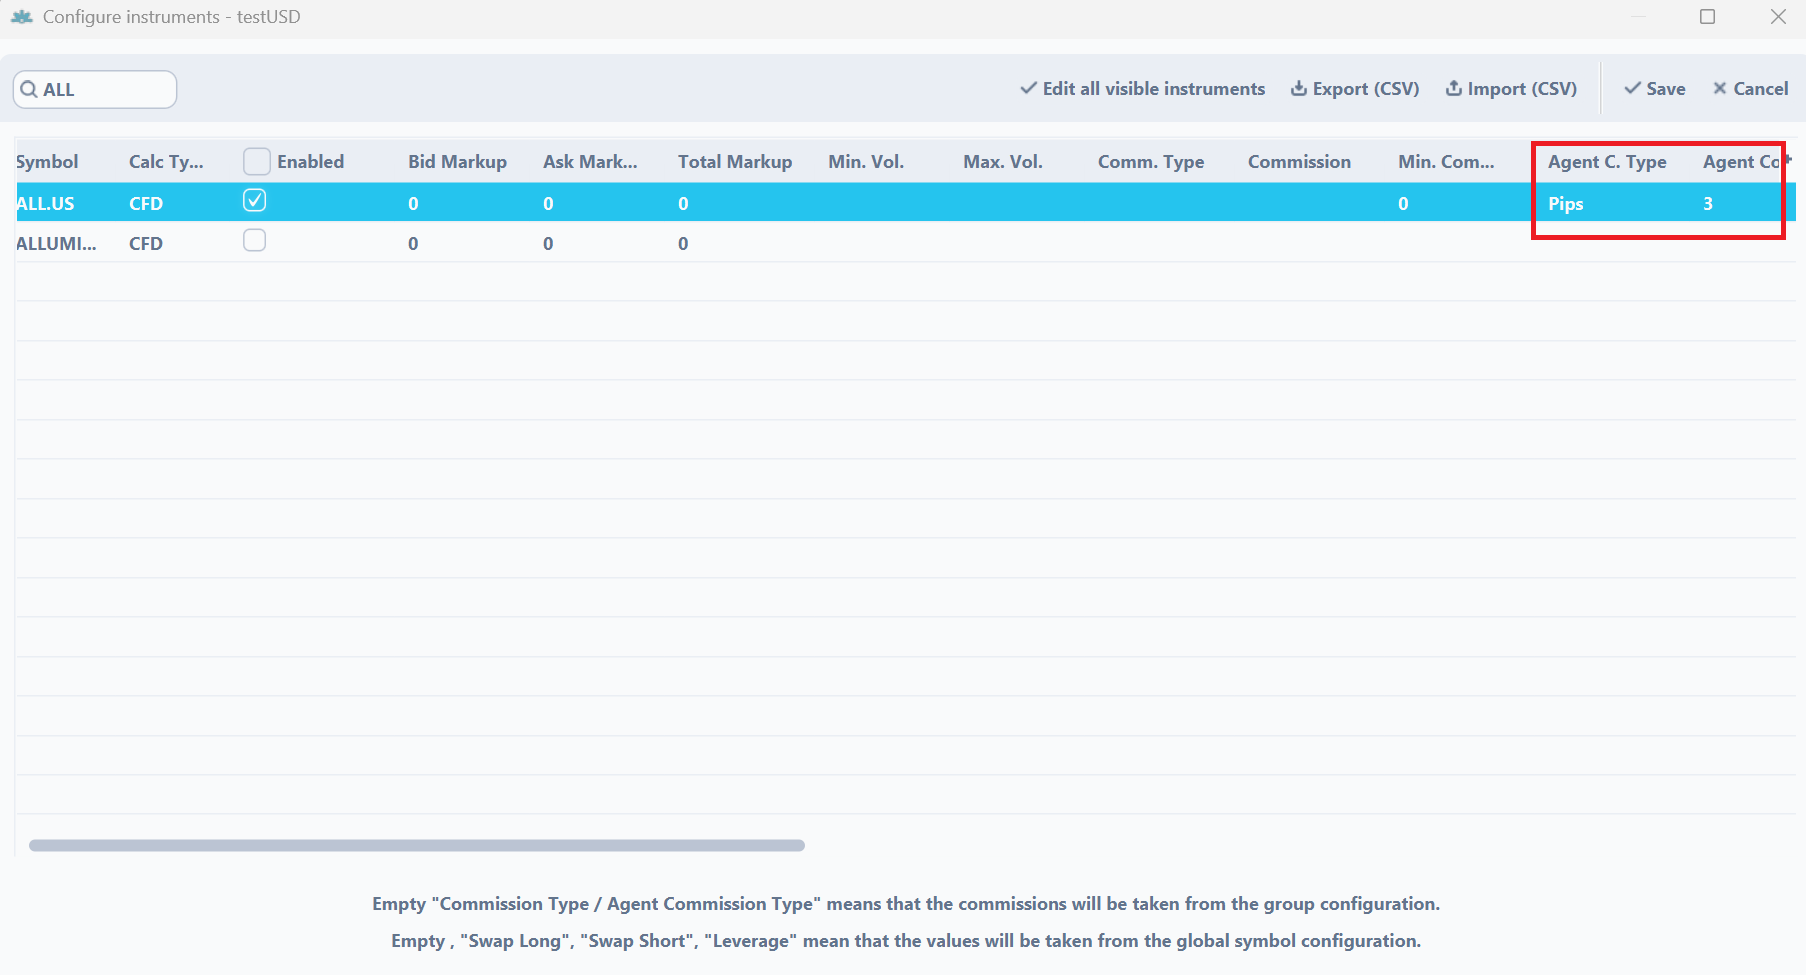
Configure Instruments Details
If you click on Configure Instruments button then you will be able to enable or disable instruments in the group, set specific markups, commission, swaps or leverage per instrument in a given group. Some of the columns are the same as in the general Symbols tab, if the values are set in the group they overwrite the values from general tab. Columns different from general tab are:
- Enabled – it defines which symbols are enabled to be traded and quoted in the group
- Bid Markup – enables us to add a markup for the bid price. Must be added as negative value
- Ask Markup – enables us to add a markup for the ask price. Must be added as positive value
- Total Markup – shows the sum of bid and ask markup
- Min. Vol. – enables us to set a minimum volume on the instrument. The volume is expressed in lots. If Min. Vol. is set to 0.1, it means that a trader can open a position with a minimum volume of 0.1 lot.
- Max. Vol. – enables us to set a maximum volume on the instrument. The volume is expressed in lots. If Max. Vol. is set to 1, it means that a trader can open a position with a maximum volume of 1 lot. A trader can open multiple positions, but the maximum size of each individual position cannot exceed 1 lot.
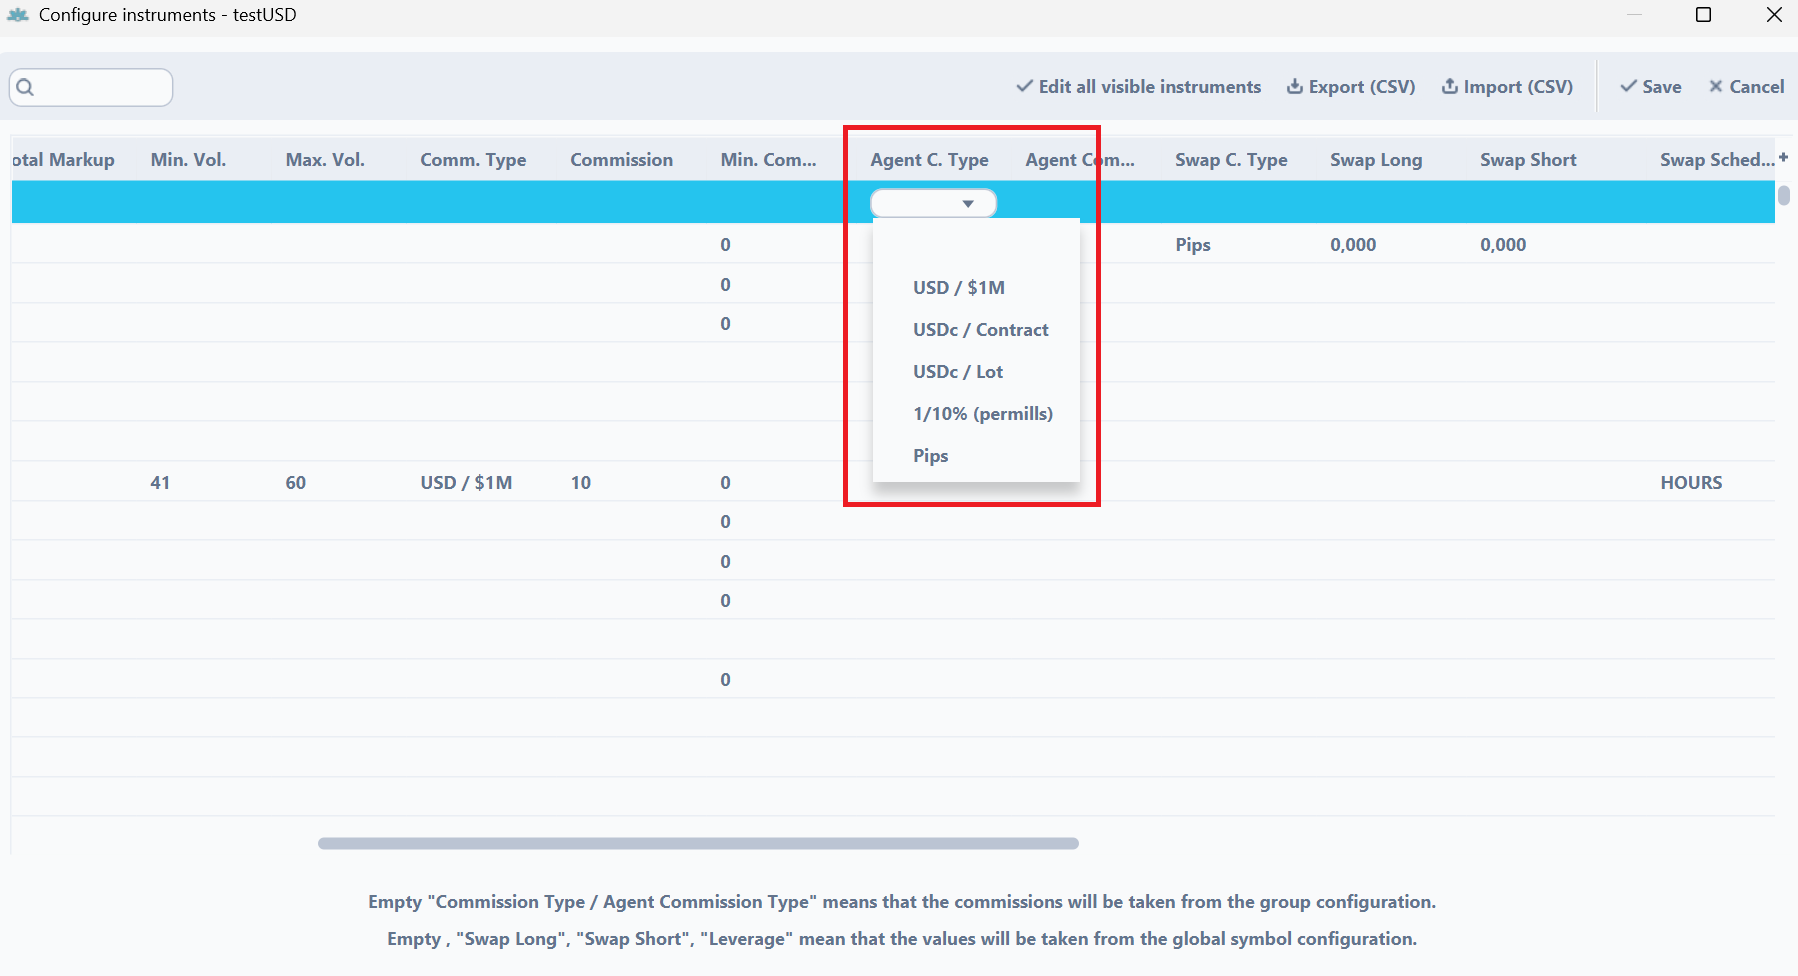
- Comm. Type* – it defines how the commission should be calculated
- USD / $1M. This commission type is set per 1 million USD traded by the client. If you set this type, your agent commission will be calculated with this formula – (commission value/1000000) * lot traded by client * nominal value of instrument * exchange rate of nominal value to USD( only if the nominal value is in another currency than USD).
- USDc / Contract. This commission type is set USD Cents per instrument lot size traded by the client. If you set this type, your agent commission will be calculated with this formula – commission value * instrument lot size * lot traded by the client. You shouldn`t use this commission type for forex instruments, because they have a lot size of 100 000, so the minimal commission for 1 lot traded by a client will be 1000 USD.
- USDc / Lot. This commission type is set USD Cents per lots traded by the client. If you set this type, your agent commission will be calculated with this formula – commission value * lot traded by the client.
- 1/10% permille. This commission type is set at 0,1% per nominal value traded. If you set this type, your agent commission will be calculated with this formula – commission value * 0,1% * lot traded by client * nominal value of instrument * exchange rate of nominal value to USD (only if the nominal value is in another currency than USD).
- Pips. This commission type is set points value per lot traded. If you set this type, your agent commission will be calculated with this formula – commission value * instrument pip value * lot traded.
- Commission – size of the commission
- Min. Comm. $ – minimum commission which will be taken
- Agent C. Type – it defines how the commission should be calculated for agent account
- Agent Comm. – size of the agent commission
- Close Only Mode for Retail – selected symbol will be only possible to close (functionality available only for retail accounts)
- Long Only Mode for Retail – it will be possible to take only long positions (buy positions) on a given symbol
- Disable Trading – this feature allows to lock in the ability to trade on selected symbols while still allowing clients to receive live prices for those symbols
- Leverage – custom leverage for particular instrument. If the field is left blank, the leverage height is according to the basic settings from the Symbols category. By completing this value – the basic leverage value for this instrument is changed to the one specified by the user. e.g.:
- if value is set to 100, leverage on instrument will be 1:100 (1% of position nominal value will be taken as required margin)
- if value is set to 30, leverage on instrument will be 1:30 (3.33% of position nominal value will be taken as required margin)
- etc.
- Fixed Leverage – if the box is checked, then the “Leverage” value from the previous point will be final leverage for the instrument. If the box is not checked then the “Leverage” value from the previous point will be multiplied by Leverage % parameter set on client’s account, e.g.:
- if Leverage % parameter on client’s account is 200, Leverage parameter on symbol is 30 and Fixed Leverage parameter is not checked, then final leverage ratio on instrument is 1:60 (1.66%)
- if Leverage % parameter on client’s account is 200, Leverage parameter on symbol is 30 and Fixed Leverage parameter is checked, then final leverage ratio on instrument is 1:30 (3.33%)
- Disable Trading – if the box is checked, trading on this instrument is disabled for this group
- Swaps multipliers – if the box is checked, settings from the SWAP tab will be applied to the group. Otherwise, own SWAP calculation settings will not be taken into account.
- Max Exposure $ – enables us to establish maximum exposure (in $) for particular instrument for one client. Above this value, the client will not be able to increase the position on the instrument.
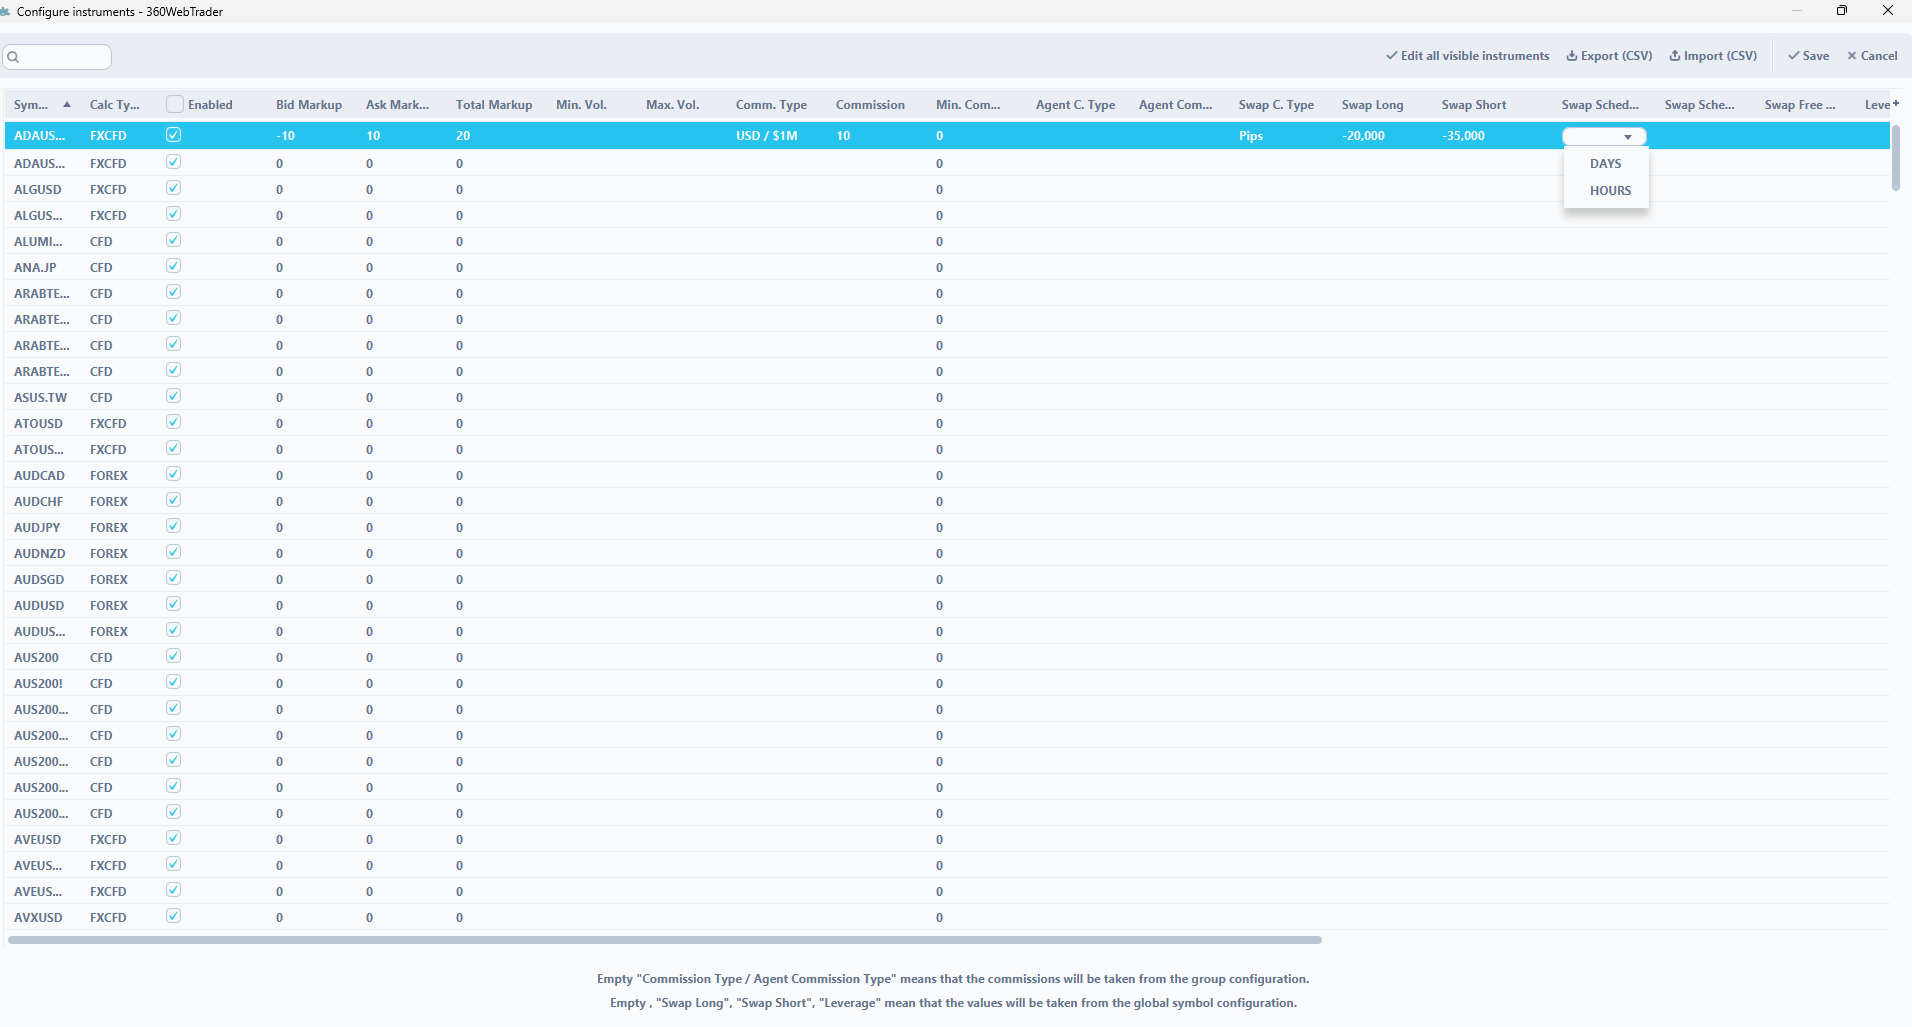
- Swap Schedule Type – indicates the mode of calculation of the swap
- Days – Every specified number of days
- Hours – Every specified number of hours
- Swap Schedule Value – the number specified will determine the periodicity of the SWAP charging (taking into account the Swap Schedule Type)
- Swap Free Days – Specifies how many days after opening a position Swaps are not charged. A parameter set to 7 would mean that swaps will be charged for the first time only on the 8th day after opening the transaction.
Example of Swap Schedule use:
- Swap Schedule Type = HOURS
- Swap Schedule Value = 3
- Swap Calculation Time (specified on group settings) = 00:00
In this example, Swaps will be charged every 3 hours starting from 00:00.
- Swap Schedule Type = DAYS
- Swap Schedule Value = 3
- Swap Calculation Time (specified on group settings) = 00:00
In this example, Swap will be charged every 3 days at 00:00, since the value was set.
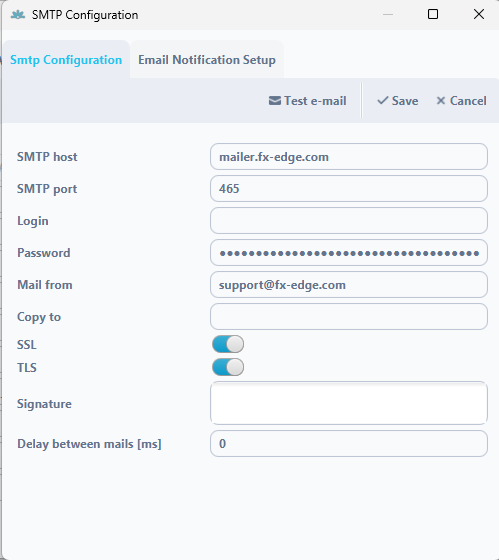
If you click on Configure SMTP button then you will be able to set a mailer from which trades in this group will receive EOM/EOD reports and informations about stoupouts and margin calls.
- SMTP host – host of the mail provider
- SMTP port – port to the given host
- Login – login to the email
- Password – password to the email
- Mail from – email address
- Copy to – email address to which report copy will be send
- SSL – it defines if the SSL protocol is enabled
- TLS – it defines if the TLS protocol is enabled
- Signature – enables us to set the mail Signature
- Delay between mails – enables us to set delay between send mails (in ms)
Below is also the button for Test e-mail which gives possibility to test if the provided mailer works.
Second Tab – Email Notofication Setup enables us to set if the mails about Deposit/Withdrawals and Credit In/Out should be send.
Swaps tab
In the ‘Swaps’ tab, the broker can define the values of swap multipliers for specific days. This feature enables the setting of a 3-day swap. For example, if a broker enters ‘3’ in the multiplier field for Friday, a triple swap will be charged on Friday. Consequently, swaps will not be charged to the client’s account during the weekend (Saturday and Sunday).
Swap Calculation time – it is time when swap will be calculated on clients accounts
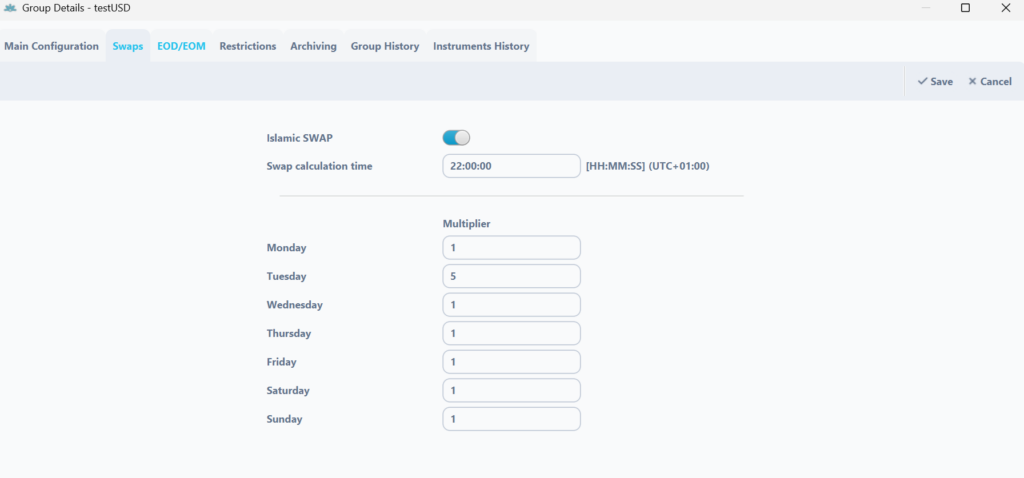
For the functionality to work properly, the “Swaps multipliers” checkbox for a specific symbol must be selected in the symbol configuration (“Configure Instruments”) in a given group.

ISLAMIC SWAPS – when you set this option, the swaps will be displayed in the system as a deposit/withdrawal with the comment “storage fee” containing Position and symbol.
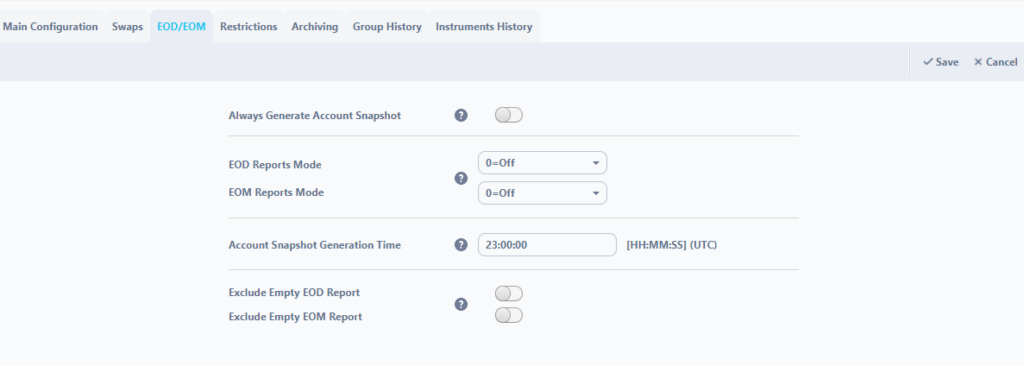
EOD/EOM
Always Generate Account Snapshot – system automatically captures and stores accounts snapshots regardless of EOD and EOM modes settings
EOD Reports Mode – you can define if you wish to send daily reports to your clients
EOM Reports Mode – you can define if you wish to send monthly reports to your clients
Account Snapshot Generation Time – you can define at what time you want to send daily and monthly reports
Exclude Empty EOD Report – prevent from sending EOD without trading activity
Exclude Empty EOM Report – prevent from sending EOM without trading activity
Restrictions tab

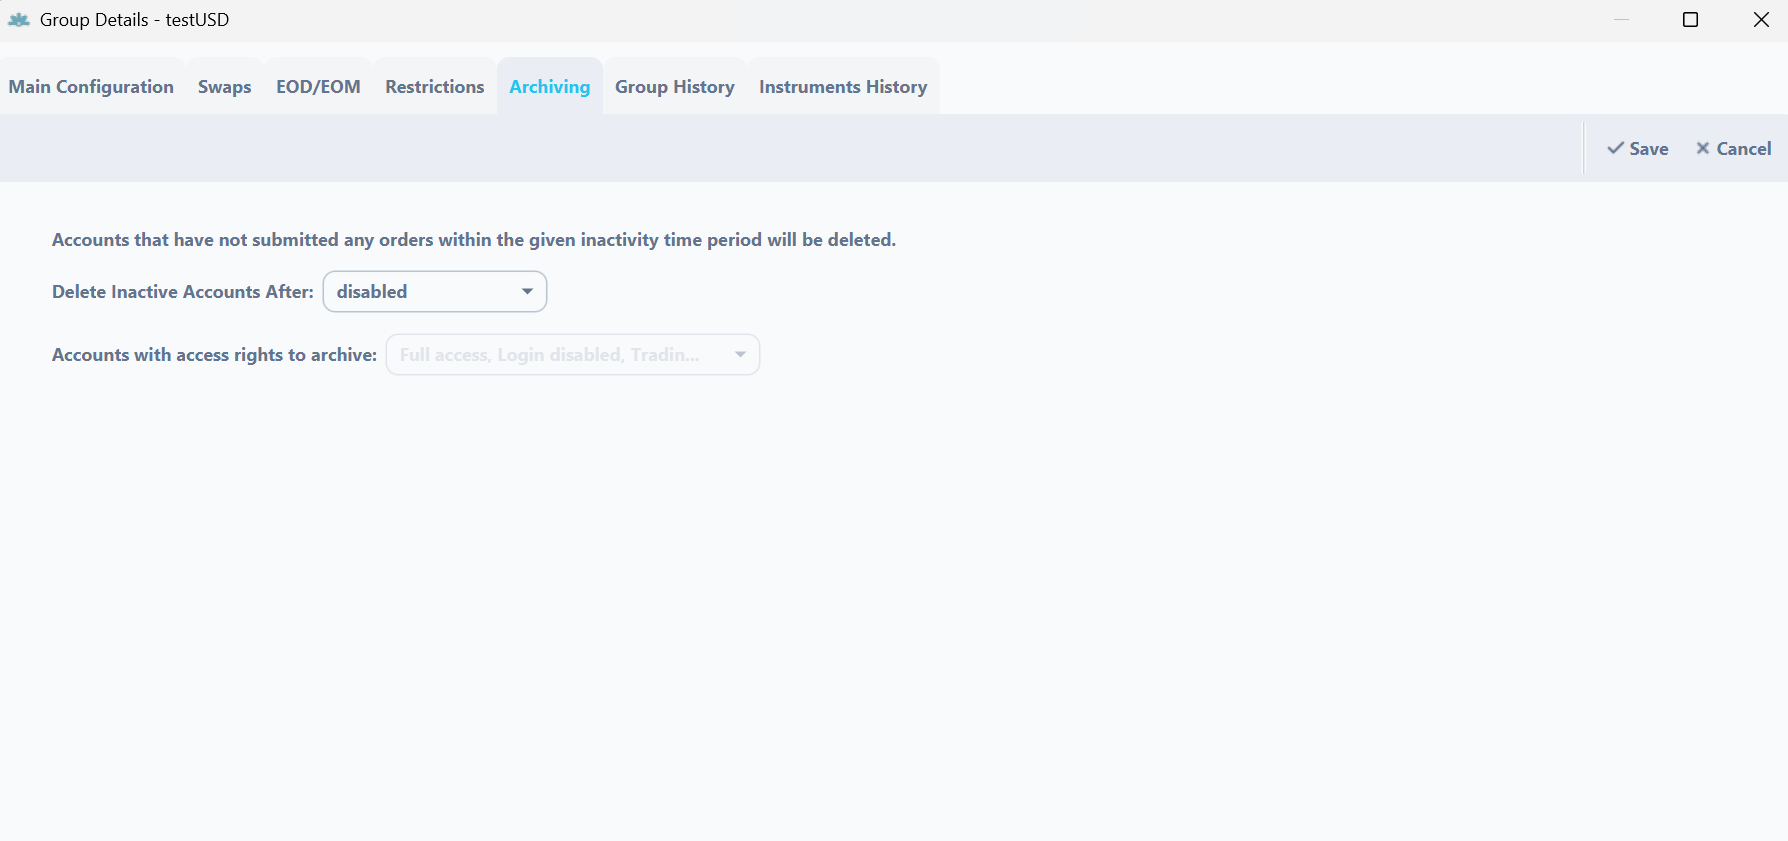
Archiving tab
In the “Archiving” tab, the broker can define the period after which inactive demo accounts will be automatically deleted. Only trading accounts that have not made any transactions on the platform within a given period of time should be deleted or locked or blocked it is marked.
Group History
This tab provides information on what changes have been made to a particular group – taking into account the selected time period.
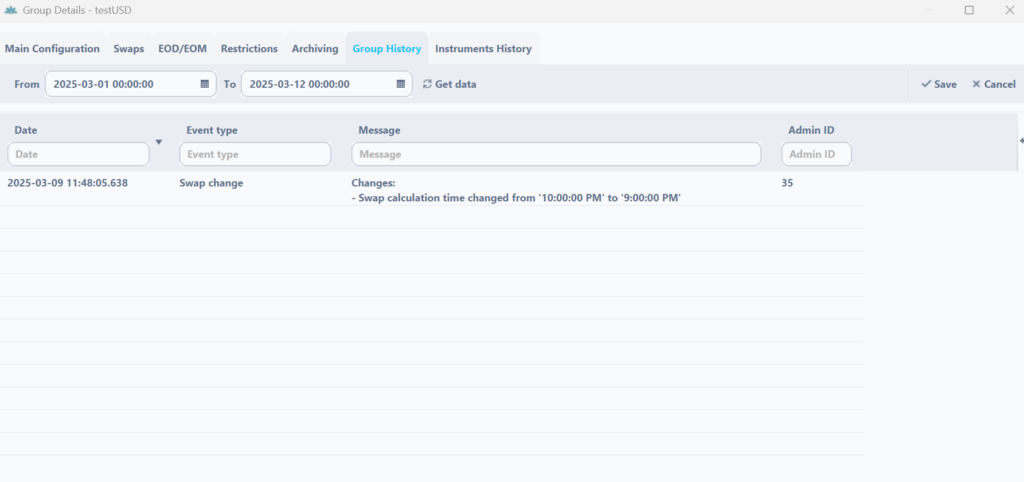
Group history consist of following columns:
- Event type – type of the change
- Message – details of the changes
- Admin ID – the number of the admin or system that made the changes
Instrument History
This tab provides information on what changes have been made to a particular group on specific instruments – taking into account the selected time period.
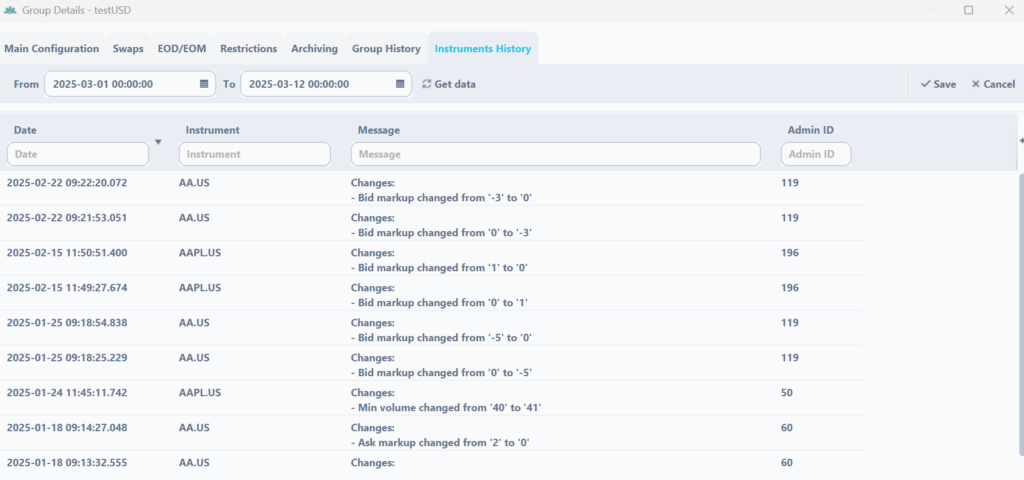
Instrument history consist of following columns:
- Event type – type of the change
- Message – details of the changes
- Admin ID – the number of the admin or system that made the changes
Calculations examples #
Commission Configuration #
Broker Commission
To set commission for clients trades (commission that Broker will get from clients) through Match-Trader Administrator you will need to following those steps:
- Log in to your account in Match-Trader Admin and choose the „Groups” tab
2. Next you should choose a group, by double click on it, in which you want to set commission. A Group configuration window will appear. In the Commission per Milion tab, you should type the value of commission and save changes by clicking ok. After that window with confirmation will appear.

A-book example. If you set e.g: $20 commission for your clients on the a-book group and we charge you just only e.g: $10 commission from hedge then you make a profit on a-book on your clients.
How this commission is calculated – This commission is calculated with the next formula (commission per million value/1000000)*(nominal value of instrument * lot traded by client * exchange rate to USD(only if the nominal value is in another currency))
For example, the client traded 1 lot of AUDUSD. AUDUSD nominal value is 100 000 AUD. AUD exchange rate to USD is 0,73. And we set Commission per Milion at 10. So formula in this case will be next : (10/1000000)*(100000*1*0,73) = 0,73. This is a commission for opening trade.
When the client closes trade commission will be calculated again. So total commission, in this case, will be 1,46 for the Client.


Agent Commission
Note that if you will set IB commission in Client Office and Match-Trader Admin, your agent will get commission 2 times. So we recommend setting this only through one app. In Client Office or Match-Trader.
Note the agent commission is included in the broker commission, for example when you put $10 in the “Commission per Million” and $2 in the “Agent Commission per Million” field then the broker will receive $8 and the agent $2 per million
There are 2 possible ways to set up a commission for agents. The first is for the whole group, second is separately for every instrument in this group. Note you can use only one method of agent commission per group.
First method. For the whole group.
To set commission for an agent (commission what IB will get from clients orders) through Match-Trader Administrator you will need to do those steps :
- Log in to your account in Match-Trader Admin and choose the „Groups” tab

2. Next you should choose a group, by double click on it, in which you want to set commission. A Group configuration window will appear. And in Agent Commission per Milion section, you should type value of commission and save changes clicking ok. After that window with confirmation will appear.
How this commission is calculated – This commission is calculated the same as broker commission. With next formula (commission per million value/1000000)*(nominal value of instrument * lot traded by client * exchange rate to USD(only if the nominal value is in another currency))
For example, the client traded 1 lot of AUDUSD. AUDUSD nominal value is 100 000 AUD. AUD exchange rate to USD is 0,73. And we set Commission per Milion at 10. So formula in this case will be next : (10/1000000)*(100000*1*0,73) = 0,73. This is the agent commission for opening trade.
When the client closes trade agent commission will be calculated again. So the total commission, in this case, will be 1,46.

Second method. For a specified instrument in the group.
- The First step is identical to the previous method
- Next you should choose a group, by double click on it, in which you want to set commission. A Group configuration window will appear. You will need to use Configure Instruments option.
3. In the Group Instruments Details window you will be able to set agent commission type and size for individual symbols. Near instruments, you have 2 tabs, that are responsible for agent commission. In Agent C. Type we define how the commission will be calculated for your agent. In the Agent Commission tab, we will type the value that will be calculated for an agent. After you choose commission type and its value, you`ll need to click OK to save changes. In the end, you will get confirmation, that all changes were saved.

4. Here you can see how commission types are calculated.
USD / $1M. This commission type is set per 1 million USD traded by the client. If you set this type, your agent commission will be calculated with this formula – (1000000/commission value) * lot traded by client * nominal value of instrument * exchange rate of nominal value to USD( only if the nominal value is in another currency than USD).
For example – We set up USD/$1M with the value of 10. The client opened a position of 1 lot on EURUSD. This instrument nominal is 100 000 Euro, the exchange rate at that moment was 1,18 USD for 1 EUR. So calculation will be (1000000/10)*1*100000*1,18 = 1,18 – this is what your agent will get for this client opening this trade. Then after a few minutes, this client closed this order, and if assuming that the exchange rate didn`t change he will get another 1,18 of commission.

USDc / Contract. This commission type is set USD Cents per instrument lot size traded by the client. If you set this type, your agent commission will be calculated with this formula – commission value * instrument lot size * lot traded by the client.
You shouldn`t use this commission type for forex instruments, because they have a lot size of 100 000, so the minimal commission for 1 lot traded by a client will be 1000 USD.
USDc / Lot. This commission type is set USD Cents per lots traded by the client. If you set this type, your agent commission will be calculated with this formula – commission value * lot traded by the client.
For example – We set up USDc/Lot with the value of 3 for AUDCAD. So it`s will be 3 cents per 1 lot traded by the client. The client opened a position of 1 lot on AUDCAD. So 0,03 * 1 = 0,03 USD or 3 cents of commission for your agent.

1/10% permille. This commission type is set at 0,1% per nominal value traded. If you set this type, your agent commission will be calculated with this formula – commission value * 0,1% * lot traded by client * nominal value of instrument * exchange rate of nominal value to USD( only if the nominal value is in another currency than USD).
For Example – We setup 1/10% permils with value of 5 for GBPNZD. Client opened 1 lot of GBPNZD and GBP exchange rate to USD is 1,3111 at the moment. Commission will be 5 * 0,1% * 1 * 100 000 * 1,3111 = 655,55 of commission to your agent.

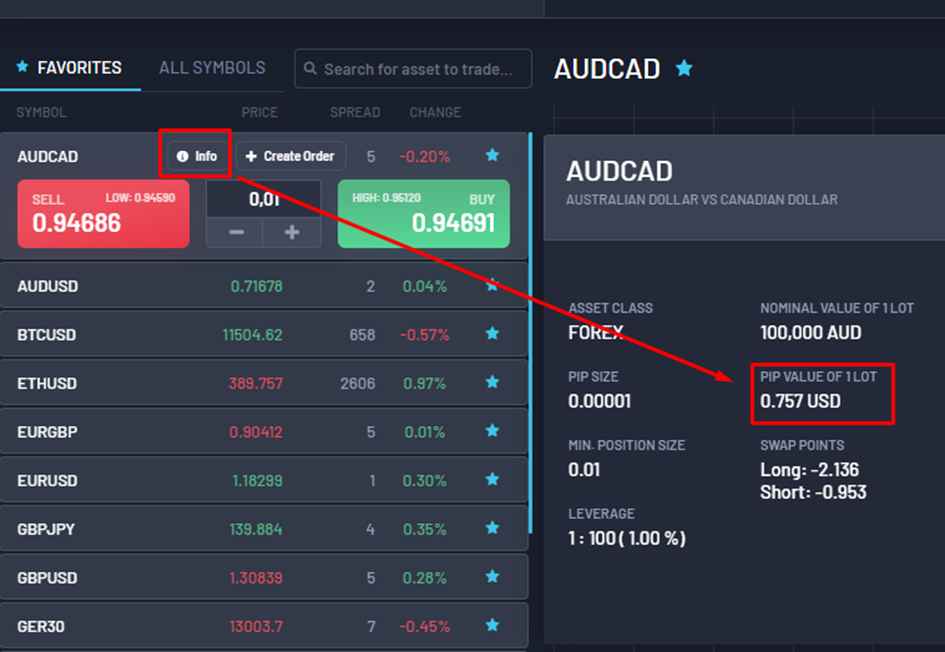
Pips. This commission type is set points value per lot traded. If you set this type, your agent commission will be calculated with this formula – commission value * instrument pip value * lot traded.
For Example – We set up Pips commission with the value of 3 for AUDCAD. The client opened the position of 2 lots on AUDCAD and this instrument has a pip value of 0,75641. Commission will be 3 * 0,75641 * 2 = 4,54 USD for your agent.

The easiest way to find instrument pip value will be through the trading platform. You can click on the information button on the instrument.
Leverage calculation #
Example of calculating final leverage
Final leverage on a trading platform can be calculated using both the Leverage % parameter set on the client’s account and the Leverage parameter set on specific symbol in client’s group. The formula to calculate the leverage is as follows:
- final leverage in % = (100 / (leverage on account x symbol leverage on group)) x 100%
This formula provides the effective leverage percentage, which you can then convert back to a leverage ratio.
Example Calculation for BTCUSD:
- Leverage % parameter on client’s Account: 200
- Symbol Leverage parameter on client’s group (BTCUSD): 10
Using the formula:
Leverage in % = (100/200×10)x100%
Leverage in % = 5%
The effective leverage is 5%, which corresponds to a leverage ratio of:
Leverage Ratio = 1:(100/5)
Leverage Ratio = 1:20
Practical Example:
Let’s consider opening a position on BTCUSD with the following conditions:
- Account Leverage % parameter: 200
- Symbol Leverage parameter for BTCUSD: 10
- Trade Size: 1 lot (1 BTC)
- Current BTC Price: $65,679
Using the given formula, the effective leverage ratio is 1:20 (5% of position nominal value will be taken as required margin)
To find the margin required for 1 lot:
Margin Required = position nominal value x effective leverage ratio
Margin Required = 65679 x 5%
Margin Required = 3283.95
Thus, with an account Leverage % parameter equals 200 and symbol leverage for BTCUSD equals 10, the effective leverage becomes 1:20 (5%) and the margin required for a 1 lot position at the current BTC price would be approximately $3,283.95 USD
Please note that below functionalities are available only for Full Server License Clients
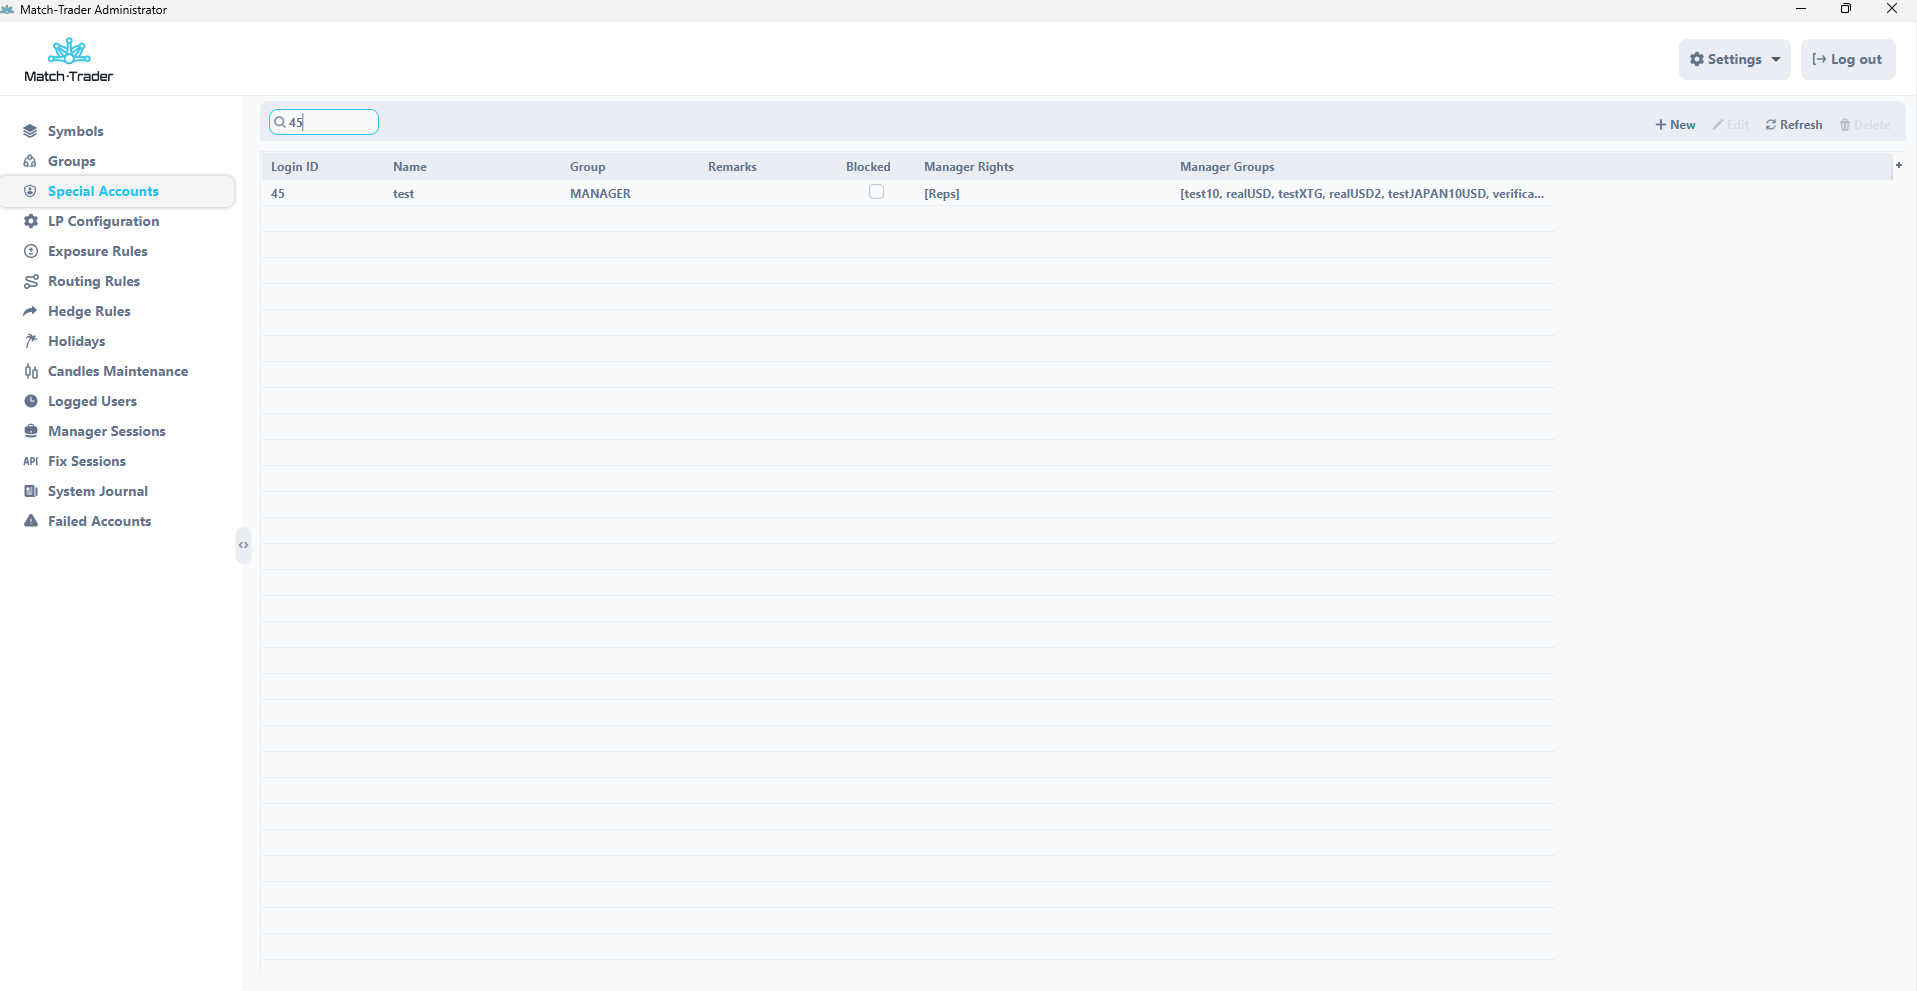
Special Accounts #
In this window user can create new manager and admin users or edit existing ones.
In the main view there is a list of all managers and admins with defined manager/admin rights and access to particular groups.
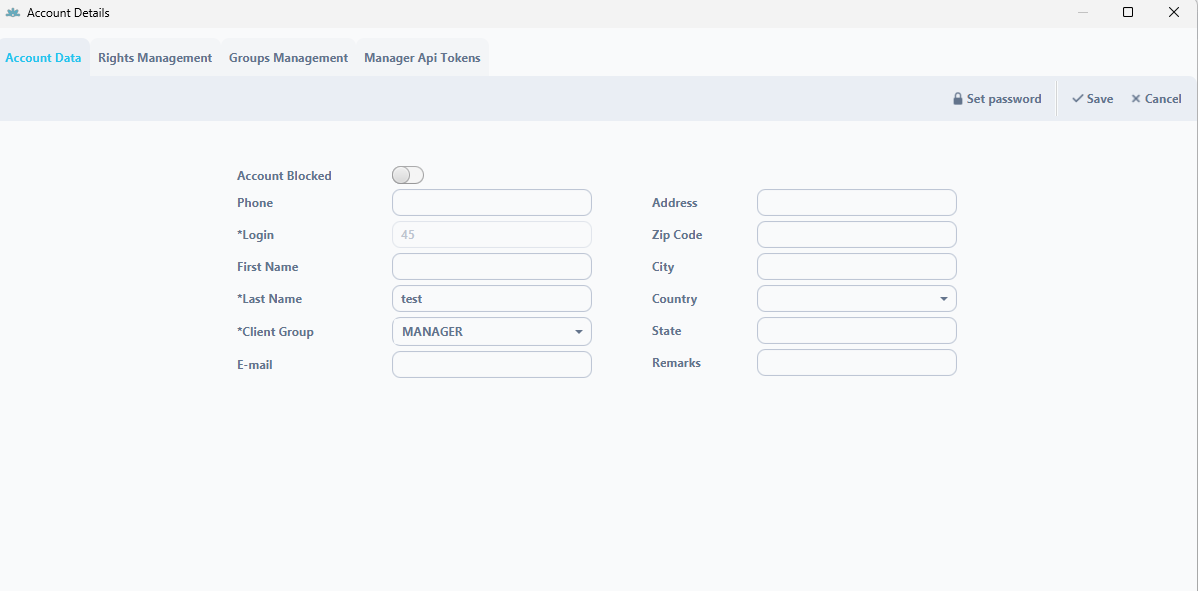
Once you click the NEW button there is a new window where user can create a new manager or admin. Fields marked with “*” are obligatory and must be filled out. In order to create a manager or admin you need to create a new account in the group with manager or admin role. In this window you can set a new password or block the account. If you don’t set the account password then it will be generated automatically and it will be displayed after clicking ok button.
In the rights management window user can define what roles should have particular manager or admin account. Each manager can have different role and different access to the group. You can select particular groups or roles by clicking arrow buttons.
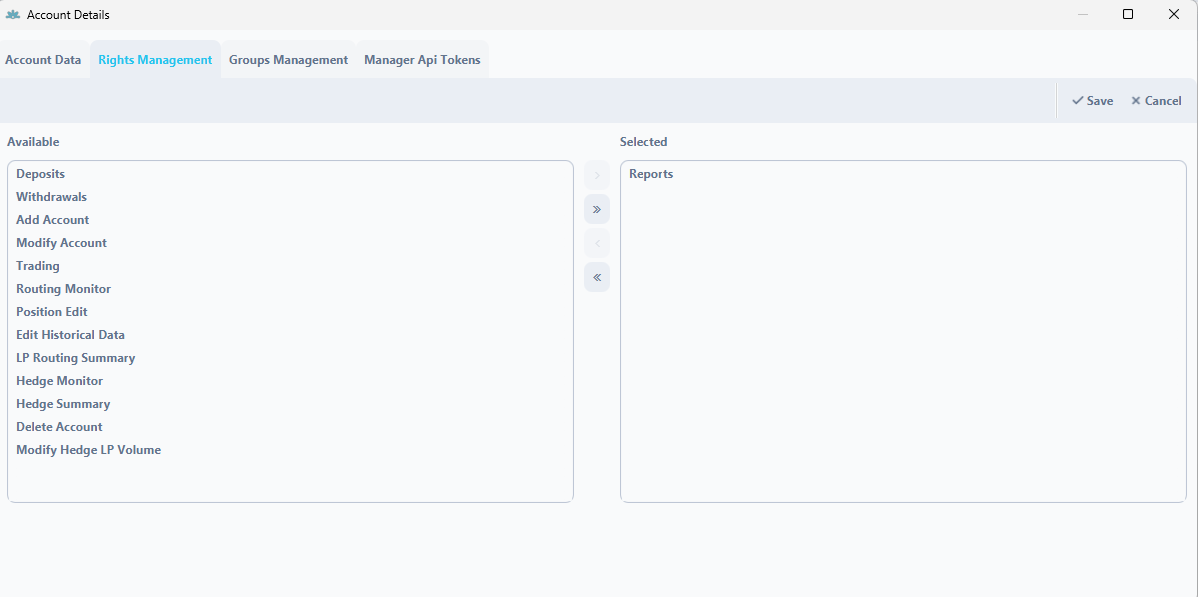
Available roles:
- Deposits – it is a role which allows adding new deposits on trading accounts
- Withdrawals – it is a role which allows making new withdrawals from trading accounts
- Add Account – It is a role which allows adding new trading accounts
- Modify Account – It is a role which allows modifying trading accounts
- Reports – This role enables managers to generate reports from manager application
- Trading – if this role is enabled you can execute a transaction on client account from manager application
- Hedge Monitor – this role is responsible for the visibility of the “Hedge Monitor” tab in the Manager application
- Position Edit – it is a role which allows manager to edit the open positions
- Edit Historical Data – this role allows manager to modify closed trades
- LP Routing Summary – this role is responsible for the visibility of the “LP Routing Summary” tab in the Manager application, where are listed hedged positions
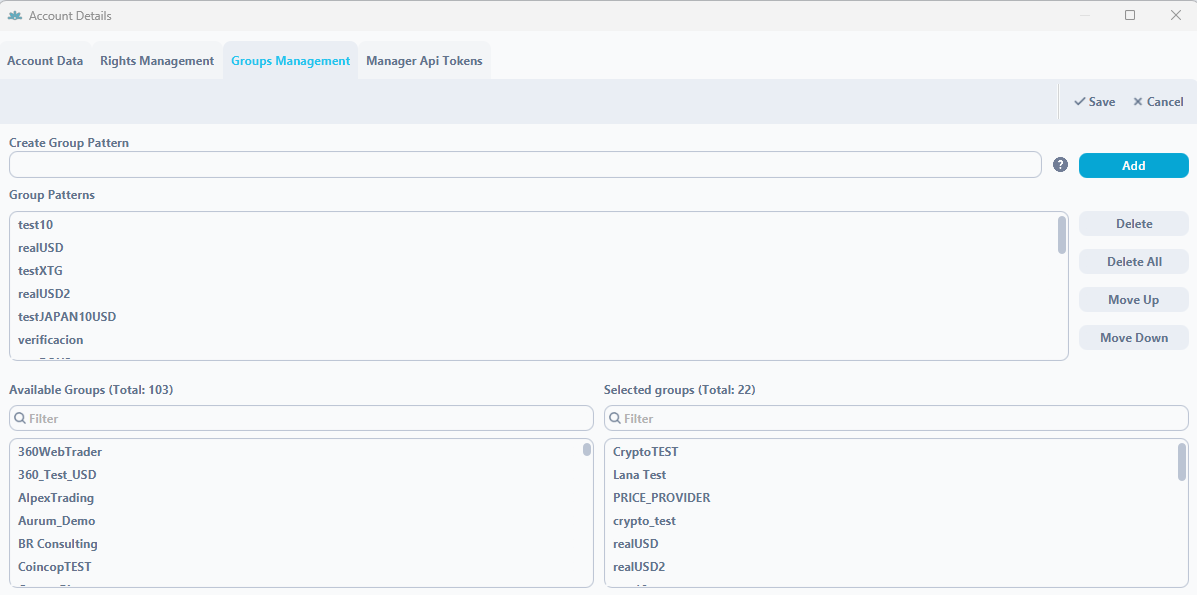
Groups Management
- Create Group Patters – in this field, it is possible to create group patterns for Special Account. Special Characters are avaliable (*, !)
- Avaliable Groups – in this field, it is possible to check which groups are possible to add to Special Account
- Selected Groups – in this field, it is possible to check which groups are added to Special Account
In the “Manager Api Tokens”, the broker can generate a token to log in to the Manager 2.0 application. After clicking “New” and entering the token name, “Token” and “Hmac” will be generated, which is used to log in to the Manager application.

LP Configuration #
LP Symbols
In the LP Symbols tab broker can set all parameters concerning connected Liquidity Providers. It can also see prices which are coming from LPs.
The colors indicates if prices from a given LP are fresh (green), prices didn’t come in time set in Delay Green in Symbols tab or didn’t come in time set in Delay Yellow (red color). Grey color means that instrument has closed session at given moment.
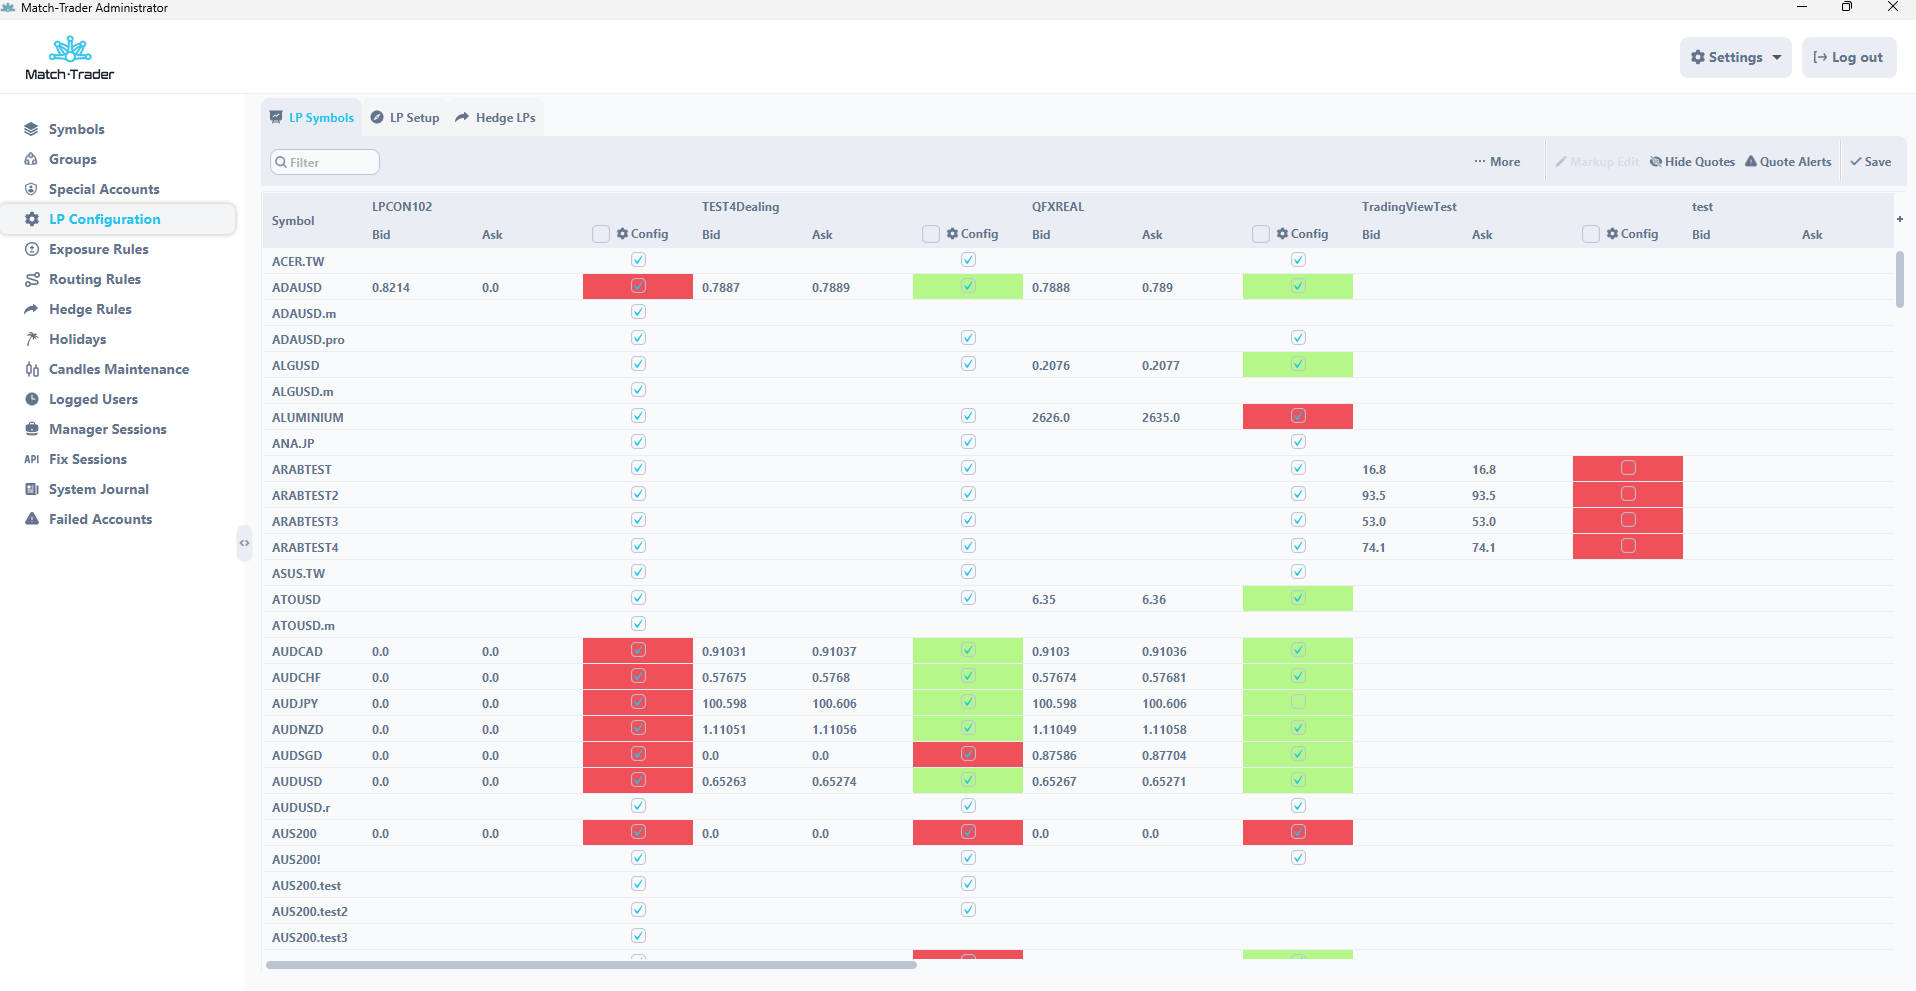
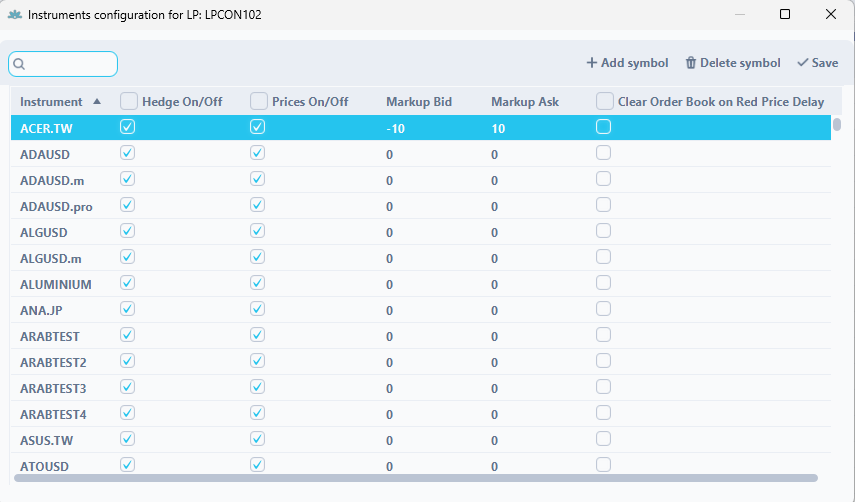
While clicking the config button for the selected LP broker can decide what instruments should be connected from a particular LP. Broker can also apply his own markups to the individual symbols provided by the given LP or clear order book on red price delay.
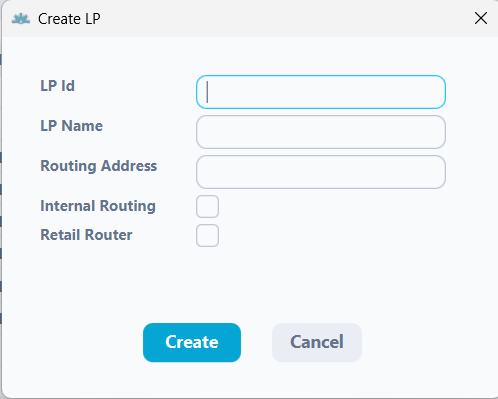
LP Setup
In LP Setup tab broker can add new Liquidity Provider (LP) or edit existing one. It can also indicate if LP can be connected as external or internal hedging. Available parameters in the window are following:
- LP ID – it is unique LP connector identifier
- LP Name – it is a name of LP configured in the system
- Routing Address – it is address of the LP connector for hedging purposes
- Internal Routing – it is an option to hedge a-book positions on internal Match-Trader account. When using this option LP ID should be trading account login
- Retail Router – required if LP account is in non-netting mode (both buy and sell positions opened at the same time are allowed)
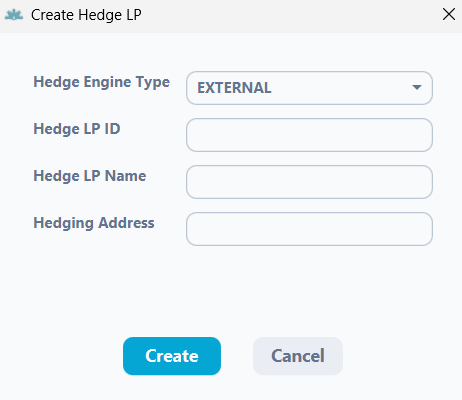
Hedge LPs
In Hedge LPs tab broker can add new Hedge LP connection or edit existing one. In contrast to LP Setup, Hedge LP use ex-post execution model, which means that order execution is performed internally in our system and then the order is sent to an external LP with the market order type. In other words position on a-book trading account will open regardless of whether there is enough balance to open hedge position on liquidity provider account.
- Hedge Engine Type
- Internal – a-book positions are routed to internal Match-Trader account. When using this option Hedge LP ID should be trading account login
- External – a-book positions are routed to external LP account
- Hedge LP ID – it is unique LP identifier
- Hedge LP Name – it is a name of LP configured in the system
- Hedging Address – it is address of the LP connector for hedging purposes
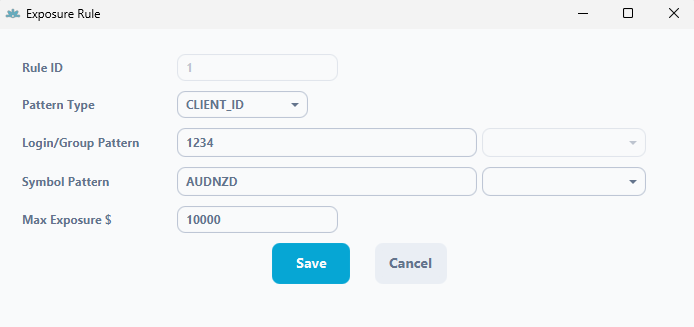
Exposure Rules #
In this section you can set max exposure for chosen login, group and symbol.
- Rule ID – it is an ID of Exposure Rule
- Pattern type – in this field it is possible to choose if rule will be applied per account or group
- Login/Group Patter – in this field need to add account ID or group names for which Exposure Rule will be applied
- Symbol Pattern – in this field need to add symbols for which Exposure Rule will be applied
- Max Exposure $ – in this field need to put maximal nominal value which will be applied for Exposure Rule
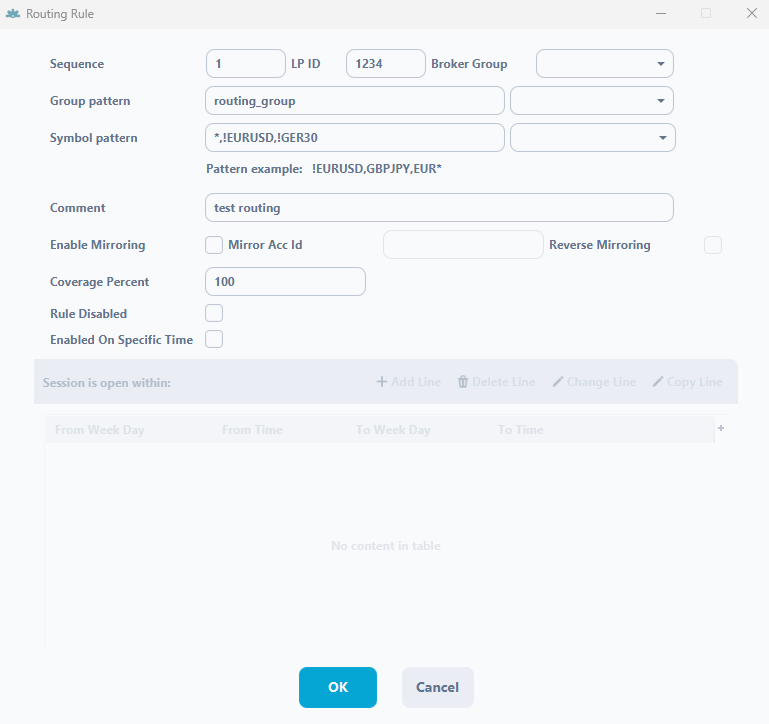
Routing Rules #
In Routing Rules you can set which groups or particuar accounts will be routed to external liquidity provider or bridge. Please keep in mind that routing rules use ex-ante execution model (for routing rules LP has to be set-up in LP Setup tab).
It means that position on a-book trading account will open only if there is enough required margin to open hedge position on external liquidity provider account.
If there is not enough margin on LP account, opening position on a-book account is not possible.
- Sequence – it is a sequence number. Routing rules with lower numbers have precedence over the ones with higher numbers
- LP ID – it is an ID of a Liquidity Provider defined in the LP configuration window in LP Setup tab
- Broker Group – in this field it is possible to assign a Broker Manager group, thanks to which Broker Manager accounts logged in to the Admin will see this Routing Rule and will be able to modify it. Brokers will be able to select the symbols they want to hedge and also set up routing schedules to set the times and days they want to hedge their clients’ trades.
- Group pattern – it is a field where broker defines what groups he wants to send to LP
- Symbol Pattern – it is a field where broker can define what instruments he wants to hedge with particular LP. * means that all instruments are selected
- Comment – it is a filed where broker can put some important informations for him about htis routing.
- Enable Mirroring – mirroring gives broker possiblity to copy trades from a-book account to other account present in Match-Trader Manager application.
- Mirror Acc Id – it is a field where broker can set the mirroring account. Please note that this is not hedge account.
- Reverse Mirroring – reverse mirroring will open reverse positions on the mirroring account
- Coverage Percent – what percentage value of trades will be covered on LP side. 100 means that LP cover trades 1:1.
- Rule Disabled – allows to disable a specific routing rule.
- Enable On Specific Time – allows to enable the routing rule only at the specific time in the week.
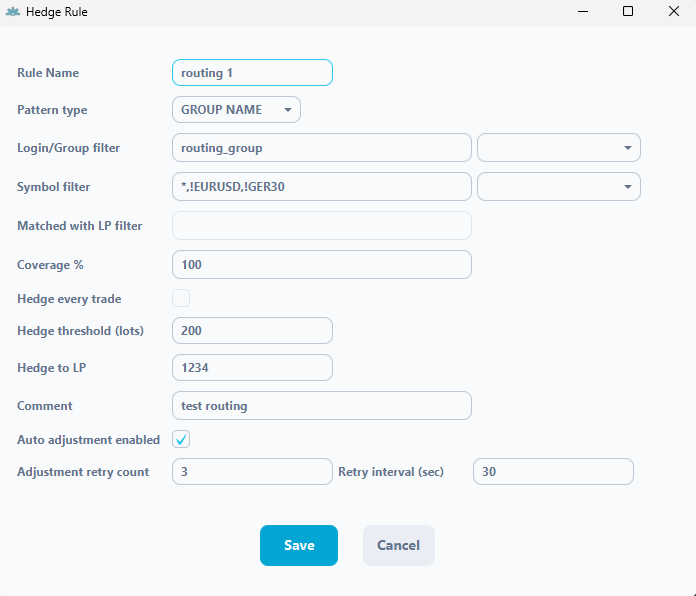
Hedge Rules #
In Hedge Rules you can set which groups or particuar accounts will be routed to external liquidity provider or bridge. Please keep in mind that hedge rules use ex-post execution model (for hedge rules LP has to be set-up in Hedge LPs tab).
It means that position on a-book trading account will open regardless of whether there is enough balance to open hedge position on external liquidity provider account.
- Rule Name – it is a name of hedge rule
- Pattern type – here you can choose if rule will be applied per client (trading account number) or per client group
- Login/Group filter – in this field you can specify whih client group or trading account number will be routed
- Symbol filtter – in this field you can specify which instruments will be routed
- Coverage % – what percentage value of trades will be covered on LP side. 100 means that LP cover trades 1:1.
- Hedge threshold (lots) – this is an amount of lots which will be b-book, anything more than this amount will be routed to LP
- Hedge to LP – it is an ID of a Liquidity Provider defined in the LP configuration window in Hedge LP tab
- Comment – in this field is possible o add comments for Hedge Rulesv
- Auto adjustment enabled – this function allows to adjust discrepancies between “Patter type” and “Hedge to LP”
- Adjustment retry count – in this field you can add a number of attempts to adjust discrepancies between “Patter type” and “Hedge to LP”
- Retry interval (sec) – in this field have to put in what interval adjustment will try to adjust discrepancies between “Patter type” and “Hedge to LP”
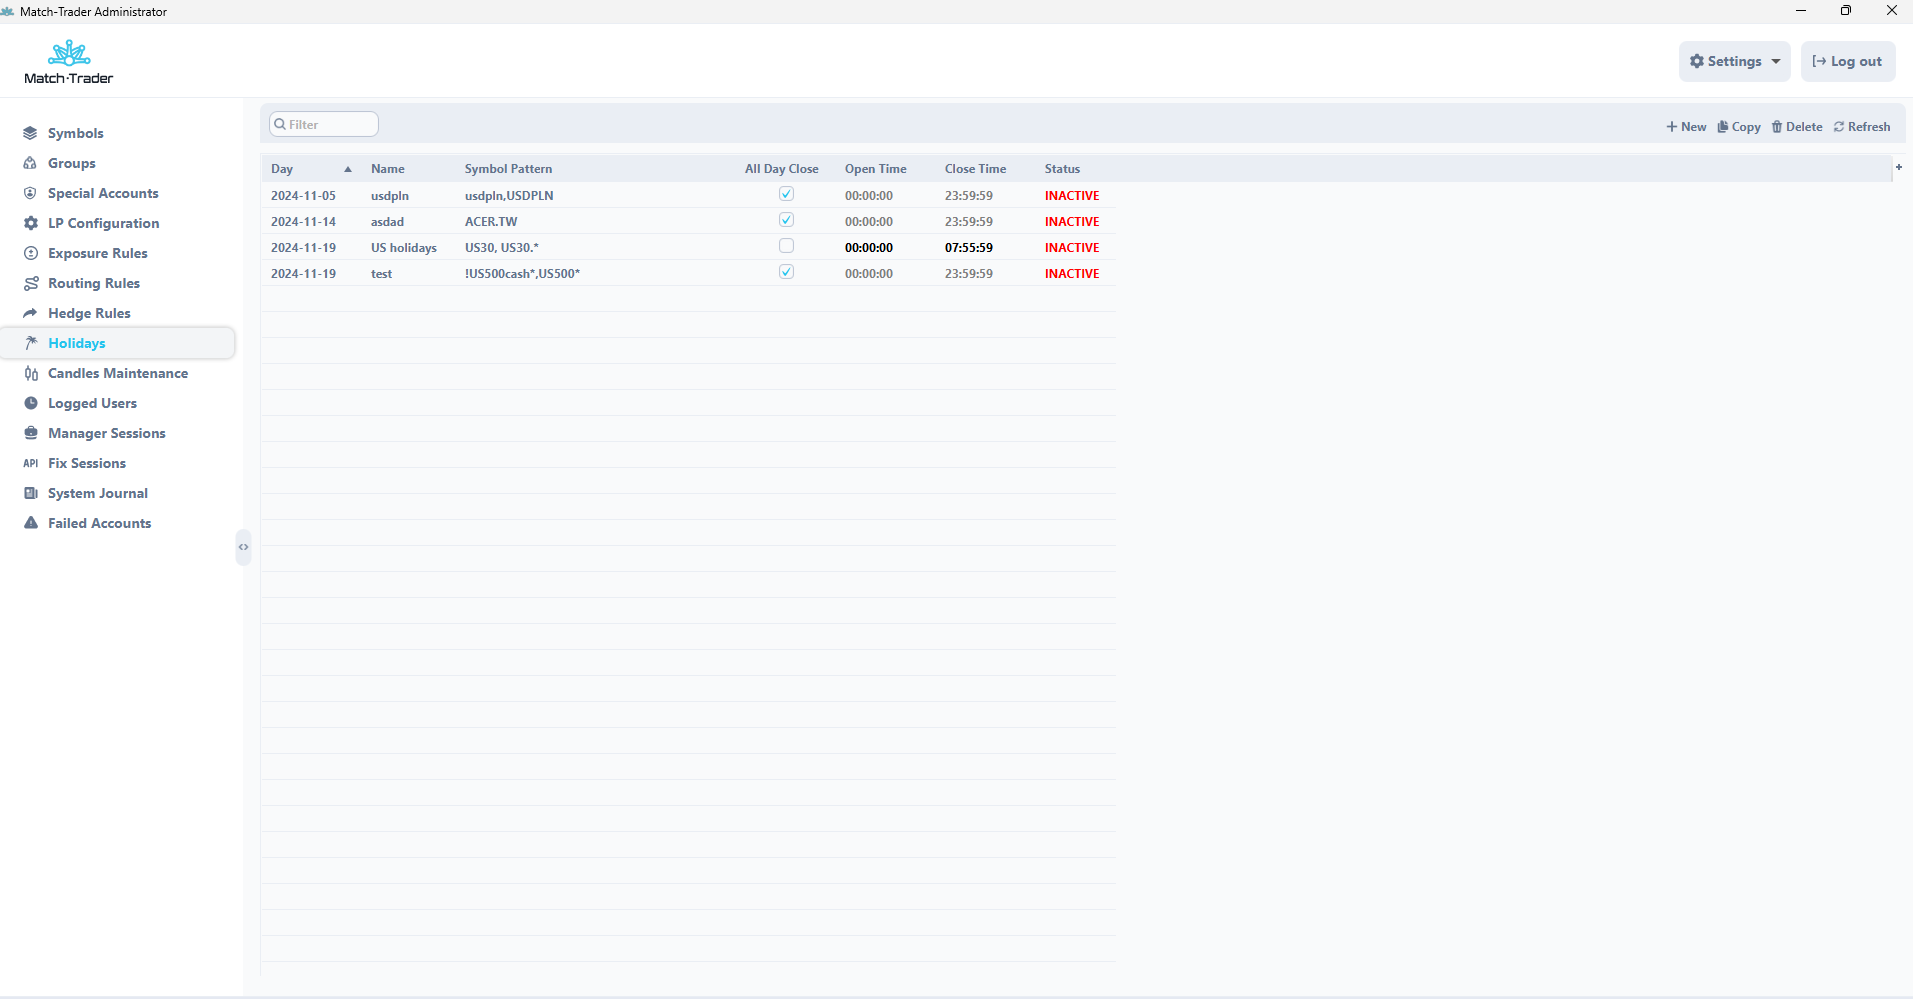
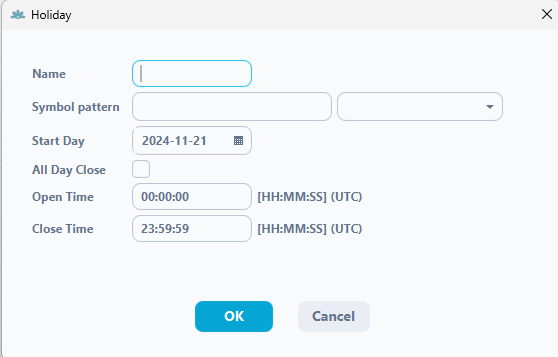
Holidays #
The Holidays tab, it is an option to disable trading sessions for individual symbols on specific days has appeared. Thanks to this solution, it is possible to make the settings of session opening hours for individual symbols independent of days considered as holidays or trading-free days.
The set holidays will override the standard trading sessions for individual symbols or group of symbols. Simply select the appropriate day and closing time in the “Holidays” tab to disable the session for the selected symbols. If Holidays should not applied for the whole day it is necessary to set open and close time per instrument.
- Day – it is a date when Holiday rule will be active
- Name – in this field is possible to put Holiday name to verify for which holiday it was set
- Symbol Pattern – in this field have to put symbols for which holidays will be applied
- All Day Close – it is an option to switch on Holidays for the whole day
- Open Time – time when the trading session will be open on Symbol Pattern
- Close Time – time when the trading session will be closed on Symbol Pattern
- Status – inform about Holiday is active or inactive for today
- Name – in this field is possible to put Holiday name to verify for which holiday it was set
- Symbol pattern – in this field have to put symbols for which holidays will be applied
- Start Day – it is a date when Holiday rule will be active
- All Day Close – this check box available to applied Holiday rule fir the whole day
- Open Time – time when the trading session will be open on Symbol Pattern
- Close Time – time when the trading session will be closed on Symbol Pattern
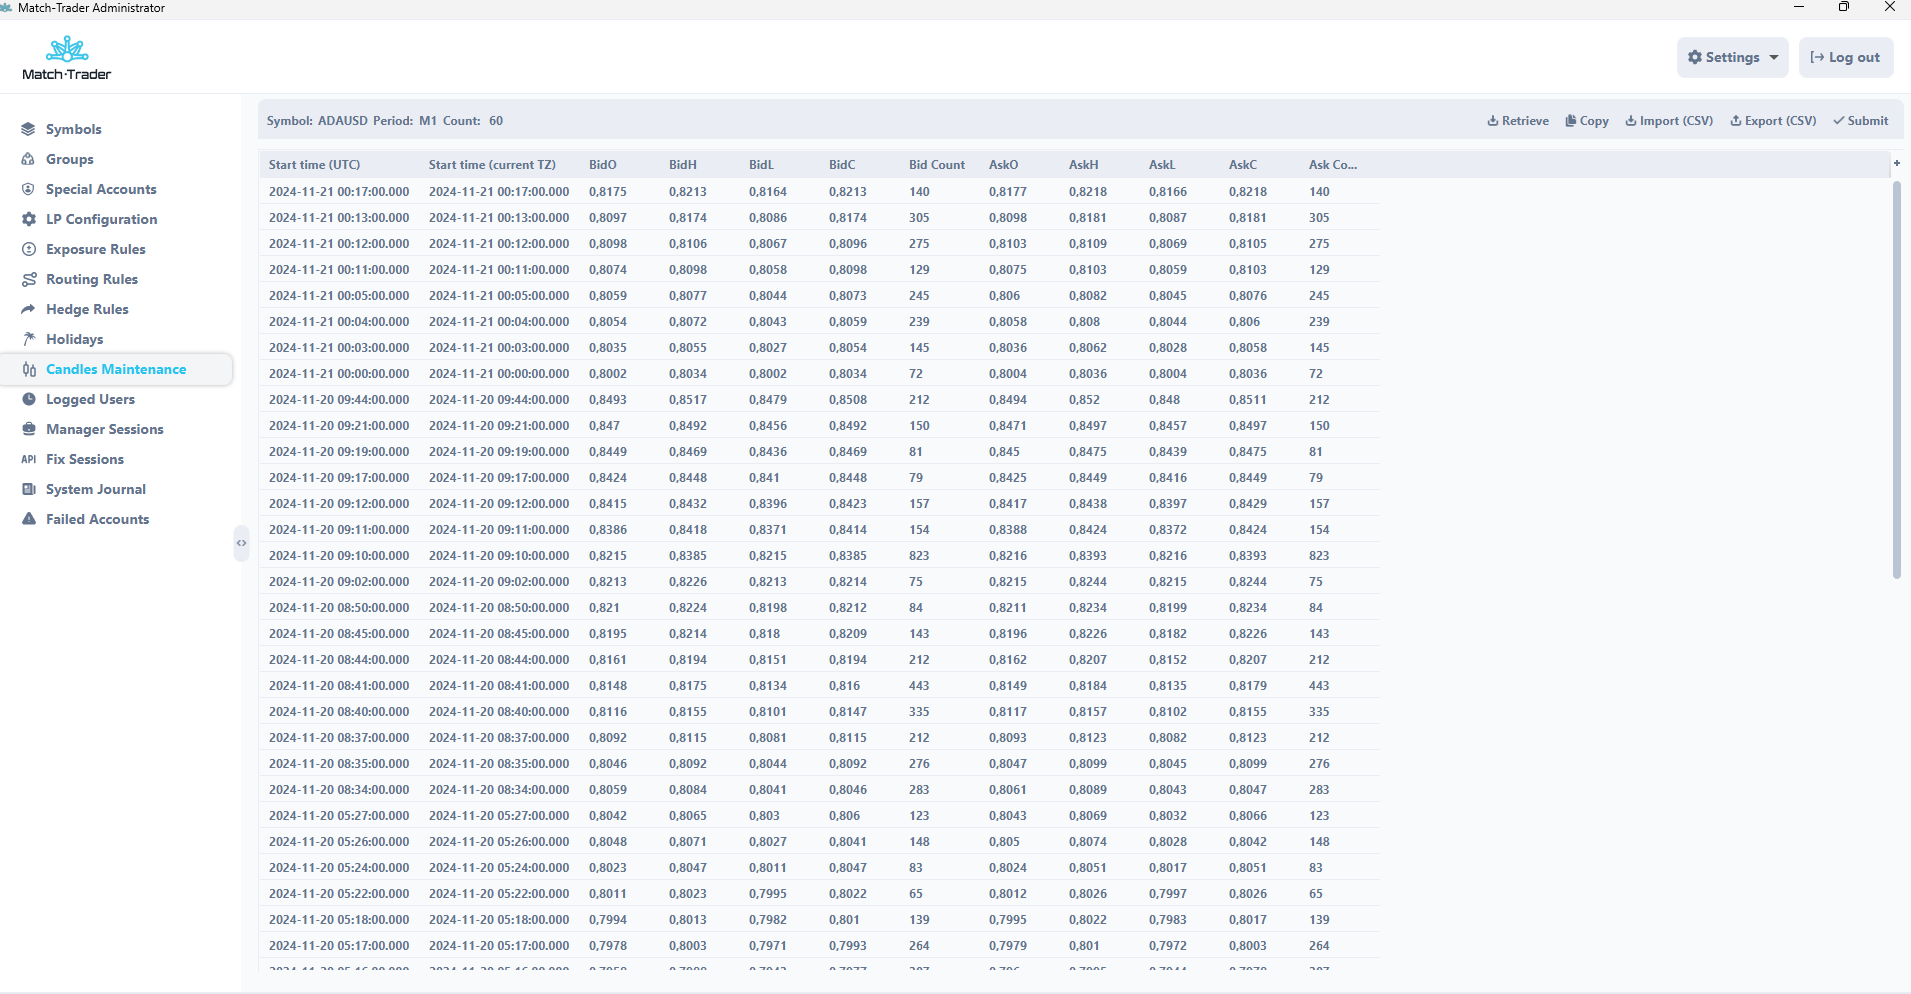
Candles Maintenance #
It is a window where broker can retrieve candles from a given interval and correct them if needed. There is also an option to export the chart history to csv file or import it to the server for a particular instrument.
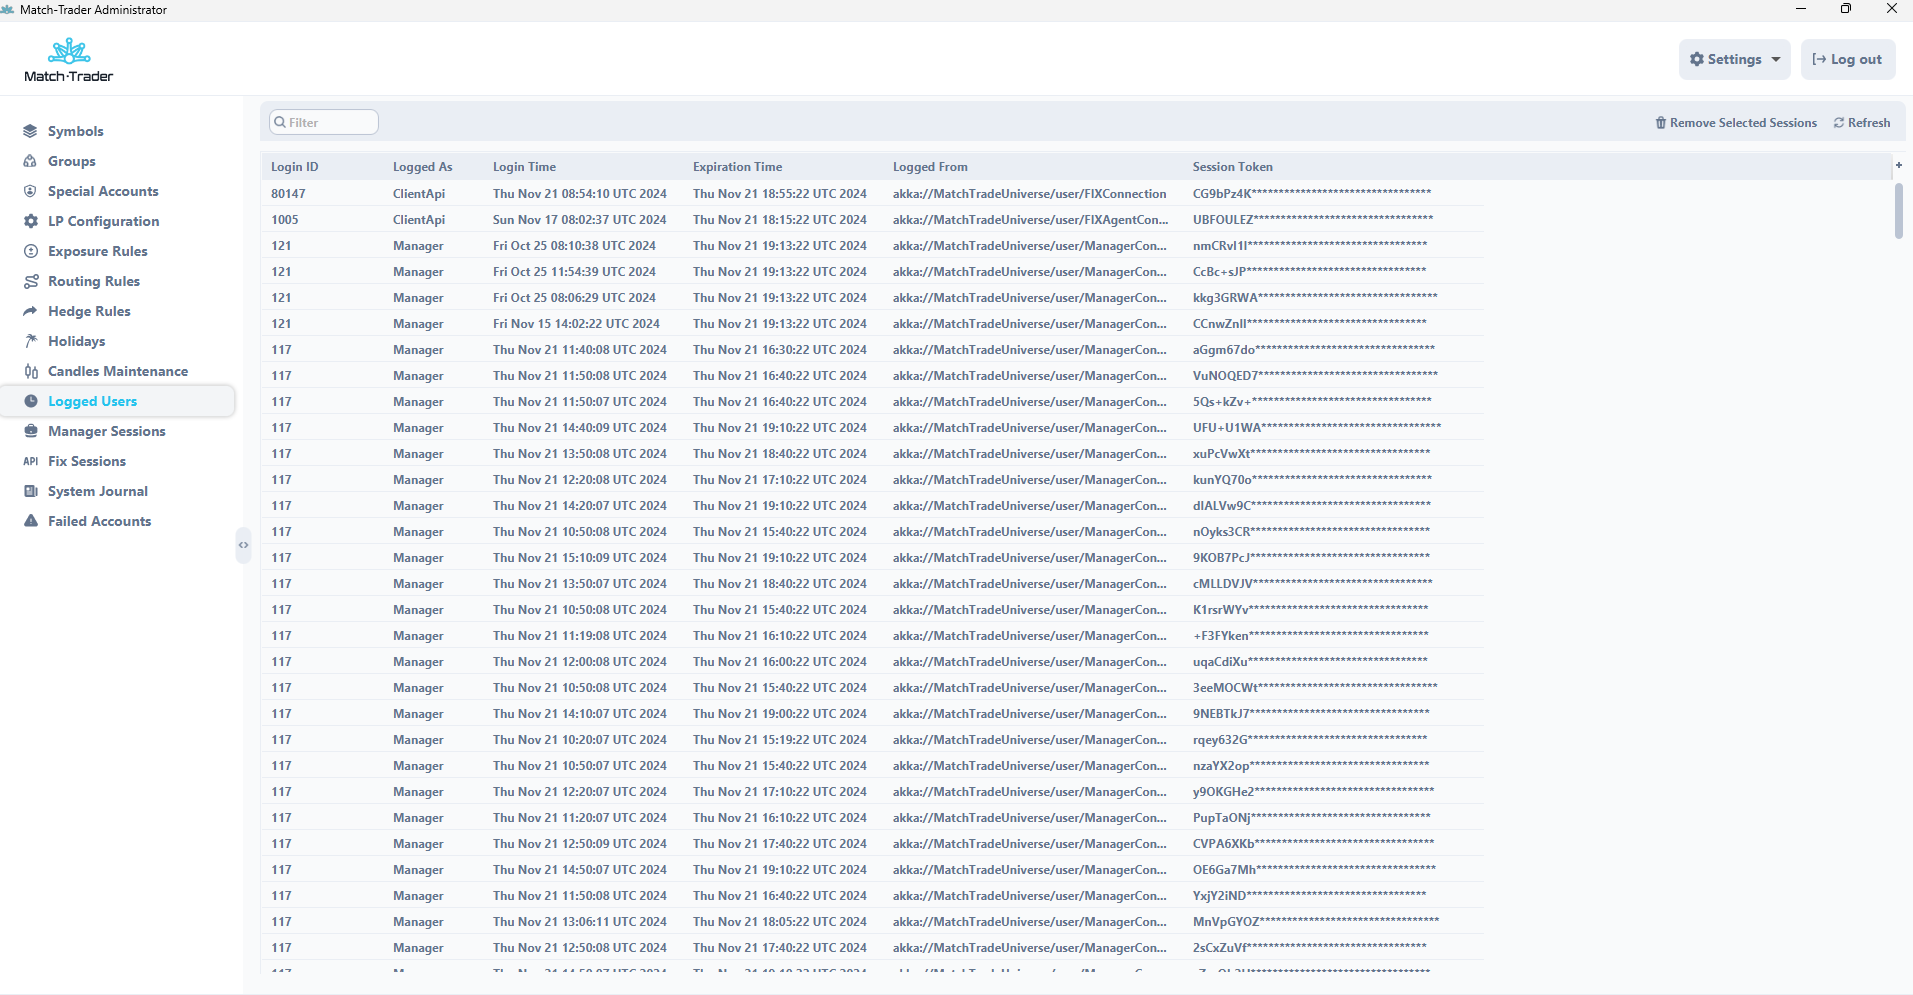
Logged Users #
In this tab broker can see all the logged clients with their connection type, login time, expiration time and the token session.
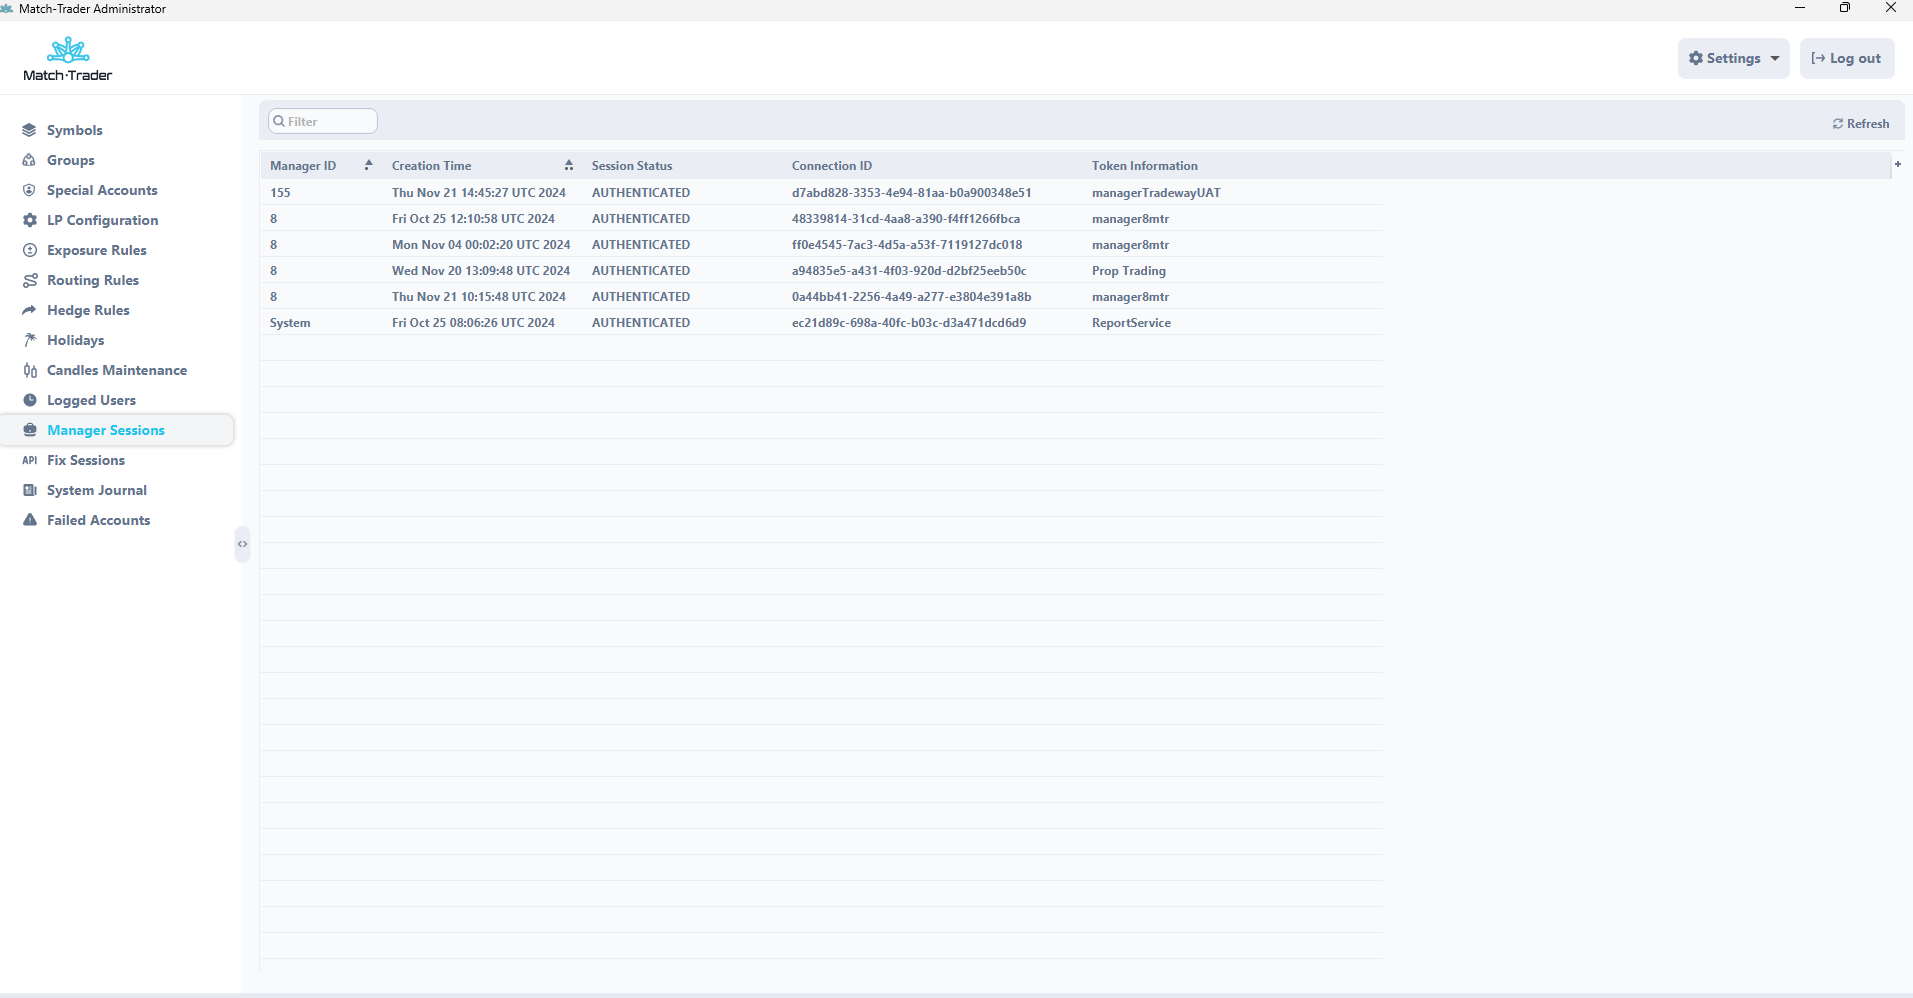
Manager Sessions #
This tab displays all sessions currently connected in the system. All managers currently using the Streaming Manager application are visible here.
Fix Sessions #
In this window broker can find all the fix application connected to the system. After selecting fix application created fix sessions will be visible with their type of connection and current status. Broker can click on the individual session and provoke the logon, logout, reset or dissconnect. At the bottom of this window are the events and messages which happend on the chosen fix session.
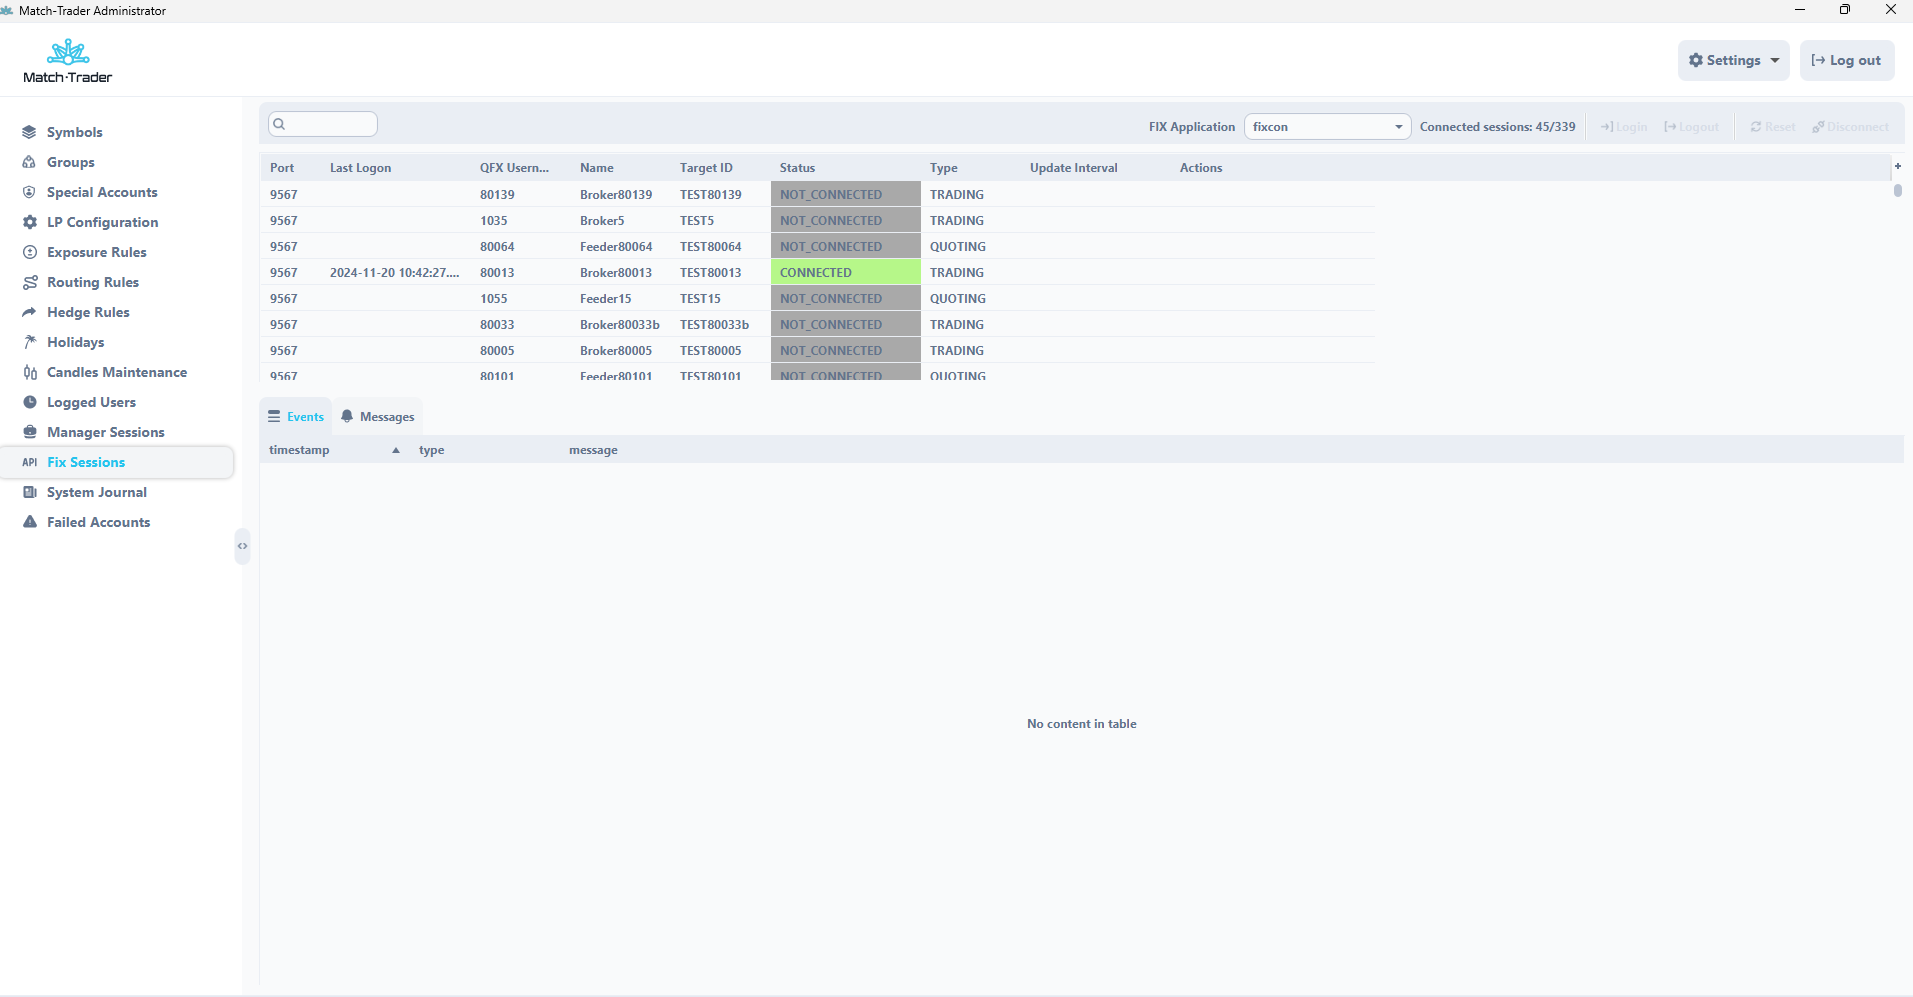
In the Update Interval column it is possible to define how many milliseconds the feed is refreshed and sent to the platform. If the value is 100, then the feed is refreshed every 100 milliseconds and only a tick may appear (i.e. in this case, a maximum of 10 ticks may appear per second). The value should be entered only for the Quoting session
Fix Connectors API #
Fix Connectors API tab is used to create fix connections for external trading systems. In case broker need such type of connection, please contact Broker Support Team in order to create proper configuration.
System Journal #
System Journal shows the server logs. Logs can be exported to CSV or TXT files. On the screen pop up some information like:
- Count: – it is the total records reflected on the window (all requested logs). The limit is 2000 so if you cannot find interested logs you need to restrict the period time or use more filters
- Timestamp – this is the time when a given operation was executed
- Level – levels of severity for the events being logged:
- INFO level is used for informational messages that describe the normal flow of application execution or provide status updates.
- WARN level indicates a potential issue or a situation that could cause problems in the future, but does not necessarily affect the current application execution.
- ERROR level indicates that an unexpected or critical problem occurred during application execution, which may result in failure or abnormal termination.
- DEBUG level provides detailed information for debugging purposes and is usually only enabled during development or testing phases. It logs more verbose information about the application’s behaviour and is often used to diagnose and fix issues.
- Service name – it is our internal names of services that serve some operations, you can use them to filter logs
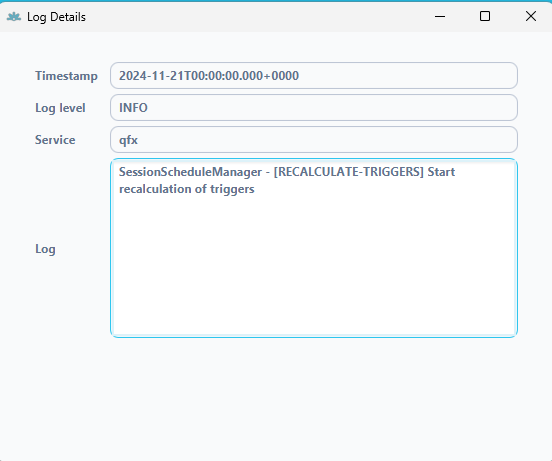
- Log – a record of events or data that provides a chronological account of an application’s activity, and captures information about the behaviour of an application, such as errors, warnings, user actions, and system events.
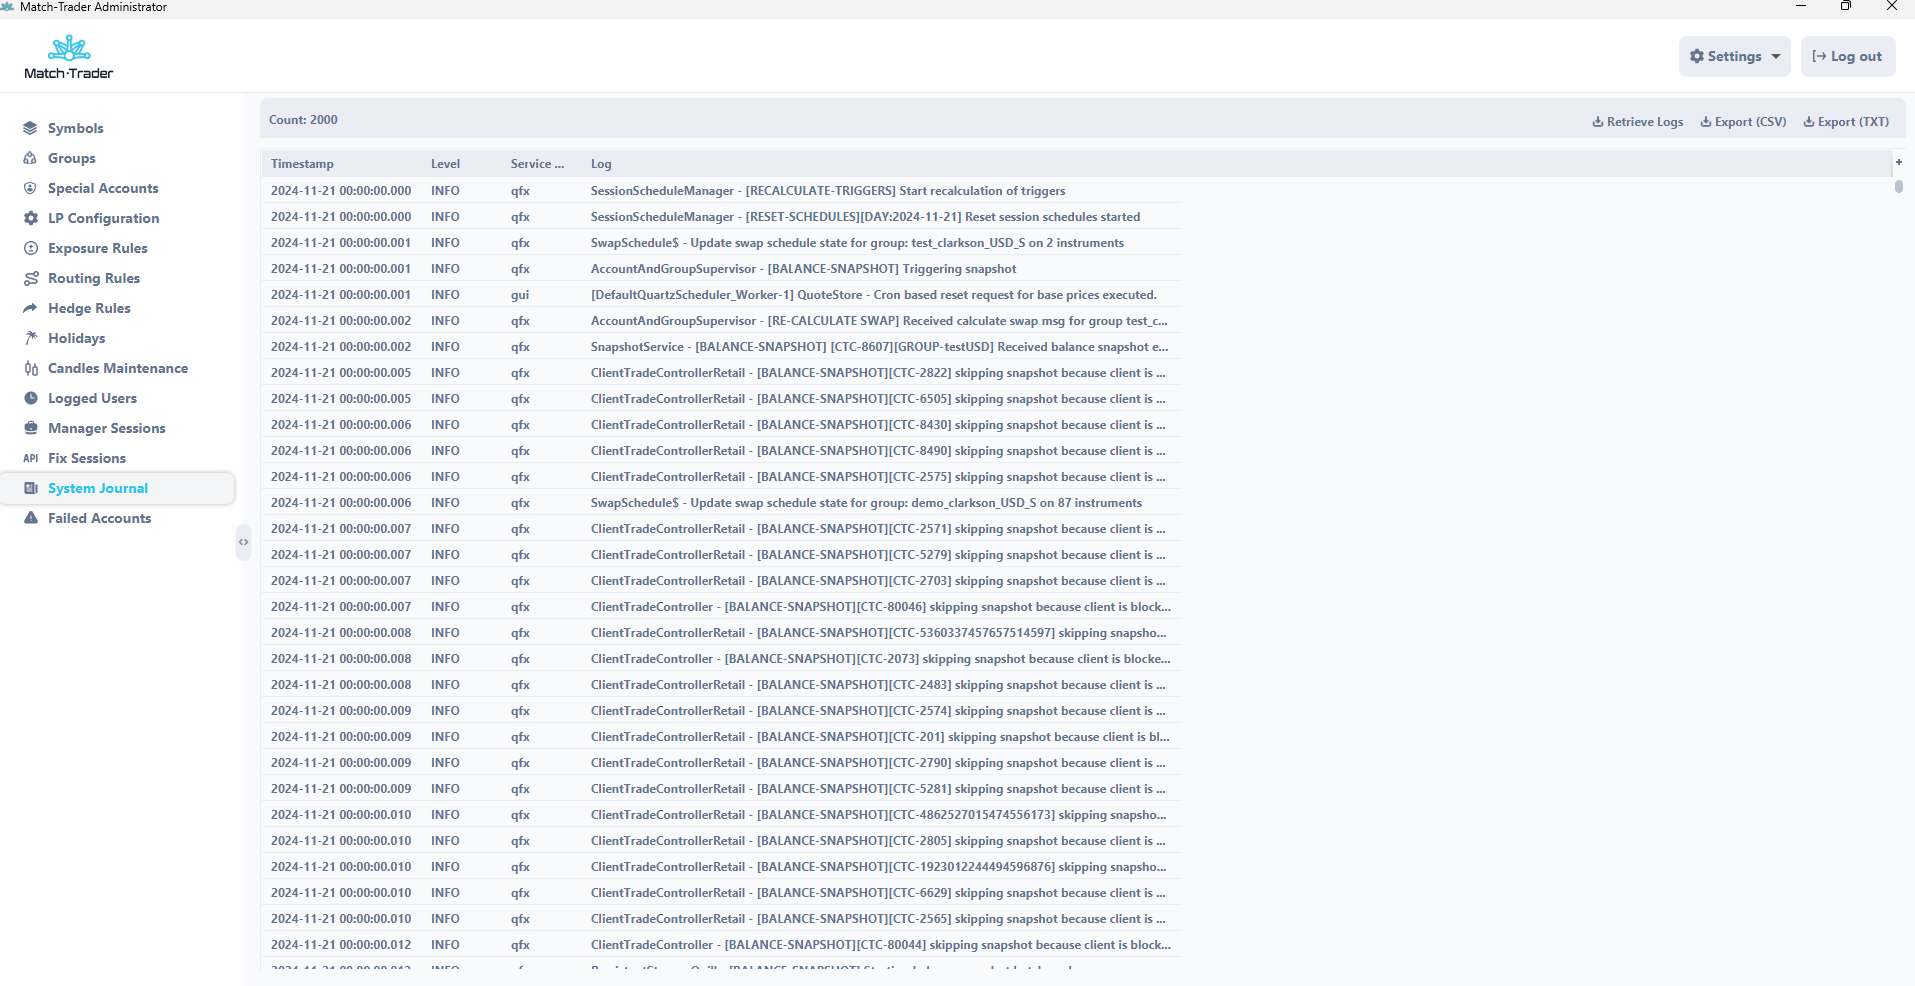
To find some special logs broker needs to retrieve logs, choose log level, service name, time and filter the text he would like to search for.
In order to better understand, we’ll use the 244276 trading account as an example
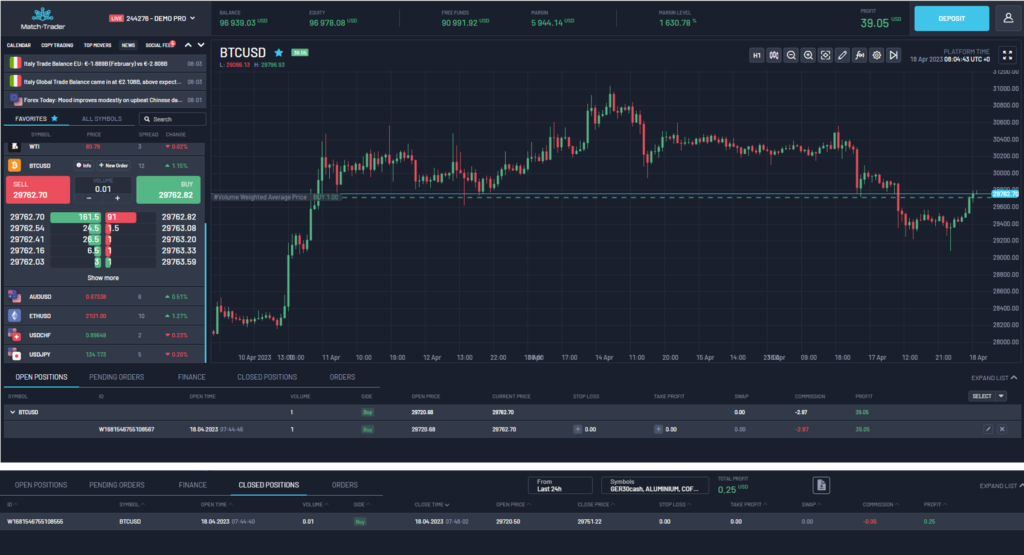
In the screenshots above you can see the account on which opened two positions on BTCUSD
- The first position was opened at 07:44:40 and closed at 07:48:02 (order id: W1681546755108555)
- The second position has been opened at 07:44:46 and is still open (order ID: W1681546755108567)
To check the execution, you should enter the “Order ID” number in the Filter field, select the period in which it was executed, and click OK.
A logs window will appear, where you can check the logs of a given order.
We can check the entire process from the moment the position was opened until it was closed.
Now we use the order ID: W1681546755108555 and check the logs in the admin application in the “System Journal” tab
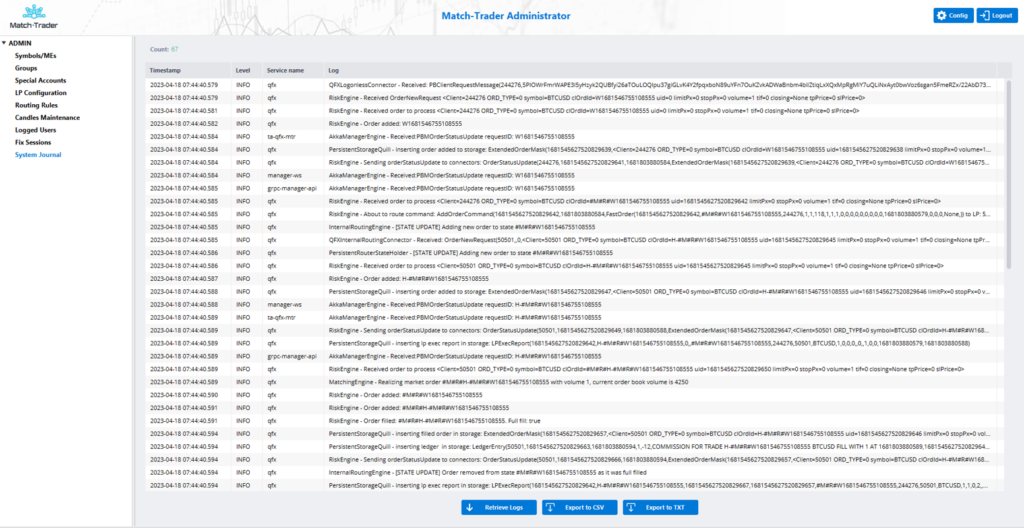
- Here, we can check the all information about chosen trade like login of trading account, instrument, volume, tpPice = take profit price, slPice = stop loss price, clOrdId = Order ID etc.

- “RiskEnging – Order added” means that the order has been opened on the account without any problems
Here often can be information that “Order rejected” means that for some reason e.g. not enough liquidity the position was rejected

- Manager ID: 9 – it is a manager who connects the manager application with the trading platform and this log means that the client close this position on the platform or mobile device
Here you can check who closes the position, you can identify the manager’s login

- The position was closed correctly

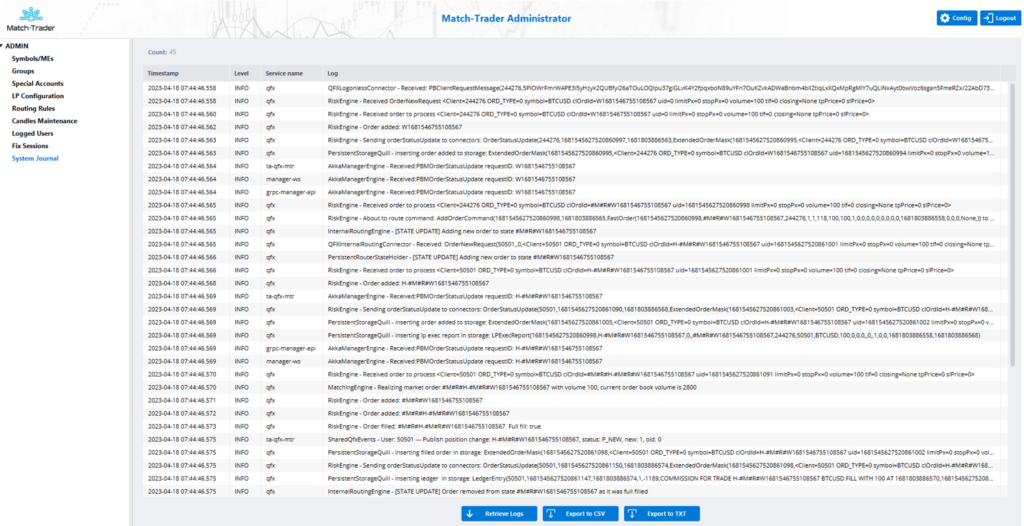
Now we use the order ID: W1681546755108567 and check the logs
- “InternalRoutingEngine” means that client 244276 is in the ABook group so this position was hedged and reflected as #M#R# W1681546755108567 on the 50501 hedge account
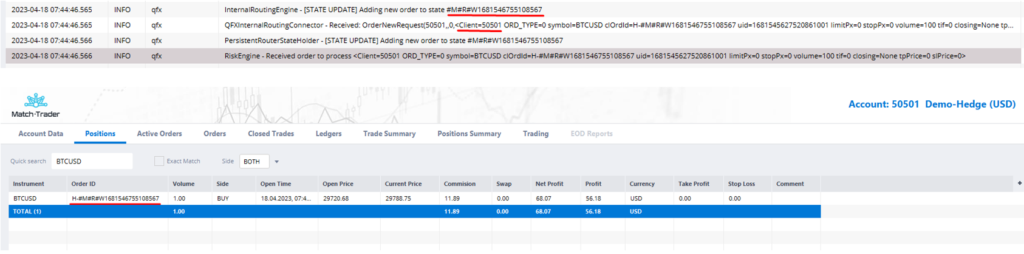
- This log means that the position was filled on the hedge account, sometimes when the position has a big volume and the market has low liquidity position like this can be not fully filled and rejected or divided

Now, we’ll create a discrepancy, it is a situation when the position on the hedge doesn’t have the equivalent on the trading account – this is a most common issue when the ABook client cannot close the position on the platform
For test purposes we’ve closed manually the position on the hedge account Order ID: H-#M#R#W1681546755108567
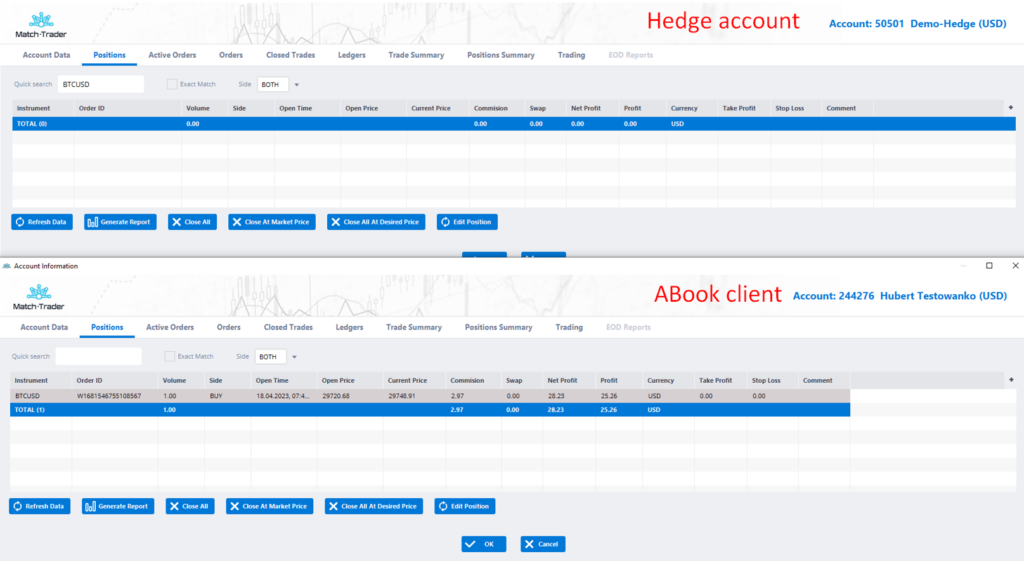
- In the screenshot above we can see the situation when e.g. a broker closed the position manually or got the stopout and there was a discrepancy
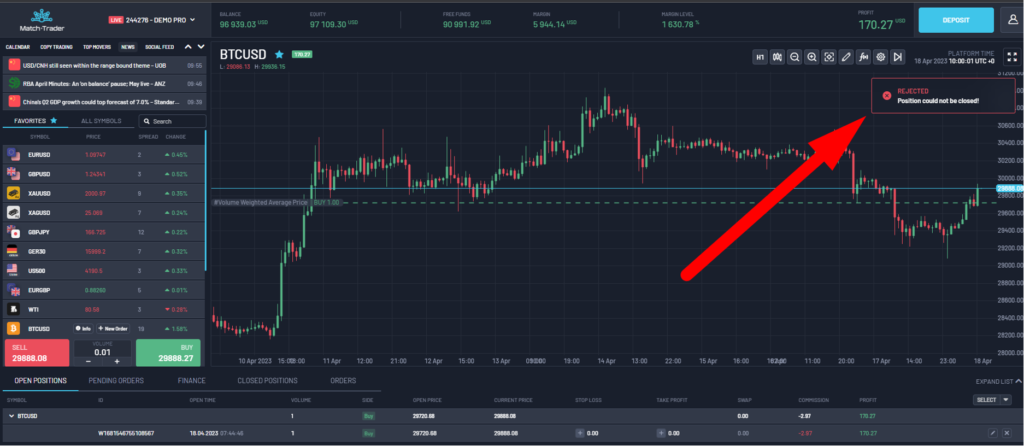
- The trader receives a REJECTED error
- Now, we will check the logs and try to find out why trader 244276 cannot close position W1681546755108567 and what is the reason
- We’ve put the order ID W1681546755108567 and requested the logs again
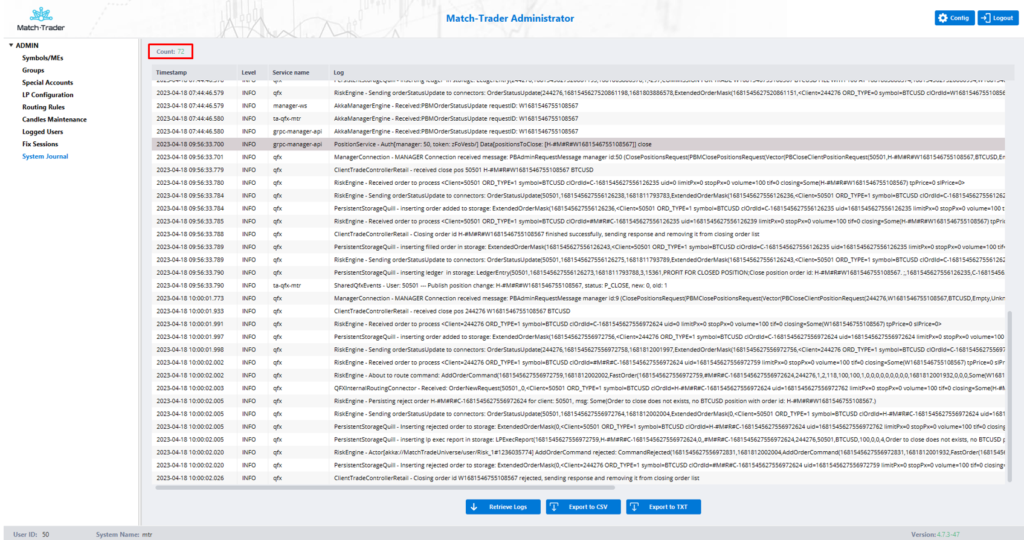
- Pay attention to the “count” amount of logs has been changed from 45 to 72 which means more logs have appeared in the system for the requested order
- As we can see at 09:56:33 manager: 50 closed the position H-#M#R#W1681546755108567 in the grpc-manager-api which means that was closed manually by the Manager GRPC application

- Later at 10:00:01, trader 244276 tried to close the position but he couldn’t (id:9 means that the client made it by the trading platform)

- Few records below we can find the logs which explain to us what exactly happening in the system

- The position W1681546755108567 cannot be closed because their equivalent on the hedge account “… doesn’t exist” H-#M#R#W1681546755108567
Also, we can use the login of the account to find a reason. All we need to do is put the account login in the Filter field (in quotation marks for the system to find an exact match) and add the system name (qfx) to the Service name to limit the number of logs.
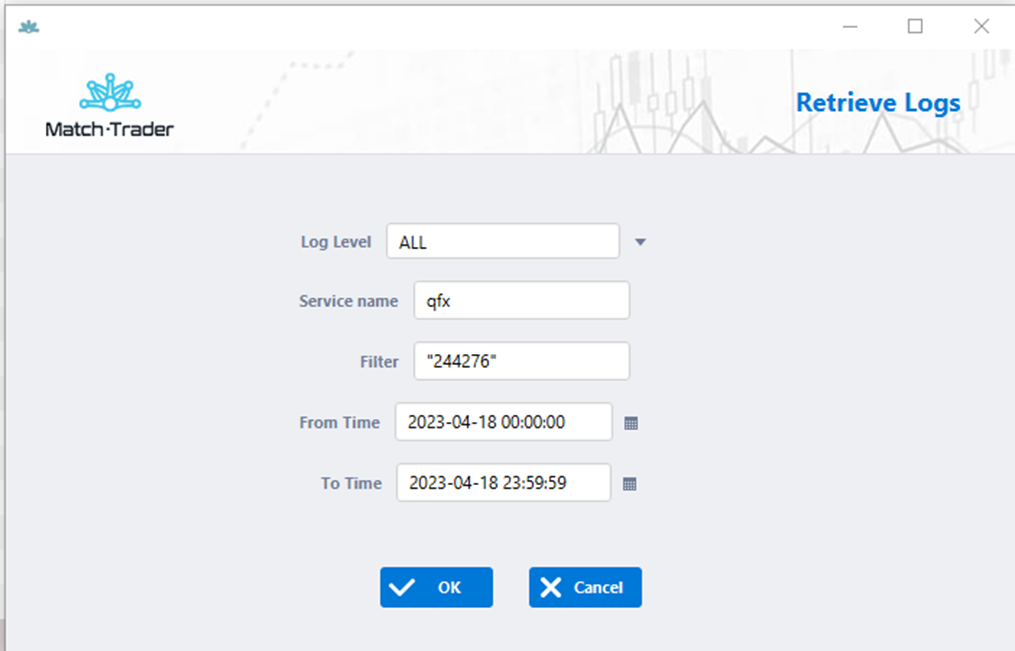
- In this way, we received the logs from all operations related to the 244276 trading account

- As we can see on the screenshot the issue regarding the “Internal routing error” it means that the problem is between the client and the hedge account (in the routing)
——————————————————————————————————————————
A client cannot login to the platform
- A common reason why customers cannot log in to the platform is that they enter the wrong password. Put the email and set the period of time when the client tried login

- As you can see in the screenshot above the client “hluniewski@match-trade.com” tried login to the platform at 08:55:18 but he used the wrong username or password. He tried a second time at 08:55:25 and the login was successful as this log pointed to it: “LoginController – hluniewski@match-trade.com user authorization in Match-Trader success”
- Furthermore, if you pay attention to the last record you can see the client’s IP “UserService – Updating last online and ips 82.214.140.62, 10.3.0.13 for: hluniewski@match-trade.com, broker id: 0”
In our example, the public IP address is 82.214.140.62 for this account.
Public IPs can also be found, for example, in the nginx-bridge service

——————————————————————————————————————————
A client cannot open a position
- A common reason is not efficient balance to open position just because the client wants to open too much volume.

- As you can see in the screenshot above, account number 244276 tried to open 100000000 lots on the WTI and the position was rejected because not enough margin
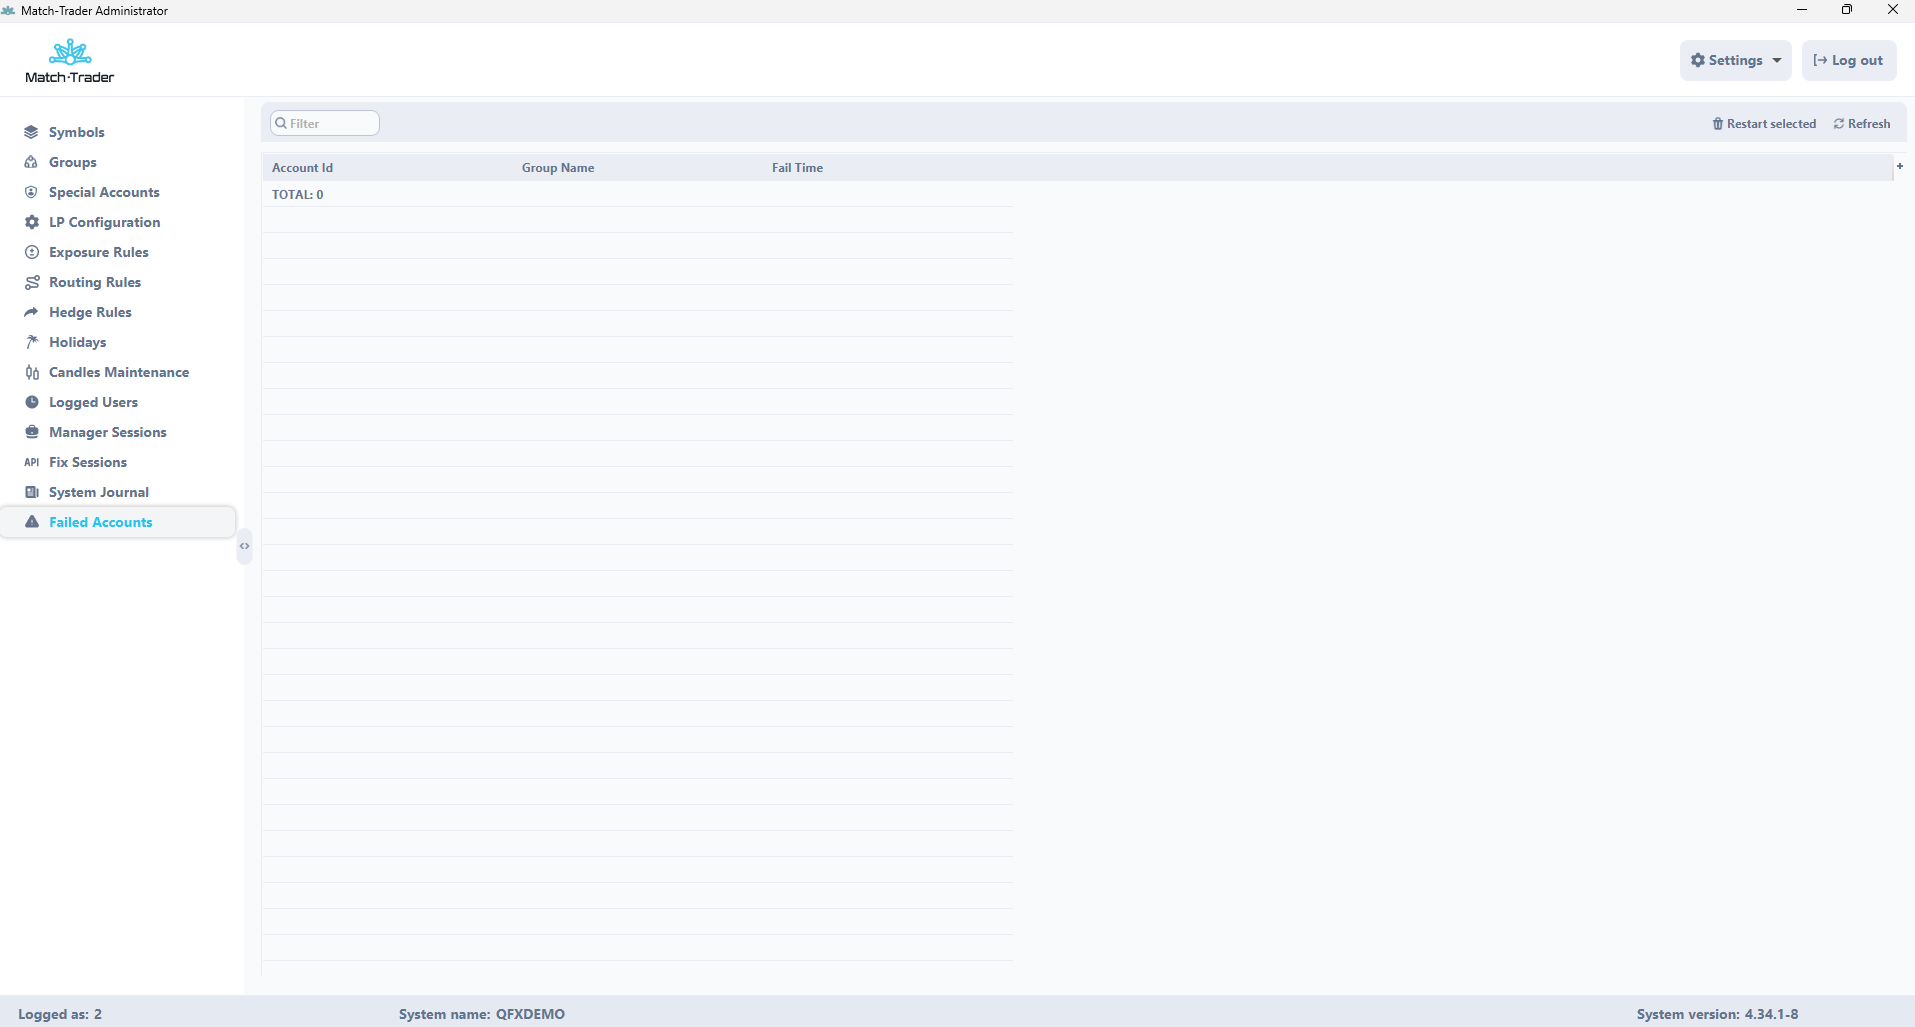
Failed Accounts #
This tab displays accounts that were created incorrectly by the system or stopped working for various technical reasons.